


The 15 Top Affiliate Plugins for Carefree, Hands-off Marketing
Posted on August 20th, 2018
By Amy Copadis
Ever try to fix something without the right tools? I have.
The other day, the screw on my glasses started to come loose. In fear of losing the screw completely and without access to the right tool to fix it, I used my fingernail to try to put the screw back into place. And guess what: It worked!
For a while.
Two weeks later, I still haven’t found the right tool to fix my glasses, and every so often throughout the day, I find myself trying once again to put the screw back into place with my fingernail.
This is hardly what we would call a smooth fix to a simple problem. I’ve wasted way too much time with this “quick fix.” That’s time I could have saved by simply finding and using the correct tool on day one.
When it comes to affiliate marketing, smoothing out your process is one essential route to earning more revenue. If you’re trying to get by with “hacks” and “quick fixes,” you could end up wasting much more of your time than is truly necessary.
So, how do we fix this problem? How can you smooth out your marketing process and take advantage of the time you have to work?
You need to have the right tools.
Today, we’re going to discuss how WordPress plugins can make the lives of affiliate marketers much easier. Then, we’ll check out 15 different affiliate plugins for WordPress to help you save time and earn bigger affiliate payouts.
Why Use Affiliate Plugins?
Since WordPress.org is open source, almost anyone can create plugins to be used on WordPress websites. This means that many different minds are working on the tools that you need to succeed.
If you can dream it, there’s probably a plugin for it.
For example, one incredible thing that an affiliate plugin can do is localize your affiliate links. Let’s say you’ve written an article about camping gear and you include an affiliate link to Amazon.com for a recommended tent or camp stove. Now, suppose a reader comes along from the UK. When he clicks on your link, he’ll be directed to the wrong Amazon store (the American one) and likely won’t be able to have that product shipped to him (or the shipping will be ridiculously expensive). He could decide to not buy it, or even jump ship and search for the product on Amazon.co.uk. Either way, you’re losing a sale.
With a plugin that localizes links, your readers will be automatically directed to the correct Amazon store depending on where they are in the world. This will result in better sales for you!
Another ability that an affiliate plugin can give you is link cloaking. This is the practice of turning a long, cumbersome affiliate link (merchant.com/productID=919191_affiliateID=919191) into something that’s short, concise and pretty to look at (yourwebsite.com/go/affiliateproduct).
This practice has plenty of benefits for affiliate marketers, including safeguarding your affiliate commissions, increased click rates, increased email delivery rates and more.
However, it’s important for affiliates in the Amazon Associates program to keep in mind that this practice goes directly against the terms for Amazon Associates, meaning you’ll be susceptible to account closure if you cloak your Amazon affiliate links.
Other affiliate plugins will give you the ability to build content faster, create attractive coupons, see detailed metrics on your affiliate links, add your affiliate ID to links automatically and more.
Sounds good, right? Now it’s time to dive into the top affiliate plugins for WordPress that will instantly make your life easier.
The 15 Top Affiliate Plugins for Carefree, Hands-off Marketing

1. Content Egg
Get Free Plugin | Get Pro Plugin
This tool boasts itself to be an all-in-one plugin for affiliate marketing, providing some incredible features for those looking to step up their affiliate game.
Content Egg offers some great automation that will make your marketing process even smoother. For example, you can set this plugin to add your affiliate ID into your links automatically once you place them on a page.
Content Egg will also give you automatic updates on the prices of the products you recommend, as well as alert you when there’s a drop in the price. If you’re looking to stay even more hands-off, the Autoblog feature gives you the tools necessary to create comprehensive content quickly and easily.
Along with these features, this plugin will also localize Amazon affiliate links, add offers to existing posts, create price comparison charts and more! It works with over 20 affiliate networks and with any WordPress theme.
There’s a free version of the plugin with limited features, and the full version is available starting at $48.

2. ThirstyAffiliates
If you’re looking for an all-around affiliate plugin that meets all of your linking needs, ThirstyAffiliates is a great option.
This plugin allows you to manage your affiliate links completely, to cloak or redirect affiliate links, to create DoFollow or NoFollow links and to add affiliate links without even leaving the WordPress editing screen!
ThirstyAffiliates also has some handy tools like the affiliate link picker, which allows you to search for affiliate links and quickly add them into posts and pages.
This plugin also gives you the option to include some interesting add-ons. The Google Click Tracking add-on places the Google Analytics Click Event code into all of your affiliate links automatically, allowing you to see more detailed metrics on your links. You can install the Geolocation add-on, which localizes your affiliate links, or the Scheduled Links add-on, which allows you to change the destination URL according to a schedule (great for sale events).
Best of all, the basic version of the plugin is free. The add-ons aren’t free, but it may well be worth the cost to streamline your affiliate tasks with them.

3. EasyAzon
This linking tool was created specifically for Amazon Associates.
It allows you to maximize your earnings from Amazon by giving you complete control over your affiliate links. It allows affiliates without coding knowledge to customize their links easily and without fuss, and it automatically localizes your Amazon links no matter where your users are coming from (once you’ve entered some key information).
EasyAzon also has unique features for Amazon Associates, including the product popup. This means that whenever a user hovers over one of your Amazon affiliate links, they’ll see a small popup with details on the product itself. You can enable this feature site-wide with a single click.
Affiliates can also prompt users to add products directly to their shopping cart on Amazon, getting readers right to the last part of the marketing funnel!
When you purchase EasyAzon, you’ll also get the Ultimate Amazon Guide, an affiliate marketing course that’s updated yearly to bring you the most relevant advice for success as an Amazon Associate.
This plugin is available from $47.

4. Easy Affiliate Links
As the name implies, this affiliate plugin is an easy-to-use solution for link cloaking.
It allows users to easily track and modify the affiliate links on their website, all from one simple dashboard. You can create short links for your affiliate links, with complete customization for the URL slug.
Easy Affiliate Links allows you to assign categories to your affiliate links, import and export links to or from XML, keep track of monthly and lifetime clicks, and even access your links whether you’re using the visual or HTML editor in WordPress.
This affiliate plugin is still being developed, which means new features are continuously being released. Upcoming features include link localization and A/B testing for the text connected to your link.
All this can be yours for the very low price of free! If you love having data to work with, you can pay for their Statistics add-on.

5. Rel NoFollow Checkbox
This simple yet powerful plugin is an extremely useful tool for affiliate marketers.
Attaching a NoFollow tag to outbound links from your site prevents search engine bots from following that link. This means that you aren’t giving away credit that could boost the ranking of other websites.
There are multiple reasons why you would want to use NoFollow tags in your affiliate links, and this plugin makes it very easy.
You know that link popup that WordPress has when you add an outbound link to your post or page? Right below the checkbox that allows you to open the link in a new tab, Rel NoFollow Checkbox adds another checkbox, allowing you to easily add the NoFollow tag to any outbound link.
This is yet another great affiliate plugin available for free!

6. Floating Banner Ad Rotator
Have you ever wanted to A/B test the banners that you put on your website? This affiliate plugin allows you to do just that with a very simple mechanism.
You can add as many different banners as you want, although it’s recommended that you use no more than five, in order to really test these well. Once you’ve uploaded the different banners, this plugin will automatically alternate them each time a user visits your page.
In the dashboard, you can see clear statistics for each of the banners, easily comparing how each one performed in A/B testing. You’ll be able to compare metrics such as views, clicks and click-throughs.
Since it’s another open-source plugin, you can download this handy tool for free.
[video_page_section type=”youtube” position=”default” image=”http://track-n-test.com/wp-content/uploads/2018/08/youtube-banner1.jpg” btn=”light” heading=”” subheading=”” cta=”” video_width=”1080″ hide_related=”true” hide_logo=”false” hide_controls=”false” hide_title=”false” hide_fullscreen=”false”]https://www.youtube.com/watch?v=A5jKAzqyWwA[/video_page_section]
7. Advanced Ads
With over 40,000 active downloads and almost 300 5-star ratings, this affiliate plugin is clearly a winner.
It’s packed to the brim with all the features you could possibly need to create, manage and test the ads that appear on your website.
Using the standards of WordPress, Advanced Ads has made creating and testing adds just as easy as creating and editing posts on your website. With their intuitive features, you can easily insert code from any affiliate network or ad network. You can completely customize where and when ads are displayed based on certain conditions (such as post type or age, author, category, etc.) or based on the user (their location, whether they’re using mobile or desktop, if they’re logged in, etc.).
Beyond that, this plugin makes it easy to A/B test ads on your website by automatically changing the ads that are displayed. In the pro version of this app, you can also test the placement of the ads on your website. The pro version also includes features such as displaying certain ads depending on the day of the week, the browser language, the device size and more. You can also display ads by country, city or continent.
While Advanced Ads is free, Advanced Ads Pro starts at $35.

8. AdRotate
Another highly successful affiliate plugin, AdRotate has over 50,000 active installs. This plugin allows users to place ads almost anywhere on their site and test which placements seem to work best. AdRotate also allows you to group ads together, so you can see metrics not just on individual ads, but also on groups of ads.
You can also control schedules and restrictions, see daily, monthly and yearly stats, track click-through ratios, show multiple ads together in a grid and so much more!
This affiliate plugin also has a pro version which allows you to see a live preview when creating advertisements, optimize for mobile adverts, geotarget more specifically to certain countries, cities, or states and see more detailed statistics.
The price for AdRotate Pro starts at $35.
9. TablePress
This free plugin allows you to easily create tables in WordPress. It requires no HTML knowledge and allows you to create product comparison tables in a way that’s organized and clean. You have full control of the style and colors within the table, allowing it to match your own website design.
Of course, the information will have to be input manually, which is the only real downside of this plugin. However, you also have the option to import tables from Excel files, CSV, HTML and other formats.

10. WP Product Review
Creating product review posts can be a pain, but this plugin makes the process even smoother.
You can create clean and attractive review tables, complete with a section for pros and cons, affiliate buttons, user reviews and more. You can completely customize everything inside the review table, including colors, border and width. You can even customize the rating icons, choosing from stars, hearts or any of the 10 other options!
WP Product Review also allows you to easily create comparison tables. Once you’ve created review tables, this plugin will automatically use those to create a comparison table. It’s that simple! You can also import product information from Amazon, making your job even faster.
Pricing for WP Product Review starts at $75.

11. WP Coupons
Made by affiliate marketers for affiliate marketers, WP Coupons boasts itself as the #1 coupon plugin for WordPress.
Their easy-to-use dashboard enables users with limited coding experience to still get the most out of this tool. It’s easy to create attractive coupons to place within your website using the built-in templates and styles that are provided.
Another great advantage of this affiliate plugin is that all coupons are mobile-friendly with very lightweight code and are compatible with all themes and plugins on WordPress.
Pricing for WP Coupons starts at $34.95.

12. Affiliate Coupons
This free affiliate plugin is another fantastic option for placing affiliate coupons on your site. You can input vendors and predefine the affiliate links that go with them, making the coupon linking process much smoother. Also, you can display coupons directly inside posts using shortcodes. You can customize exactly how the coupons are presented, as there are multiple options to filter and sort them.
With a smooth design for coupons on your website, this plugin will have you boosting sales and getting greater revenue in no time!

13. GreedyCoupon
Another free affiliate plugin for placing coupons, GreedyCoupons includes a custom coupon post design, as well as SEO compatibility. You can feature multiple coupons on the same page or even create a slider that rotates different coupons.
It’s true that these last two options don’t have as many features as WP Coupons. However, they’re both available for free and are great for affiliates who want to try using coupons on their website.

14. Pinterest
This plugin is a must-have for affiliate marketers. Pinterest is one of the largest social media sites currently available to use and it’s imperative that you make your content shareable to Pinterest.
The Pinterest Plugin for WordPress allows you to automatically add a “save” button to any media on your page. You can also add widgets that display pins, boards or your Pinterest profile and customize the language that’s displayed.
This free affiliate plugin lets you set up social media sharing to Pinterest quickly and easily, allowing your readers to do promotion for you!

15. Yoast SEO
For affiliate marketers who are concerned about SEO (as we all should be), this plugin is absolutely vital.
With over 40 million downloads, this is the cream of the crop for SEO plugins.
With the help of Yoast SEO, you don’t need to hire an SEO expert (or be one) in order to optimize your site for search engine ranking. Instead, this plugin gives you step-by-step assistance, helping you optimize each page and post for the specific keyword(s) that you want to rank highly for.
You’ll see how many times you’ve used your target keywords, how readable your post is, how your post will appear in Google searches (including metadata optimization help) and a text link counter. Yoast will even take care of the technical SEO stuff, like robots.txt, sitemaps and other complicated subjects. That way, you can relax and focus on the content.
Yoast SEO has a free and a paid version which starts at $69. I recommend using the free version first to see whether you really need the paid version.
Obviously, having the right tool for the job not only saves you time, but will also save you the frustration of a complicated affiliate marketing process.
Once that process is smoothed out using the affiliate plugins we mentioned above, you’ll see your revenue increase at the same rate that your frustration decreases.
With these affiliate plugins, you’ll be able to get more done in less time and boost your affiliate earnings.
Content retrieved from: https://cospot.com/affiliate/affiliate-plugin/.
[Case Study] – Create Your Own Viral Site and Bank Hard
Posted on August 20th, 2018
January 24, 2016 by Rhys
Viral sites are big business these days with some of the biggest names in the industry selling for millions. By leveraging the power of social media to drive traffic you can create a profitable site in no time at all. In this case study I’m going to show you how to create your own viral site and bank hard.
Case Study Overview
- Create our own viral wordpress site
- Get the best content, rewrite and add to our site
- Post on Facebook and drive huge volumes of traffic
- How to monetize your site to make money.
Why Build Viral Sites?
Viral news sites are one of the only ways to make money by offering 100% free content. You’ve probably heard of sites such as Bored Panda, Buzzfeed and Daily Elite which are sites that specialise in viral content and as such receive millions of visitors everyday. In turn they make money from advertising through Google Adsense, paid articles and paid advertisements. Once you’ve built up a solid visitor base and following you can sell these websites for large profits. Just last year the Daily Mail bought Daily Elite for $47 million USD. Yes $47 million!
Viral sites are easy to build and maintain however you do need to ensure you continue writing content so visitors return. If you start building viral sites you can’t stop posting content when you reach 100 articles. Later in the course I’ll show you how I get help building viral sites so you don’t actually need to focus on writing content everyday – that get’s boring! Let someone else handle that process for you.
Part 1: Create Your Viral Site
When I build viral sites I like to follow a set process which involves choosing a suitable domain name, linking to the web hosting provider I use, then using a particular template that is perfect for such websites.
Choosing A Site Name
You need to choose something unique and nifty that’s a little bit different. You can look at BuzzFeed and BoredPanda as perfect examples here. You could stick with something with the words Bored or Buzz or Feed. Try not to copy someone else’s domain name, especially if you plan on trying to sell the site at a later date.
Things that might help you pick a suitable name include markets you intend to target. I’m from New Zealand so I’m going to target the 4 million kiwis (nickname) that live in our country. I’m going to focus on bored people so the name I came up with was BoredKiwi.com. Quite similar to bored panda but there’s a clear difference in our target market and domain name.
Viral Host did a good article on how to choose a suitable domain for a viral site. Also you can checkout domain suggestion tools which might help with inspiration. Always pick a .com or .net domain so your not limiting yourself to local countries.
Once you’ve decided on a name, I’d register it with either Godaddy or Namecheap.
Web Hosting For Viral Sites
If your site explodes with viral traffic then shared hosting probably won’t cut the mustard. Now don’t panic you don’t need to rush out and buy VPS or dedicated server hosting just yet. The main problem your going to face running a wordpress blog on shared hosting with lots of traffic is your page loading times and the pressure on your shared hosting server. The best way to solve this is to setup Cloudflare which offer a free solution to get you started. You’ll find their $20/mo plan is much better but to get started it’s free.
What is Cloudflare and how does it work? Cloudflare offers a solution to supercharge your website by offering a CDN feature which distributes your content around the world on their servers to that your content is closer to your visitors thus speeding up your website. They offer solutions to protect your websites from a range of online threats from spammers to SQL injection to DDOS protection which means if your main host goes offline, cloudflare will keep your site online.
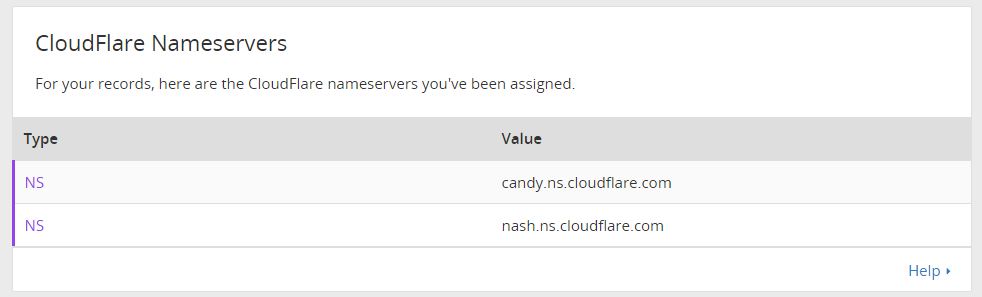
You can get more information here, simply enter the name servers they provide you into your domain provider.
After creating Cloudflare, get the nameservers as below.
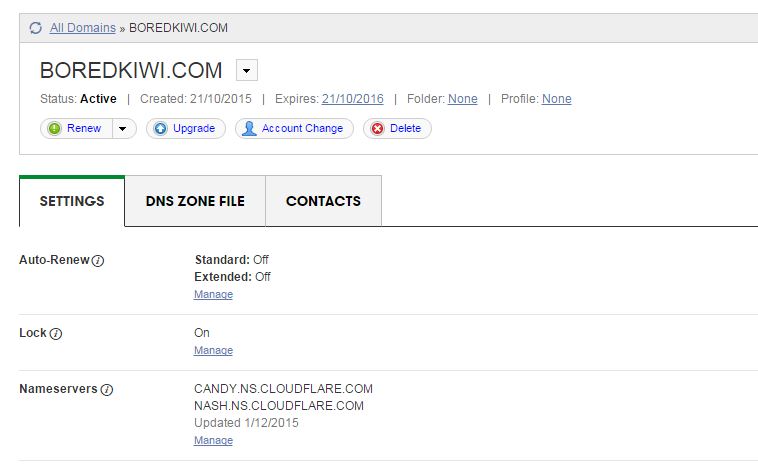
Now you’ll want to add this into your Godaddy or Namecheap account. For Godaddy this is under Domain Management > Manage DNS.
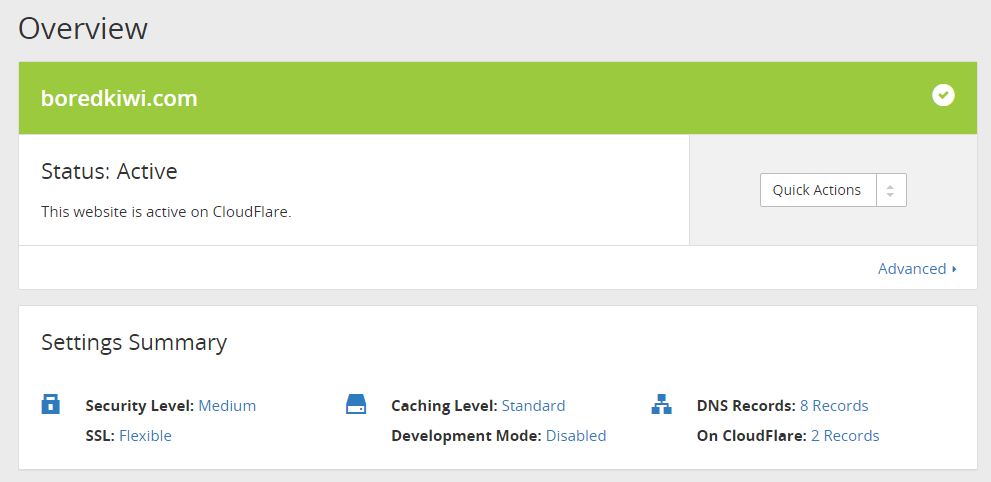
Lastly you’ll need to add your hosting companies nameservers into Cloudflare and then you’ll see this message meaning your all setup. Once setup your site will already start to load super quick.
WordPress Setup + Template Selection
I build my viral sites using WordPress. If you use any big name web hosting these days you’ll be able to install WordPress through your Cpanel control panel (if your using Linux hosting). There’s many guides out there on how to setup wordpress but I’d recommend this course.
Next you’ll want to choose a suitable template. The one I use for all my viral sites is Newspaper by MyThemeShop. It costs $59 however I think it’s worth every cent. The theme ranks your posts in Google within hours and looks great on tablets, cellphones and even desktops. The social sharing options are very helpful when building a viral site.


The reason I use this theme is as follows:
100% RESPONSIVE LAYOUT OPTION
NewsPaper Theme was built in with responsive design. Automatically It will adjust any types of devices. Now a days more than 60% visitors are visiting world most popular sites via mobile phone. So, it’s situation demand to make a responsive website, NewsPaper Theme is made with mobile friendly option.
ATTRACTIVE FEATURED POST SECTION
By featured section you will be able to add your extra oriented post by highlighting your article. Featured post will include HD images to grab more attention. Featured post section make an important role to advertise on your site.
SPEED OPTIMIZED
It’s the great option to reduce your bounce rate by Speed optimized option. Google give priority those sites take less time and load fast. So, increase your visitors and pageviews using NewsPaper Theme.
FULLY SEO OPTIMIZED
All MyThemeShop themes are search engine optimized including NewsPaper Theme. It will help search engines to crawl and index your content quickly. Without search visitors you will not get proper ranks. NewsPaper Theme will increase your search visitors by giving more impression.
HIGHLY DECORATED CATEGORIES SYSTEM
NewsPaper Themes allow multiple categories option to decorate your posts. It’s grab more attention for new visitors about what they want to know. Simply make categories and give your site a professional look.
GOOGLE ADSENSE OPTIMIZED
When it comes to monetize blog, Adsense is most popular monetization method quality blog and websites. NewsPaper Theme is Google Adsense and others ad optimized theme that will increase your CTR’s and CPM’s rate. So, make money blogging via NewsPaper theme.
CLEAN CODING
To help search engines and schema.org to understand your blog, Mythemeshop developers made this theme with neat and clean code . Search engines will easily understand theme code for SEO purpose.
SOCIAL MEDIA INTEGRATED
Whenever you make content in NewsPaper Theme, it will go for viral quickly. Facebook, Twitter and more popular social sharing button are included with this theme.
EASY OPTION PANEL
Easily you can customize your theme options from one place. Specially newbies can monitor their themes from option panel.
Option panel are includes General Settings, Styling Options, Header, Homepage, Single Posts, Social Buttons, Ad Management, Theme Typography, Sidebars, Navigation, Theme Translation Panel, Import / Export Options etc and more.
24*7 SUPPORT
Full Support is not appear in maximum themes club. But in Mythemeshop something different, i got instant support from Mythemeshop expert team. Just you can ask them a query, definitely they will answer your query in right away.
This concludes the first part where our site is now built ready for adding content.
Part 2: Finding Content, Writing Articles
Now that our website is build we’ll need to start adding content. There’s many other sites out there that you can get inspiration from to re-write articles from for your own website. One of those websites I like to use is called ViralViralVideos.com where they seem to post videos all day everyday of viral content. Most of the videos are hosted on Youtube so you can simply right click on the video and choose, ‘Get Embed Code’ and then embed it onto your own WordPress blog. You can take the authors text and spin it or reword it to suit your own style of website. There’s literally thousands of websites like this online, you just have to find them.

Other resources include the big players in this industry including TheLadBible, BoredPanda, BuzzFeed, DailyElite. Of course Reddit and Twitter are also two of the best sites for finding topics to post about. You want to look for something that you would probably share with your own friends as sharing is the number one way to spread your posts on social media.
How To Write Viral Articles
The best way to write viral articles is to use the structure such as, ‘9 of the Best Ways To…’ or ‘Watch What This Man Does… What He Does Next Will Blow Your Mind!!’ or ‘Watch What Happens When ….” Basically you want to encourage users to click on to your articles. Later in the article I’ll be showing you how to market these on Facebook so you should write articles such as this.
Here’s an example from my BoredKiwi website.

Other styles you can use are articles such as “6 of the World’s Scariest…” or “5 of the Best Ways To…” and of course the “How To…” Videos are always a good way to drive traffic.

Buy Viral Articles
It’s great writing your own articles but it gets boring after a while so the best way to ensure your website is stuffed full of high quality content for your readers is to buy articles from sites such as iWriter.com. iWriter allows you to sign up as a buyer and connects you with writers all over the world who’ll write articles from 150 – 2000 words for prices ranging from $1.50 for 150 words to $40 for a 2000 word article. As all your articles will be no more than 300 words you can get lots and lots of articles for your site with not much effort.
Once someone has created an article for you, simply upload it to your site, add a few pictures or videos and then post to your social media pages (we’ll show you later).
There’s plenty of guides on how to create iWriter jobs however this is what my typical job looks like.
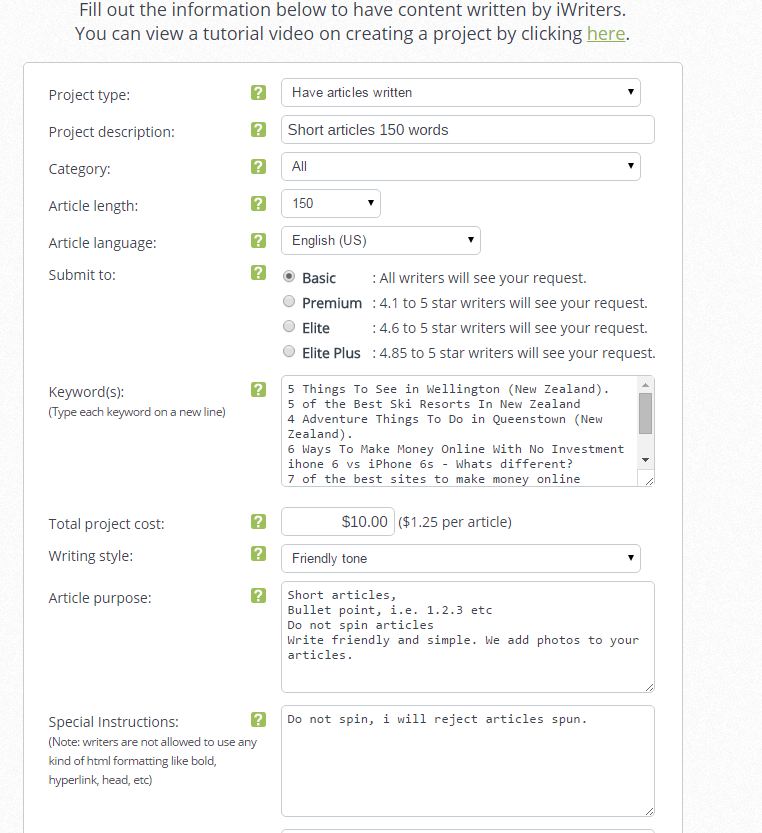
- Project Type: Have articles written
- Project Description – I like to keep this at 150 words. Most writers will write more than this
- Category – purely for iWriter’s reference, I leave it all
- Article length: 150 words. You can try longer articles if you want
- Submit to: The cheaper articles can be done by any one, stick with it
- Keywords: This is effectively the name of your articles (1 per line = 1 article)
- Project Cost: $1.25 per article x 8 articles for me for $10 – Super cheap
- Writing Style: Choose between Professional or Friendly – I always choose friendly
- Purpose: Here you need to tell them what you want, see my example
- Special Instructions: Make sure you tell them you’ll reject spun articles.
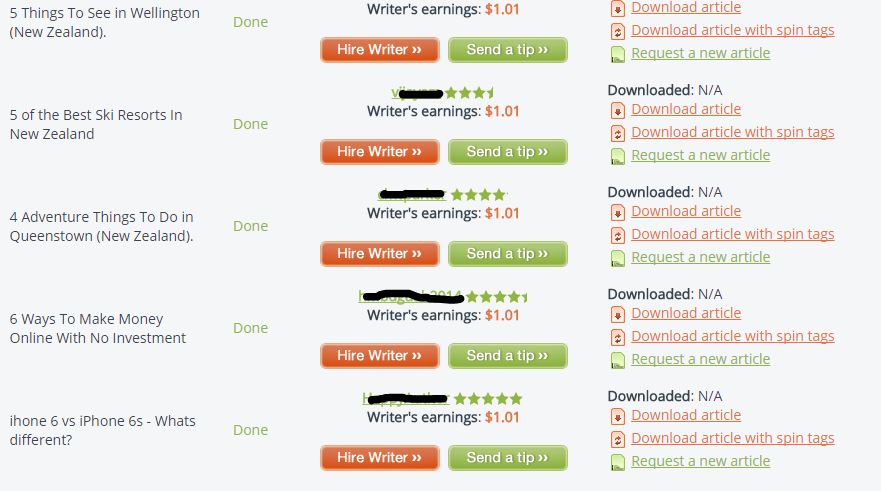
That’s really all there is too it with iWriter. Your articles will likely be done within 12 – 24 hours. You’ll probably have a few spelling mistakes however you can reject articles or request rewrites however remember your paying $1.25 for 150 words so you’ll have to factor in that you might need to fix some typos etc. You’ll be able to download the articles once completed. If you find a high quality writer you can then hire them (at the new rate of $2.50) to write all your articles next time.
So now we have our articles you can post them on to your new website, if your using WordPress and MyThemeShop your screen might look like mine below.

Part 3: Drive Traffic From Facebook
You’ll want to use Facebook to drive traffic to your website. Be sure to go to Facebook pages manager and setup a new page. There’s plently of guides online on how to do this so I won’t describe the process here however once you’ve got setup you’ll want to ensure you’ve set yourself up with a logo and banner image to match your site. I’d recommend using AdExpress here – checkout our review. You should end up with something such as this,

Now Facebook has recently implemented a feature that requires all new Facebook pages to have 50 likes before you can register a sub domain such as Facebook.com/boredkiwi – This is quite annoying as someone could come along and steal your chosen url to match your site – I personally think for SEO and traffic building it’s important to have something that matches your site so the best way is to buy 100 likes from Fiverr.com to get you started. Then register your Facebook url.
Now your ready to post your first article on to Facebook.

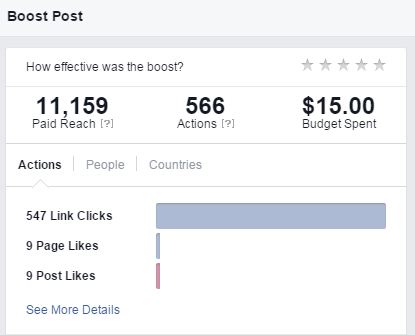
So this article didn’t go viral but I boosted it using Facebook Ads and the results were quite incredible for $15. Now remember you only need a couple people to visit the link then hit the share button on our website or on the Facebook post. In this case the article got lots of shares via my website which churned out a few thousand visitors in 24hrs.
There are many other ways to promote your posts, for example if you have 5000 friends then you only need a few of those to share your post and it could start going viral. I have a friend who has 10 accounts with 5000 people (this is Facebook’s limit) which he posts his articles in and they go viral very quickly. Another friend uses Facebook groups – for example there is some groups out there with 250,000 members that will see your posts if someone shares them into that group.
Part 4: Monetize Your Site
The best way to start monetizing your site is to put Google Adsense or a similar ad network (pop unders) on your site where you get paid a small commission on every visitors. Let’s say your site had 5,000 visitors a day – you’d probably be making at least $10 a day on Google Adsense which is $300 per month. Now imagine if you had 500,000 visitors a day? Go figure.
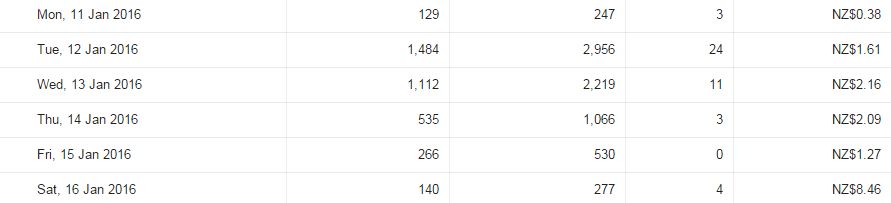
Here’s my Adsense stats form my first few days running this BoredKiwi site.
<!– –>
Filed Under: Case Studies
Content retrieved from: http://www.imrhys.com/create-your-own-viral-site-and-bank-hard/.
14 Powerful Plugins Every WordPress Blog Should Have
Posted on August 19th, 2018
Tung Tran
- Last Updated February 21, 2018
It’s no doubt that WordPress is very powerful, flexible and feature-rich.
And it also has a large database of both free and premium plugins to boost it up even further.
With so many options to choose from, it can be difficult to sort out the good from the, well, not so good.
In this article, I’ll be featuring a list of my favorite plugins that I usually use to optimize my sites for better performance. Let’s dive in!
More…
Table of Contents
-
- 0.1 1. Akismet
- 0.2 2. Yoast SEO
- 0.3 3. Google Analytics by Yoast
- 0.4 4. W3 Total Cache
- 0.5 5. Gravity Forms
- 0.6 6. Thrive Content Builder
- 0.7 7. ThriveLeads
- 0.8 8. Thirsty Affiliates
- 0.9 9. SumoMe
- 0.10 10. Duplicator
- 0.11 11. WP Limit Login Attempts
- 0.12 12. Comment Redirect by Yoast
- 0.13 13. Reply Me
- 0.14 14. Ad Inserter
- 1 Conclusion
1. Akismet

Akismet comes as a default plugin for every new WordPress installation. It checks new comments against a giant database and automatically filters out the ones that look like spam.
Although I hated it a few years back for frequently trashing out my legit comments, Akismet’s spam detecting algorithm has been improving a lot since and I rarely see that problem happening these days.
You’ll need a free Akismet.com API key to activate it. There are also paid plans available for heavy users or businesses.
2. Yoast SEO

With over 1,000,000 installs, this is one of the most popular plugins in WordPress.org
And it’s also consistently rated as the #1 SEO plugin for WordPress by many experts and users.
WordPress is already very technically good for SEO, but Yoast SEO really takes it to the next level.
The plugin helps improve your site with a wide range of features like:
-
- Make your blog posts more SEO-friendly
- Prevent content duplication and low-quality indexation issues
- Drive more traffic from social by optimizing CTR
- Create optimized XML Sitemaps
- and more…
3. Google Analytics by Yoast

This plugin simply inserts the Google Analytics tracking code into your site’s header for you if you’re not the technical type.
It also helps to set up outbound links and downloads tracking in a few clicks. It enables you to view detailed reports through internal dashboards without leaving WordPress as well.
The plugin has recently been acquired by Syed Balkhi, and he rebranded it as “Google Analytics by MonsterInsights”.
4. W3 Total Cache
This plugin improves your site speed by optimizing server performance, page load times, and provide easy CDN integration.
This is a must-have as faster sites tend to rank higher and get more organic traffic.
You can combine this with a good hosting service like Traffic Planet Hosting, and your site should be blazing fast.
5. Gravity Forms

Gravity Forms is the most advanced form builder for WordPress, yet it’s so simple and easy to use.
You can use this plugin to create contact forms, email optin forms, order forms, surveys, etc.
It also integrates with Zapier which opens up the possibility to create hundreds of powerful automations to help you save time and increase efficiency.
6. Thrive Content Builder

Launched in 2013 by Shane Melaugh, Thrive Content Builder has rapidly got it name among online marketers because of its ability to quickly create good-looking conversion-focused articles and landing pages.
Gael from Authority hacker published a case study on how reformatting a piece of content with Thrive Visual Editor has helped grow one article’s traffic by 9275%.
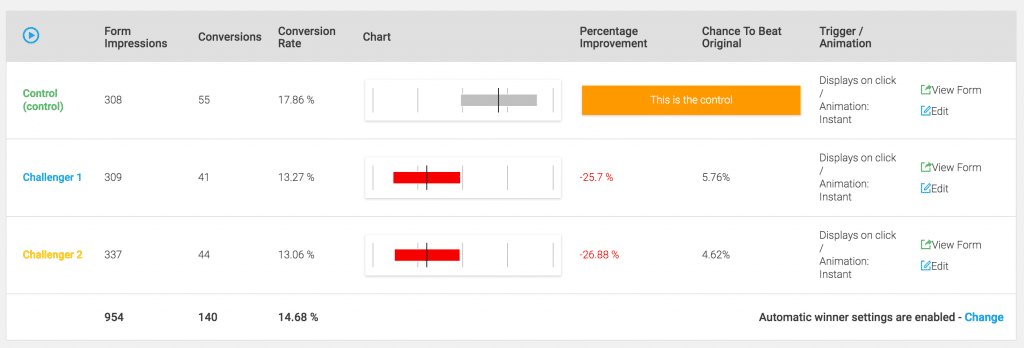
7. ThriveLeads

This is another good product from ThriveThemes and it’s one of the plugins and themes you’ll get when you sign up to be a Thrive member.
ThriveLeads can really skyrocket your list growth by making it easy to create optin forms, lightboxes, slide-ins, and more.
It also saves you money by having an internal A/B testing option which is very easy to use.
Here’s an example of a test I recently ran on the previous post.
8. Thirsty Affiliates
Thirsty Affiliates is an affiliate link management for WordPress that helps you organize and cloak affiliate links.
It’s free, simple, fast and easy to use. There are also some premium add-ons to power it up.
9. SumoMe

SumoMe is a set of tools designed to grow your traffic. Some of my favorites are:
- Google Analytics Dashboards – Similar to Yoast, you can quickly have a glance at how your site is performing with this one
- Welcome Mat – this newly launched feature will help turn any page into an email magnet by displaying a full-screen call to action when a new visitor lands on your site.
- Image Sharer – When enabled, this will display a few sharing buttons when you hover over any image.
- Social Sharing Bar – Better than any options available, this floating bar can help you increase social sharing from visitors.
10. Duplicator

This plugin gives you the ability to migrate, copy or clone a site in just a few clicks.
There’s not much to say about Duplicator. It just works!
My developer also use this to perform regular backups for my websites.
11. WP Limit Login Attempts

This plugin adds a layer of protection to your blog by blocking an IP from making further login attempts after a specified limit on retries is reached.
This prevents your site from all brute-force attacks.
12. Comment Redirect by Yoast
As the name implies, this plugin automatically redirects first-time commenters to a page of your choice.
I usually send them to a welcome page with an optin form to make a good first impression and convert them into email subscribers at the same time.
13. Reply Me
This plugin shows a checkbox that allows people to get notified by emails when anyone replies to their comments.
It’s simple but it helps a lot to increase return visitors to your blog.
14. Ad Inserter

This plugin makes it very easy to insert ads or any HTML/Javascript/PHP code anywhere on your website.
It also has many additional options, which you can read more about in the plugin directory page.
Conclusion
Plugins can make WordPress even more powerful, but they can also slow down your site or create conflicts, so you should be careful when installing new ones.
Above are the 14 essential plugins that I always use and they work great together to make my sites faster, more SEO-friendly, and convert better.
What are your set of favorite WordPress plugins? Do you want to add any to this list?
Feel free to let me know in the comment section.
Content retrieved from: https://www.cloudliving.com/powerful-wordpress-plugins/.
Add a Table of Contents and In-Post Pagination to WordPress
Posted on August 18th, 2018
As a webmaster, some of your goals are likely to be increasing the number of pages a visitor views on your site per visit, as well as increasing the time they spend on your site. Increasing both of these metrics can benefit your site in a number of ways.
As Google can use these metrics to evaluate how useful and relevant your content is to your readers, it can have a positive effect on the ranking of your site in the search engine results pages. This can in turn increase the number of visitors to your site.
By adding a table of contents to the start of your posts, you can easily convey to your readers just what is covered in the post, and if necessary allow them to jump to the most relevant part. This is a great way to decrease the likelihood that the user might bounce back to the search engine results page after landing on your site. By being able to quickly see what is in front of them via the contents, they can immediately determine how useful the content is to them.
Another way to increase the page views per visitor is to divide your content up into smaller chunks. By paginating your posts, or dividing them into pages, you can increase the pages a visitor views during their visit, which again reduces the bounce rate in the eyes of Google and can have a positive effect on how they evaluate the relevance and quality of your site, therefore ranking it more positively in their results pages.
If you sell advertising space on your website, then increasing these metrics can also help you increase the amount you can charge. Low bounce rates and a high number of page views per visitor can all increase the attractiveness of your site to potential sponsors and advertisers, or even if you ever decide to sell your website.
Adding a Table of Contents to WordPress
Adding a table of contents to your longer WordPress posts not only makes it easier for your visitors to navigate a long piece of content, but it also shows them exactly what your will be covering and what they will learn as soon as they hit your page.
Another advantage of adding a linked table of contents that allows users to quickly ump to the part they are most interested in, is that it makes it easy for you and your readers to directly link to a specific part of your posts. Instead of just providing a link to the post, it is possible to link to a specific paragraph using the table of contents anchor links. This can make your content more sharable, increasing visitors to your site.
[video_page_section type=”youtube” position=”default” image=”http://track-n-test.com/wp-content/uploads/2018/08/youtube-banner1.jpg” btn=”light” heading=”” subheading=”” cta=”” video_width=”1080″ hide_related=”true” hide_logo=”false” hide_controls=”false” hide_title=”false” hide_fullscreen=”false”]https://www.youtube.com/watch?v=ZbUoJ_7DLZk[/video_page_section]
The Best Table of Contents Plugin
If you were building your website by hand, writing the underlying HTML, then you would have to create anchor links throughout your document, and then create the list of contents and link each one to those anchor points. This could quickly get time consuming as the number of pages on your site grows.
Thankfully for WordPress users there is a very handy free table of contents plugin that makes adding this feature to your content a very hands off and automated affair. That plugin is the aptly named Table of Contents Plus and while there are other options, this is a good choice with over 48,000 downloads and a very respectable 4.8 out of 5 star rating, not to mention its great features and ease of use.

To install the plugin, just login to your WordPress admin dashboard, click on Plugins > Add New and search for Table of Contents Plus. It should be the first result returned so click on Install Now and then activate the plugin.
Creating a Table of Contents
The way the plugin works is to scan your posts and pages, looking for headers. If the plugin detects more than a set number of headings, it will then create a table of contents (TOC) for your post.
The settings page for the plugin can be found under the Settings sidebar menu then clicking on TOC+. From here you can set the number of headings required in a document to show the TOC. You can also set the position of the TOC and choose which content types automatically get a TOC, by default just pages is selected. The plugin can also be configured to show a custom header above each TOC.
Other settings and features of TOC+:
- Add show/hide controls for the TOC
- Use a hierarchical structure based on different heading types (H2, H3, etc.)
- Number list the items
- Smooth scroll rather than jump to the section of the page
- Set the width, font size, and direction of text wrapping
- Choose a colour theme or create your own
- Select which headings to include (H1, H2, etc.)
- Disable for individual pages using a shortcode
- Disable for specific headers or those containing a certain word
- Display the TOC in the sidebar using the widget
For a free plugin, this one is really feature packed and covers every eventuality that might occur when configuring your TOC.
[video_page_section type=”youtube” position=”default” image=”http://track-n-test.com/wp-content/uploads/2018/08/youtube-banner1.jpg” btn=”light” heading=”” subheading=”” cta=”” video_width=”1080″ hide_related=”true” hide_logo=”false” hide_controls=”false” hide_title=”false” hide_fullscreen=”false”]https://www.youtube.com/watch?v=oyDDowvVRvw[/video_page_section]

Add a Sitemap
Another interesting feature of this plugin is the ability to add a sitemap page to your site. This can be done simply by entering a shortcode into a post or page. By default, that page will then contain a big TOC of all the pages on your site.
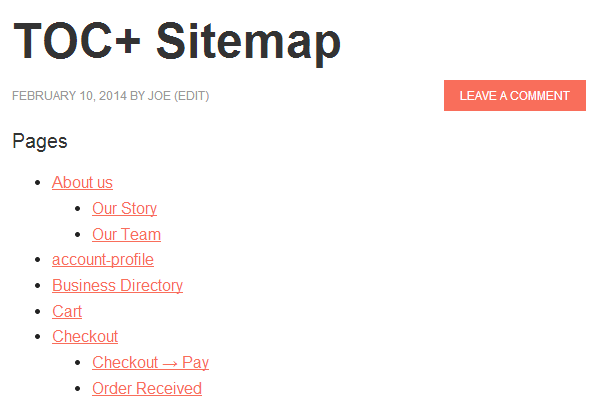
The sitemap shortcode can be customised to also show the following:
- Posts – ordered by title, date, author, number of comments, ID, and more
- Category – lists categories instead of posts or pages
Adding a TOC to your posts and pages with this plugin couldn’t be any easier. If you are writing long posts for your site, this plugin comes highly recommended.
Table of Contents Plus
Adding Pagination to a WordPress Post
WordPress already uses pagination to make it easier for your visitors to navigate their way through your published content. This feature allows you to show a set number of posts on a page, and then display a link to view the next set of posts. This is instead of simply showing a huge list of all your site’s posts.
This same principle can be applied to long form content in WordPress, such as in-depth posts and pages. This can make it easier for your readers to consume your content as they can work their way through the page in a more step by step manner. It also allows you or your readers to link directly to a specific sub-page of the post.
The easiest way to start dividing your posts up into more manageable chunks is to simply add the following into your content at the point you would like to start the next page:
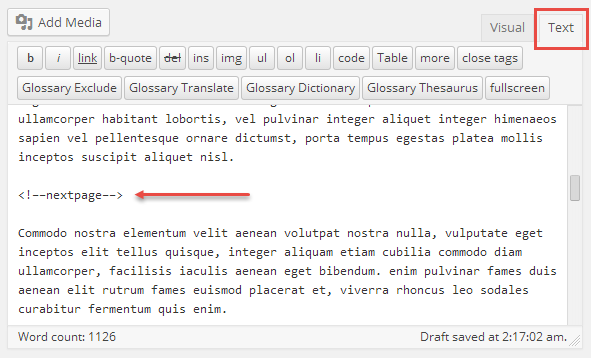
<!––nextpage––>
Please note this must be done when using the Text view of the post editor:
While this does work, some themes might not display the required links to the next page. If this is the case for your theme, either upgrade to a better theme, or edit your single.php file to include <?php wp_link_pages(); ?> (more info here).
As anyone who has tried to add more ‘advanced’ features to their posts, switching from Visual to Text view can cause problems with formatting. Using the manual approach to post pagination also means that you have to consciously remember to add pagination to each post. A better way for you and your site might be to use a post pagination plugin.
The Best In-Post Pagination Plugin for WordPress
Like adding a table of contents to your site, an easier and more feature rich way to enable post pagination can be to use a plugin. When it comes to automatically paginating your posts and splitting them into multiple pages, there aren’t many options. The best one seems to be Automatically Paginate Posts which auto-inserts the required tag into your content.
After installing the plugin, its settings are added to the reading page (Settings > Reading). From here you can choose which post types will be automatically paginated and also set the number of pages each post will be divided into.
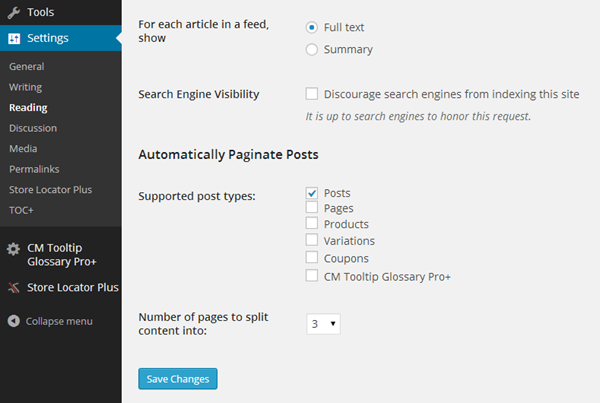
The plugin can be overridden when creating a new post or page by using the metabox that is added to the post editor screen. If enabled, the plugin will add some links to the end of your post which allows the user to move onto the next part.
If you want to use the manual method for adding pagination, by inserting the next page tag, then it will disable auto-pagination for that post. This is handy if you want to ensure that your content is divided in a more meaningful way and doesn’t separate parts of the post that should be on the same page, such as a paragraph and its associated image.
The Atomically Paginate Posts plugin isn’t ideal as it will break up a post no matter how long it is. This can be annoying for the reader if they have to click after every few lines which would happen on a short post. It would be nice if the settings allowed you to divide the posts after a set amount of words, rather than setting the number of pages a post must be divided up into. However, you can disable the plugin at the individual post level which is a good idea for short posts.
Conclusion
Adding a table of contents to your posts and pages and also breaking them up into more manageable chunks with in-post pagination is a great way to make your content more manageable and easy to consume.
Adding in a table of contents makes it very easy for you and your readers to directly link to a relevant part of the page, thanks to the way the table of contents plugin adds anchor links into posts. This can help make your content more sharable as a reader can link straight to the point they are referencing in their own blog posts or social media posts.
In-post pagination is also a great way to increase your page views and reduce bounce rate. This can have a positive effect on your sites SEO rating as it shows to Google that your readers stick around for longer and do more than check out the page they land on before bouncing straight back to the search results.
Have you implemented tables of contents or in-content pagination on your site and did you notice any increase in visitor engagement?
Content retrieved from: https://www.wpsquared.com/add-a-table-of-contents-and-in-post-pagination-to-wordpress/.
10 WordPress Plugins to Turn Your Site Into an SEO Powerhouse
Posted on August 18th, 2018
What steps have you taken to ensure that your WordPress blog is friendly for search engines?
If you can’t answer this question, now’s the time to take a step back and reassess your situation. Conversely, even if you’ve taken some action, there’s still a good chance that there are still improvements that you can make.
In the past, I’ve discussed the best plugins for a new WordPress site. I’ve also touched on some of the top plugins for creating high-quality content.
While all of this is important, you don’t want to overlook anything that you can do to improve your blog’s SEO.
WordPress is well known for being SEO friendly “out of the box.” Even so, with thousands of WordPress SEO plugins to choose from, a few additions to your blog may be all that you need, in order to reach the next level. From WordPress SEO by Toast to XML sitemap, know that there’s a WordPress SEO plugin that can help get you there.
Below, I’m going to discuss 10 WordPress plugins that can help turn your site into an SEO powerhouse. These plugins won’t guarantee high search engine rankings, but they’ll definitely improve your chances of SEO success.
Are you ready to get started?
1. Yoast SEO
Have you come to the conclusion on what’s the number one WordPress SEO plugin for your website?
There are plenty of other options out there, but my favorite is Yoast SEO.
WordPress SEO by Yoast is the most popular SEO plugin on WordPress for a reason. This can be seen in the approximately 2,000 reviews, with an overall rating of 4 out of 5 stars.
If you want to improve your WordPress SEO, both by creating better content and by optimizing your site, this plugin may be the best place to start.
There are many features to focus on, with some of my favorites including:
- Page analysis tool.
- Technical WordPress Search Engine Optimization
- XML Sitemaps functionality
When it comes to page analysis, you need to know exactly what you’re doing. SEO by Yoast makes sure that you’re always on the right track.
For example, Yoast SEO can quickly scan any page for images, ensuring that each one has an alt tag that matches the primary keyword for the post. Along with this, it checks your content for length and confirms whether or not your meta description is up to par. And, that’s just the start.

When you look at this, it’s easy to see what you’ve done right and if you’ve done anything wrong. In the event that a green check mark is absent from a particular line, you can address the issue before publishing – for example, heading back to your meta description to make a tweak or two.
If you need guidance with each aspect of your site’s SEO, the WordPress SEO by Yoast plugin has your back. Thanks to its simple, yet detailed approach, it’ll never let you down.
2. All in One SEO Pack
If you don’t want to use Yoast SEO, which is the one I prefer, you can always give the All in One SEO Pack a try.
The name pretty much explains it all.
Since its release in 2007, this WordPress plugin has been providing webmasters with an easy to use solution to many SEO related challenges.
The biggest benefit is the fact that you don’t need any experience to get started. If you can read and you can input the right data in the right fields, then you can use this plugin.
For some inputs, you may not need to touch anything (unless you want to, of course).
With the above, you can stick with the defaults, which is often best, from an SEO perspective. Or, you can alter the format to better suit your needs.
Top features of All in One SEO Pack include:
- XML Sitemap and Google Analytics support.
- Automatic optimization of titles for all search engines.
- Automatic generation of META tags.
- Helps you avoid duplicate content, which can have a negative impact on search engine rankings.
- Ability to override any setting.
Overall, All in One SEO Pack gives you as much or as little control as you want. As you gain experience, you can take on more responsibility, through the advanced features of this plugin.
3. Google XML Sitemaps
What are you doing to ensure that your site’s content gets indexed?
If you don’t have an answer to this question, you’re missing the boat. Sure, the search engines may find your content without being pointed in the right direction, but you don’t have to sit back and hope for the best.
With the Google XML Sitemaps plugin, a sitemap will be generated automatically. Subsequently, its easier for search engines to index your blog.
Best yet, once you create a sitemap and are comfortable with the settings, you never have to do anything else. Instead, the plugin does everything for you, updating your sitemap after each new piece of content that you publish.

There are many “Basic Options” to address, so make sure that you focus on the importance of each one. If all else fails or if you don’t know what you’re doing, stick with the plugin’s default settings.
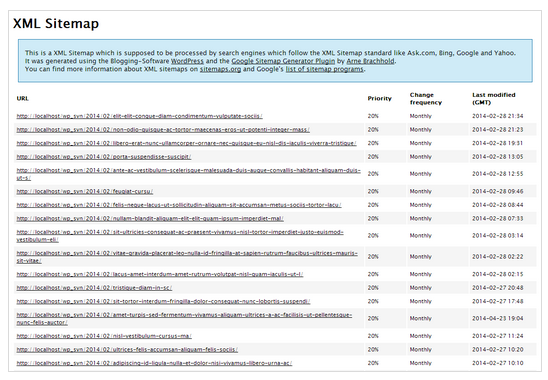
Once you create a sitemap, it’ll look something like this:
Pro tip: submit the sitemap URL to Google via Google Search Console.
The Google XML Sitemaps plugin does everything right, all in an easy to understand and efficient manner. You couldn’t ask for anything more from a sitemap creation tool.
4. Broken Link Checker
As you create more and more content, you’ll find one thing to be true: it can be difficult to keep up with the management of your blog.
This is where tools, such as the Broken Link Checker plugin can help.
The name says it all, with this plugin checking your content for broken links and missing images. If you’re lucky, you’ll never be alerted that there is something wrong with your site. Of course, don’t expect this to happen.
It’s good to know that the plugin can keep a watchful eye on your website, notifying you of any broken links. This allows you to focus on what you do best, such as creating content, while never having to worry that broken links are working against you.
Some of the top features include:
- Ability to monitor links in posts, pages, comments and even custom fields.
- Detects any link that doesn’t work.
- The option to give broken links a different appearance in posts.
- The option to prevent search engines from following broken links.
Being that this is a guide on how to use SEO plugins, the final point is the most important. You don’t want your site littered with broken links, as it can have a negative impact on your rankings and user experience.
With the option to prevent search engines from following these links, you never have to worry about the consequences that could happen before you’re able to remove or alter the link.
The Broken Link Checker plugin is both simple to use and powerful. With more than 400,000 active installs and a high rating, it’s worth checking out.

5. Google Analytics by MonsterInsights
Do you use Google Analytics to track website visitors, top keywords and other, similar data?
If so, you should check out the Google Analytics by MonsterInsights plugin. Not only does it have approximately 11 million downloads, but its feature list is well worth checking out:
- Use of Google Analytics API for simple installation.
- Ability to use the asynchronous or universal tracking code.
- Access to a beautiful data metric dashboard within WordPress.
- Outbound and internal link tracking.
- Access to both demographics and interest reports.
The primary benefit of Google Analytics by MonsterInsights is the ability to review your Analytics data from your WordPress dashboard. You don’t have to jump back and forth between your website and Google Analytics. Instead, everything is exactly where you want it to be.
The general settings panel is where you’ll start.
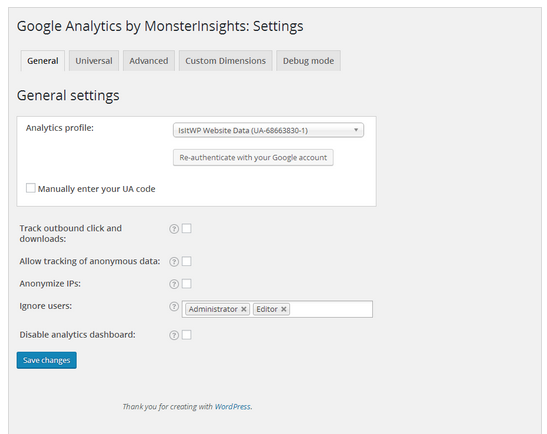
Once you make all the right choices here, it’ll only be a matter of time before you’re collecting data that you’re able to access from your WordPress dashboard.
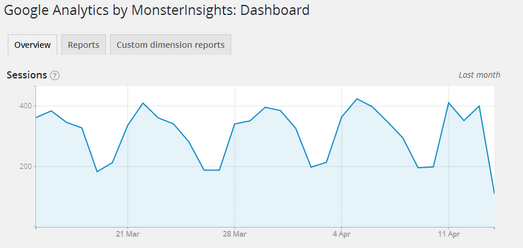
Here’s an example of a dashboard displaying the number of sessions on a website:
You aren’t required to use this type of Google Analytics plugin. You could always visit Google Analytics direct, when you want to review data for your website. However, this can be time consuming.
If you want to review your website stats in a more efficient manner, this plugin could be your key to success.
6. W3 Total Cache
When was the last time that you thought about the speed of your WordPress website? Do you understand that this can impact your search engine rankings?
Many people overlook just how important it is to provide a lightning quick experience. Google has made it clear that site speed is a ranking factor, so this isn’t something you want to overlook.
If you’re having trouble in this department, it’s time to consider the benefits of the W3 Total Cache plugin.
With this, you can improve site speed, as well as the overall user experience. With a long list of users, including big names, such as AT&T and Mashable, you know that you’re in good company if you install this plugin.
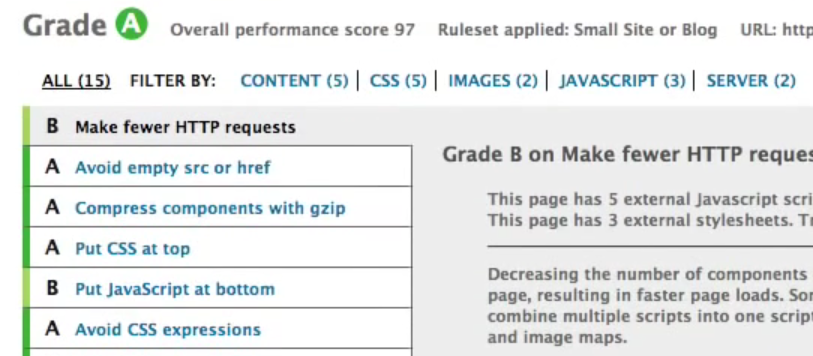
There are many benefits to using the plugin, but here is my favorite, as shared on the official download page:
“At least 10x improvement in overall site performance (Grade A in YSlow or significant Google Page Speed improvements) when fully configured.”
That’s saying something. With such a bold claim, it only makes sense to review this plugin and see if it can do something special for your website.
From the caching of pages and posts to the ‘minification’ of 3rd party JavaScript and CSS, you never have to wonder if the features of this plugin are worth your time. You’ll like what you see soon after the install is complete.
(via YouTube)
7. All In One WP Security & Firewall
What impact would a security breach have on the way that people use your website?
Despite the fact that WordPress is extremely secure, this doesn’t mean that you can forget about all of the risks that are out there.
To protect your website, to the best of your ability, use All In One WP Security & Firewall.
There is nothing wrong with extra security, beyond what WordPress already provides, as this will help keep your site running efficiently.
For example, there are many user account security features:
- Password strength tool.
- Stop user enumeration.
- Ability to detect any accounts with an identical display name and log in. This is a poor decision, from a security perspective, as it gives hackers half of what they need to access your dashboard.
But, how will I know if my website is secure, you might ask?
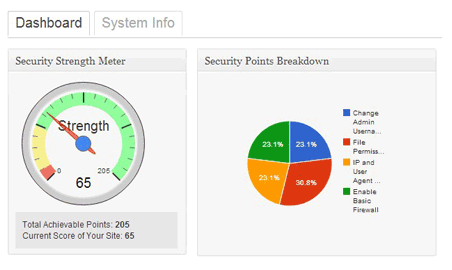
This is another area where the plugin can help, as it provides a security points score, based on the current set up.
(via Tips and Tricks HQ)
The last thing that you want people to see in the search results is this:
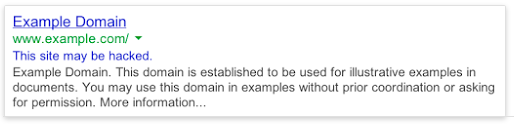
(via Google)
Not only will this chase people away from visiting your website, but it can kill your reputation. With all this working against your site, rankings can suffer as a result.
Using the All In One WP Security & Firewall plugin will give you greater peace of mind about the security of your WordPress site.
8. WPtouch Mobile Plugin
Is your WordPress website mobile friendly?
This may not have been a big deal in the past. But, in today’s day and age, it’s a must. There are a couple of reasons for this:
- More people than ever are browsing the internet via a mobile device, such as a smartphone or tablet.
- The lack of a mobile friendly website will have a negative impact on your search engine rankings.
There is a lot to know about Google’s mobile friendly update, including the fact that your website should be mobile friendly.
If you don’t have the time, money and resources to pay a developer or to upgrade your site on your own, then you can turn to the WPtouch Mobile Plugin.
This plugin “automatically adds a simple and elegant mobile theme for mobile visitors to your WordPress website.”
Easy enough, right?
Once the plugin is installed, you can use the administration panel to customize the mobile appearance of your blog. Best yet, you don’t have to alter the code to make key changes.
This plugin has nothing to do with the desktop theme, as this will still be displayed to those who are non-mobile visitors. It simply ensures that any mobile visitor to your website can review your content in a seamless manner.
Today, your WordPress website needs to be mobile friendly. If you want to make this happen without delay, use the WPtouch Mobile Plugin.

9. Yet Another Related Posts Plugin (YARPP)
Are you familiar with the fact that a low bounce rate is a positive SEO signal? How about the fact that you want to keep people on your site for as long as possible?
Both of these things show search engines that your site has a lot to offer, while also providing a strong user experience.
One of the best ways to improve in both areas is to install the Yet Another Related Posts Plugin.
Once installed and set up, the plugin displays posts and pages (or other content) related to the current content. The idea behind this is simple: you’re giving readers relevant content, which means that they will stick around longer.
Some of the things that I like about the plugin include:
- Option to choose between thumbnail and list view.
- Use of an advanced algorithm to ensure that the best posts are displayed.
- Templating features, so you can control exactly how results are displayed.
In today’s world of SEO, you need to lower your bounce rate and increase the amount of time that users spend on your site. A plugin like this can help you do just that.

(via YARPP)
10. Seo Optimized Images
It’s easy to get so caught up in optimizing your content that you overlook the importance of images.
But, there’s more to using images than simply inserting them into your content. You must also make sure that each one is optimized, as this will improve your rankings, while also helping drive traffic through Google Images search.
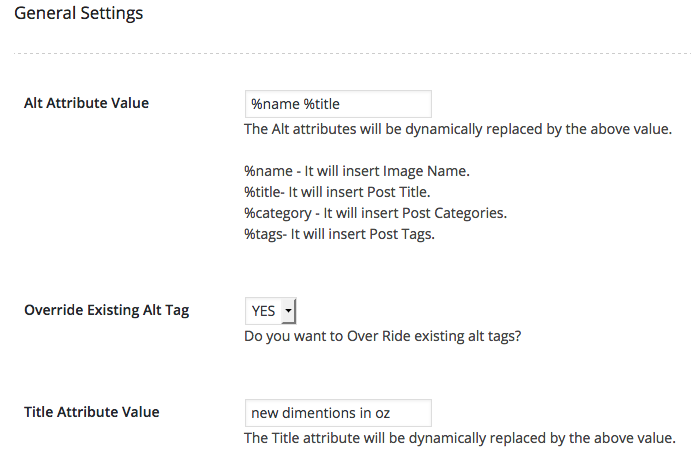
With the guidance of the SEO Optimized Images plugin, you can “dynamically insert Seo Friendly alt and title attributes” into every image.
When using WordPress, it’s extremely easy to add images to posts and pages. But, that doesn’t guarantee that you’ll optimize each one for optimal performance.
If you want to avoid any image-related SEO mistakes in the future, be sure to use this plugin. It’ll help your SEO, while also saving you time.
Conclusion
As you search available WordPress plugins, you’ll be surprised to find just how many are devoted to SEO-related tasks.
While it’s a good business practice to learn more about each WordPress SEO plugin at your disposal, you don’t want to bog yourself down with too many. To protect against this, get started by considering the 10 plugins detailed above.
Do you have experience with any of these? Would you add others to the list? Share your thoughts in the comment section below.
Content retrieved from: https://neilpatel.com/blog/10-wordpress-plugins-to-turn-your-site-into-an-seo-powerhouse/.
How to Increase Pageviews and Reduce Bounce Rate in WordPress
Posted on August 12th, 2018
Before we start
Lets cover some basics regarding terminology and technology. Bounce rate represents the percentage of visitors who enter your site and “bounce” (leave the site) rather than continue viewing other pages within the same site. Page view is a request to load a single page on an internet site. We use Google Analytics to track our data. You are welcome to use another analytics service, or you can simply install google analytics in your WordPress site.
Now that we have taken care of the basic terminology, you are probably wondering why the heck do these numbers matter?
If you are running a site that is primarily monetized by banner ads, then the number of pageviews matter. If you are trying to build a loyal audience, then the number of bounce rate matters. Also the lower your bounce rate, the better ads eCPM (cost per thousand) or CPC (cost per click) you will get. When the same user views the next page, your ad provider most likely has a better ad to serve them thus giving you a higher eCPM or CPC.
We have consulted with a lot of clients helping them increase their pageviews and reduce bounce rates. We have also done a lot of experiments on our own sites like List25. So all the methods that we will share are the ones that we have used in the past and know that they work.
P.S. These techniques will ONLY work if you have Good Content.
[video_page_section type=”youtube” position=”default” image=”http://track-n-test.com/wp-content/uploads/2018/08/youtube-banner1.jpg” btn=”light” heading=”” subheading=”” cta=”” video_width=”1080″ hide_related=”false” hide_logo=”false” hide_controls=”false” hide_title=”false” hide_fullscreen=”false”]https://www.youtube.com/watch?v=lxgE4HgXJ1g[/video_page_section]
Interlink Your Posts
Anytime that you can interlink your other posts within the post content, you are going to see an increase in pageviews. In WordPress 3.1, interlinking got even easier because you can simply search for the post you want to link while adding links. Interlinking techniques work great when you have a site with a lot of articles. If you are just starting out, then you will be a bit limited. So how do you go back and interlink older articles when you have something new? You can manually do it, but it will take some time. There are plugins that lets you automatically link keywords in WordPress (Although that article is showing you how we did this for affiliate links, you can use it for internal linking purposes as well). Not only does interlinking help you increase pageviews and reduce bounce rates, it also helps with SEO as well.
If you want to see an example of interlinking, then just look at the paragraph above.
Show Related Posts After the Post
One of the main reasons why the user leave your blog after reading the post is because you are not showing them what to do next. By showing the user with a list of “related posts” or “other popular posts”, you may get them to go on to visit another post in your site. There are a lot of ways you can add related posts to your blog. You can use a plugin called YARPP that has its advanced algorithm that picks the related post. You can show related posts by category or tags without using a plugin. You can also show related posts by showing other posts by the same author.
Show Excerpts on Front / Archive Pages
Showing excerpts on front/archive pages have two advantages. First, it decreases page load time. Second, it helps increase the pageviews. You should almost never show full posts on your front page or archive page. Imagine having like 25 images in one post, and then have 5 of those on one page. It would be a horrible user experience because of (slow load time and super long page) which would make the user leave your site. We have a tutorial on how to display post excerpts in WordPress themes. Most good theme frameworks like Genesis, Thesis, Headway etc. already have this option built-in.
[video_page_section type=”youtube” position=”default” image=”http://track-n-test.com/wp-content/uploads/2018/08/youtube-banner1.jpg” btn=”light” heading=”” subheading=”” cta=”” video_width=”1080″ hide_related=”false” hide_logo=”false” hide_controls=”false” hide_title=”false” hide_fullscreen=”false”]https://www.youtube.com/watch?v=th_CMRGAmYw[/video_page_section]
Splitting up Long Posts
Are you writing a super long posts? Well, you can split it into multiple pages using the WordPress <!–nextpage–> tag in your post. Simply add it wherever you want, and your post will split into multiple pages. You can see an example of how we split our posts into two pages or even into five pages. You have to be very careful when doing this because if you do not have a sufficient amount of content on each page, then the user might get pissed of. We have seen a lot of big name sites like Forbes, NY Times, Wall Street Journal and others utilize this technique.
Interactive Sidebar
Your sidebar can play a crucial role in increasing pageviews and reducing bounce rate. You can show your popular posts in the sidebar. You can even customize it to show popular posts by week, month, all time. You can also show your most recent posts only on single post pages. We have seen sites that create custom images to navigate to specific posts of theirs. You can integrate other sections of your site in your sidebar for example look at our WordPress Coupons section or the gallery section in the sidebar.
Encourage Random Browsing
On List25 we created a feature called I’m Feeling Curious. When a user clicks on this button, they will be redirected to a random post in WordPress. We put the button in our header bar which was a very hot spot. After seeing good results, we ended up putting it on WPBeginner as well and called it Explore.
[video_page_section type=”youtube” position=”default” image=”http://track-n-test.com/wp-content/uploads/2018/08/youtube-banner1.jpg” btn=”light” heading=”” subheading=”” cta=”” video_width=”1080″ hide_related=”false” hide_logo=”false” hide_controls=”false” hide_title=”false” hide_fullscreen=”false”]https://www.youtube.com/watch?v=0j8RrMJ5oeQ[/video_page_section]
Results
When we started out List25, we faced a lot of criticism. People were saying that sites like these fail to grow because it is hard to keep a loyal audience. We asked around and a lot of people who had done something similar in the past reported that the bounce rate for a siimlar site was soaring in 80% range. Average user would view only one page per visit and leave. We started the site out to get some base data. Our bounce rate was in the 75% range. We slowly started implementing the changes mentioned above. Bounce rate decreased from the average of 76% to 42%. Our pageviews per visit increased to 2.79 / pages per visit. Average time spent on page went to the average of 3 minutes and 40 seconds << This is the average time spent for our 1 million unique visitors! What are you doing to increase pageviews and reduce bounce rate? Share with us.
Content retrieved from: https://www.wpbeginner.com/beginners-guide/how-to-increase-pageviews-and-reduce-bounce-rate-in-wordpress/.