


How To Track Facebook Ads in Google Analytics [The Easy Way]
Posted on August 14th, 2018
Accurately tracking Facebook ads in Google Analytics consists of two primary steps:
- Clearly defined and consistent UTM Parameters so that you can identify Facebook traffic in Google Analytics
- Import cost, impression, and click data into Google Analytics so that you can map platform and session data
Analyzing performance holistically can be a daunting task given that Facebook and Google don’t always play nicely together.
But as a data-driven marketer accurately tracking Facebook ads in google analytics is crucial to understanding campaign performance.
So let’s explore a method for efficient Facebook ad tracking after we take a look at the current problem.
[video_page_section type=”youtube” position=”default” image=”http://track-n-test.com/wp-content/uploads/2018/08/youtube-banner1.jpg” btn=”light” heading=”” subheading=”” cta=”” video_width=”1080″ hide_related=”true” hide_logo=”false” hide_controls=”false” hide_title=”false” hide_fullscreen=”false”]https://www.youtube.com/watch?v=YGOehkY6VNk[/video_page_section]
Tracking Facebook Ads in Google Analytics is Time Consuming
Reporting works well within the confines of one specific vendor.
Google products, for example, work well together in that they allow the linking of Google Analytics (reporting) and Adwords (advertising platform), enabling one to see all data seamlessly in a single reporting interface.
Although Facebook has become a prominent advertising platform, it does not, like Google, have a diverse product portfolio and does not provide reporting outside of platform-specific metrics.
Note: Facebook does provide a reporting and Analytics Tool that is worth exploring.
Since there is no way to seamlessly connect the two platforms, what are our options?
- Analyze and report on each platform separately
- Map the data in a spreadsheet
- Perform manual exports & GA custom imports
All of these options, even with a sound system in place, can be extremely time-consuming, taking away from analyzing and optimizing campaign performance.
In this article, I will go over three available Google Analytics features that you can leverage when tracking Facebook ads in Google Analytics:
- Data Import
- Calculated Metrics
- Custom Reports
It Starts with Proper Campaign Tagging
Let’s go back to the beginning.
When setting up Facebook campaigns, many digital marketers use the Google Campaign URL builder to generate UTMS that look something like this:
/http://easyautotagging.com/?utm_source=facebook&utm_campaign=Spring%20Launch&utm_medium=cpc&utm_content=lifestyle%20image
Aside from the manual effort required, there is nothing wrong with this approach.
That said, defining the source as ‘facebook’ and medium as ‘cpc’ provides limited insight into audience/targeting performance.
[video_page_section type=”youtube” position=”default” image=”http://track-n-test.com/wp-content/uploads/2018/08/youtube-banner1.jpg” btn=”light” heading=”” subheading=”” cta=”” video_width=”1080″ hide_related=”false” hide_logo=”false” hide_controls=”false” hide_title=”false” hide_fullscreen=”false”]https://www.youtube.com/watch?v=ck5VEYhoUFo[/video_page_section]
Using Available Facebook Campaign Fields
There is a more straightforward way to tag your URLs without having to come up with a unique naming convention for UTM fields.
The easiest way to tracking Facebook Ads in Google Analytics is to create unique naming conventions for your Facebook Campaigns, Ad Sets, and Ads that you then use to tag your UTMs respectively.
Below is an example of what the UTM fields and their respective Facebook values would look like:
Campaign – “Campaign Name”
Source – “Facebook” or “Instagram”
Medium – “Ad Set Name”
Ad Content – “Ad Name”
Note: Using Ad Set Name (read audience) as the medium value can mess with your default and/or custom channel grouping in Google Analytics. You can either modify your channel grouping or map custom parameters to custom dimensions.
There are two ways you can go about tagging your campaigns:
Bulk exports/imports via the power editor
EasyAutoTagging which automates tagging all of your Facebook campaign ad URLs
I go into details of how you can do this in How to Track Granular Facebook Campaign Performance in Google Analytics.
Linking your Google Analytics Account
So, how can you see this data in Google Analytics?
First, we have to import Facebook campaign cost, impression and click data into Google Analytics in one of two ways:
- Manual Import
- Automated Import
Option 1: Manual Import
Without EasyAutoTagging, you are limited to exporting Facebook campaign data daily, weekly, or monthly, then manually importing it into Google Analytics via Data Imports.
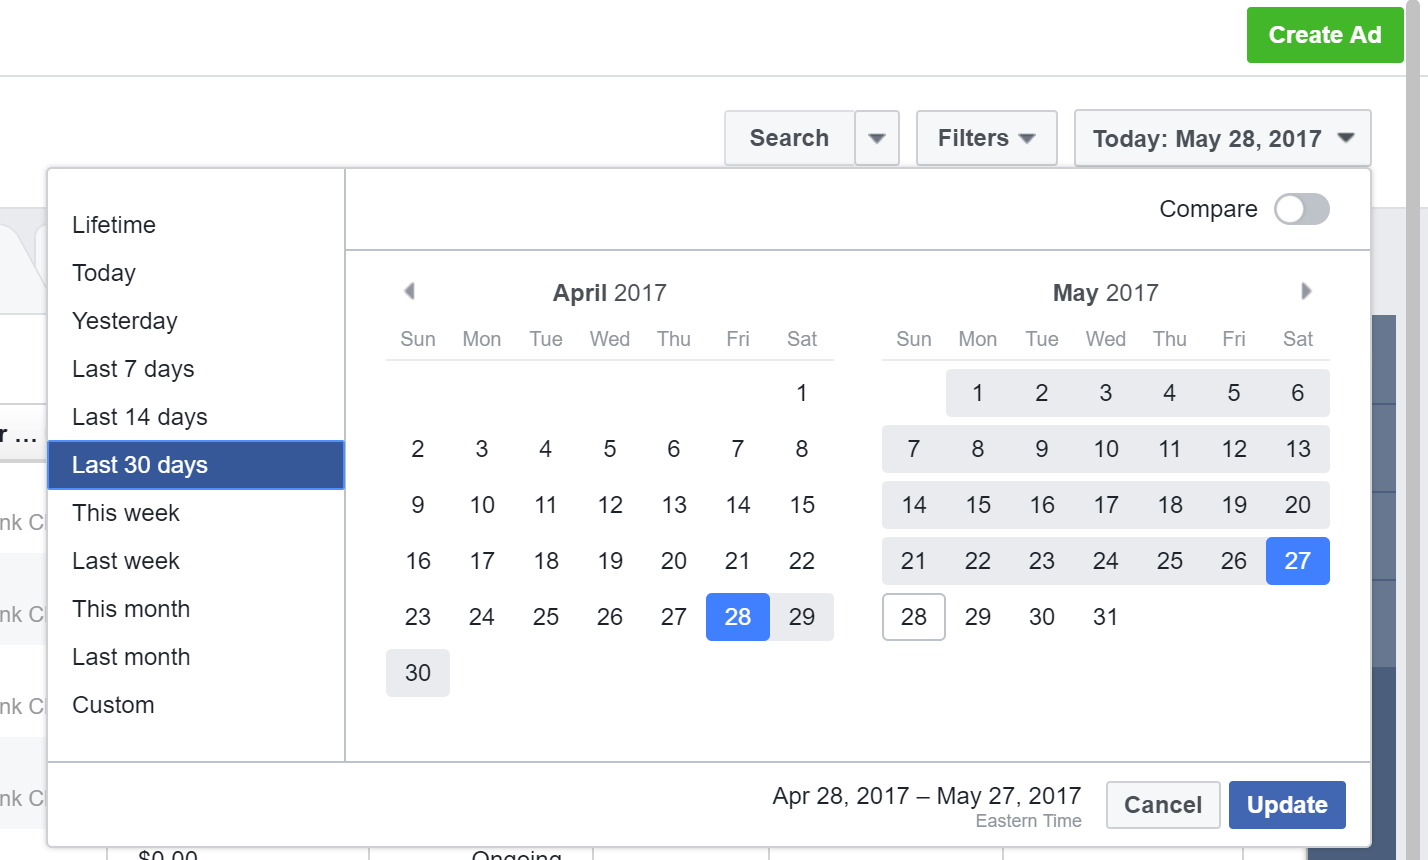
First, go to your Facebook accounts Ads Manager and select your desired date range:
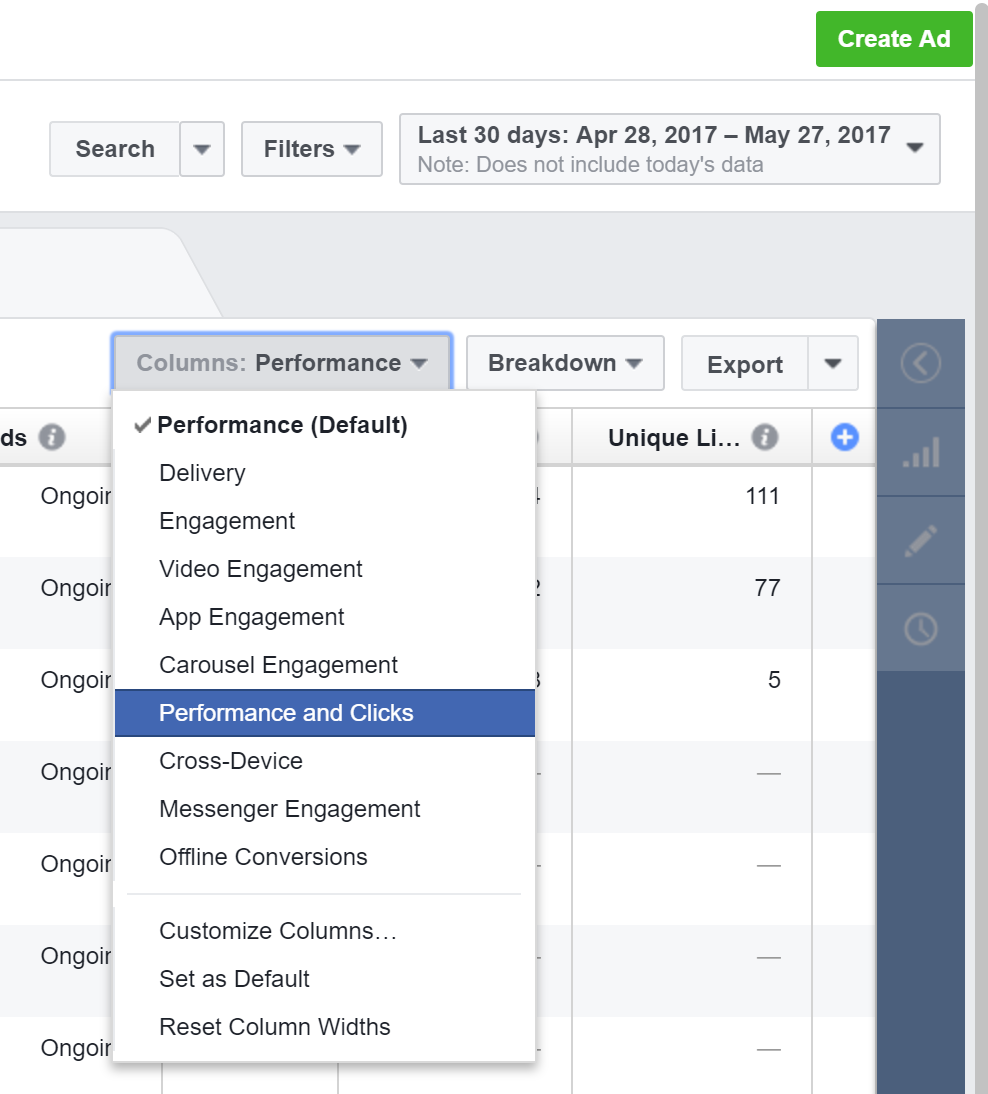
Select the Ads tab across the top and Go to Columns and Select Performance and Clicks:
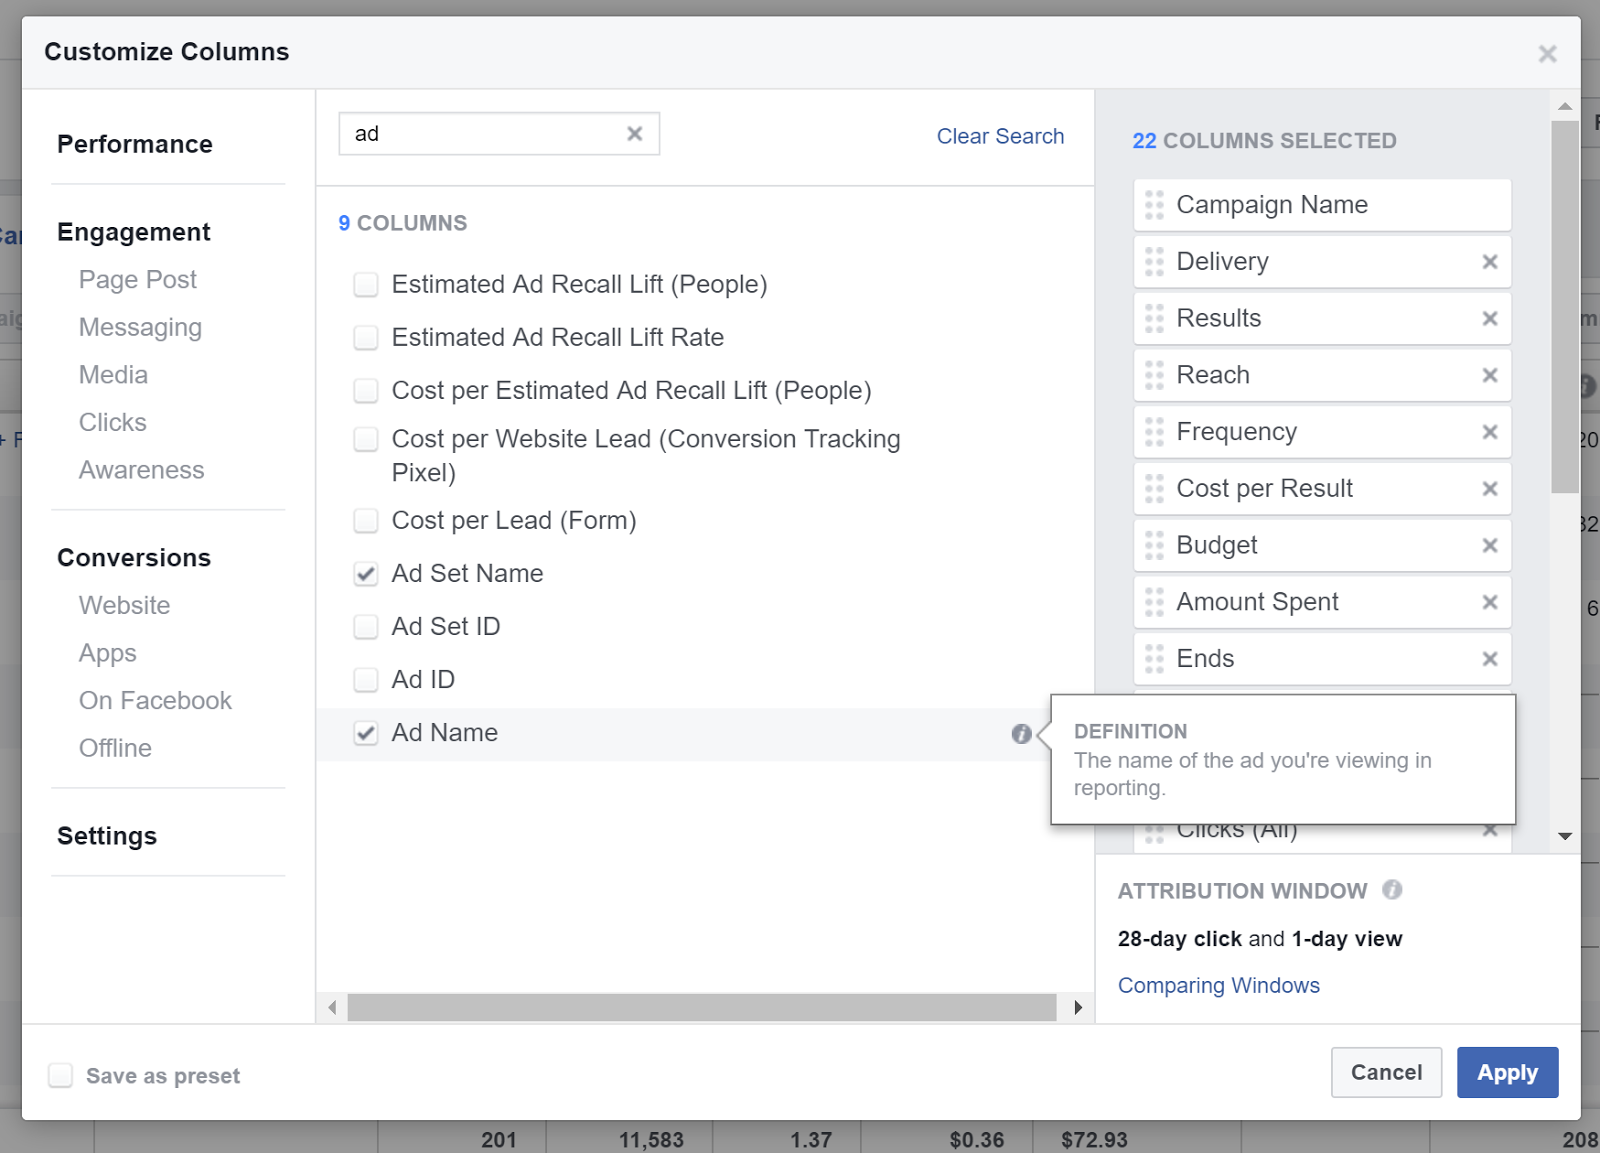
Customize columns and add Campaign Name, Ad Set Name, and Ad Name:
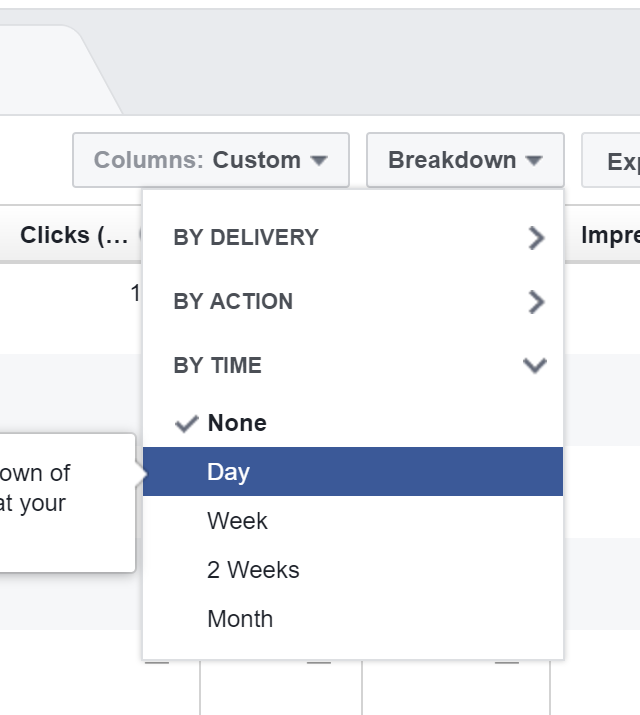
Click Breakdown > by time > Day
Select the campaigns you would like to import and export these to a CSV file:

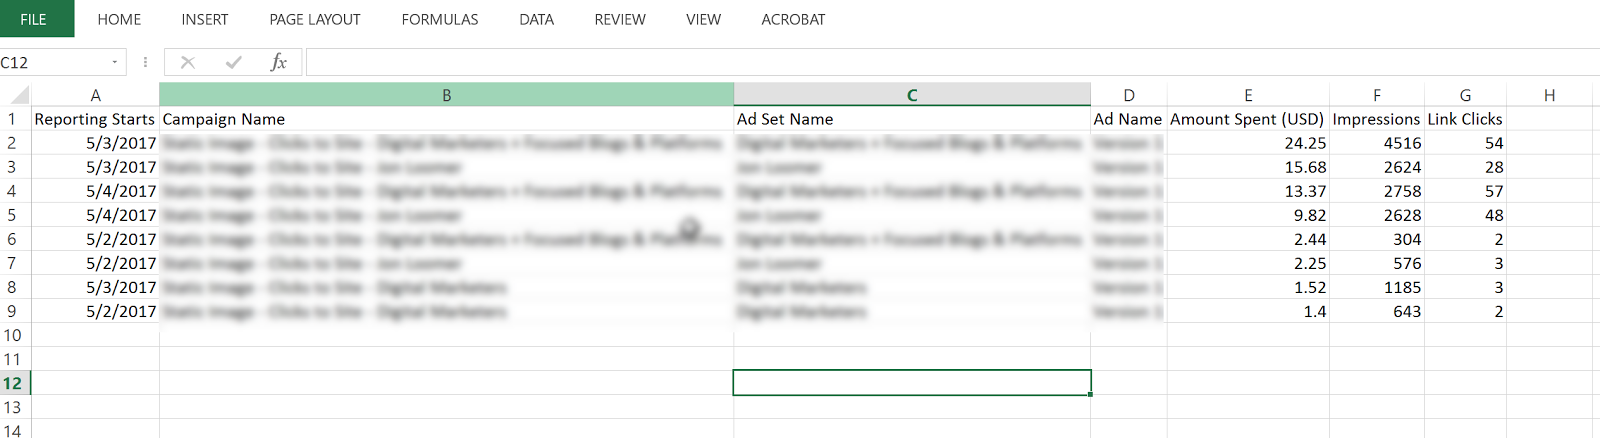
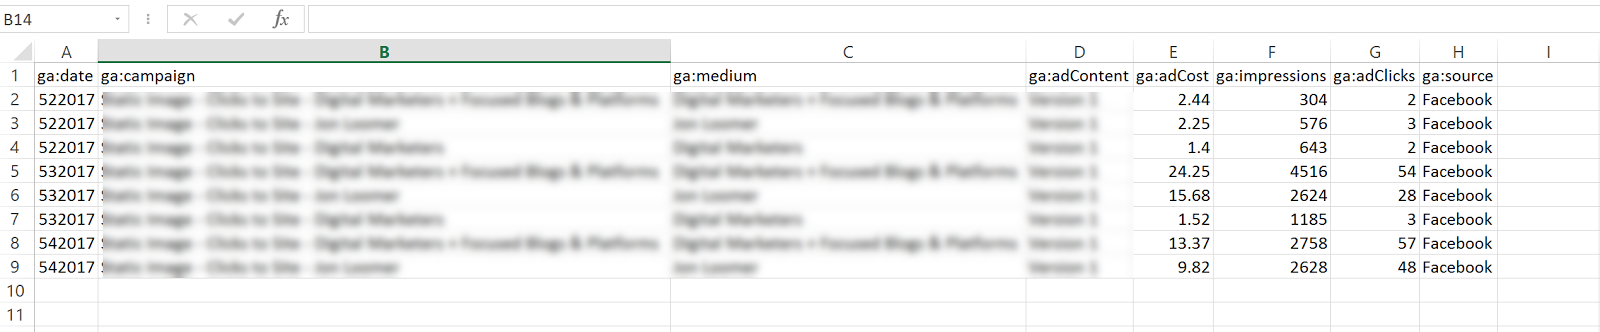
Open the CSV and delete all columns except:
Day (Reporting Starts), Amount Spent, Campaign Name, Ad Set Name, Ad Name, Impressions, Link Clicks
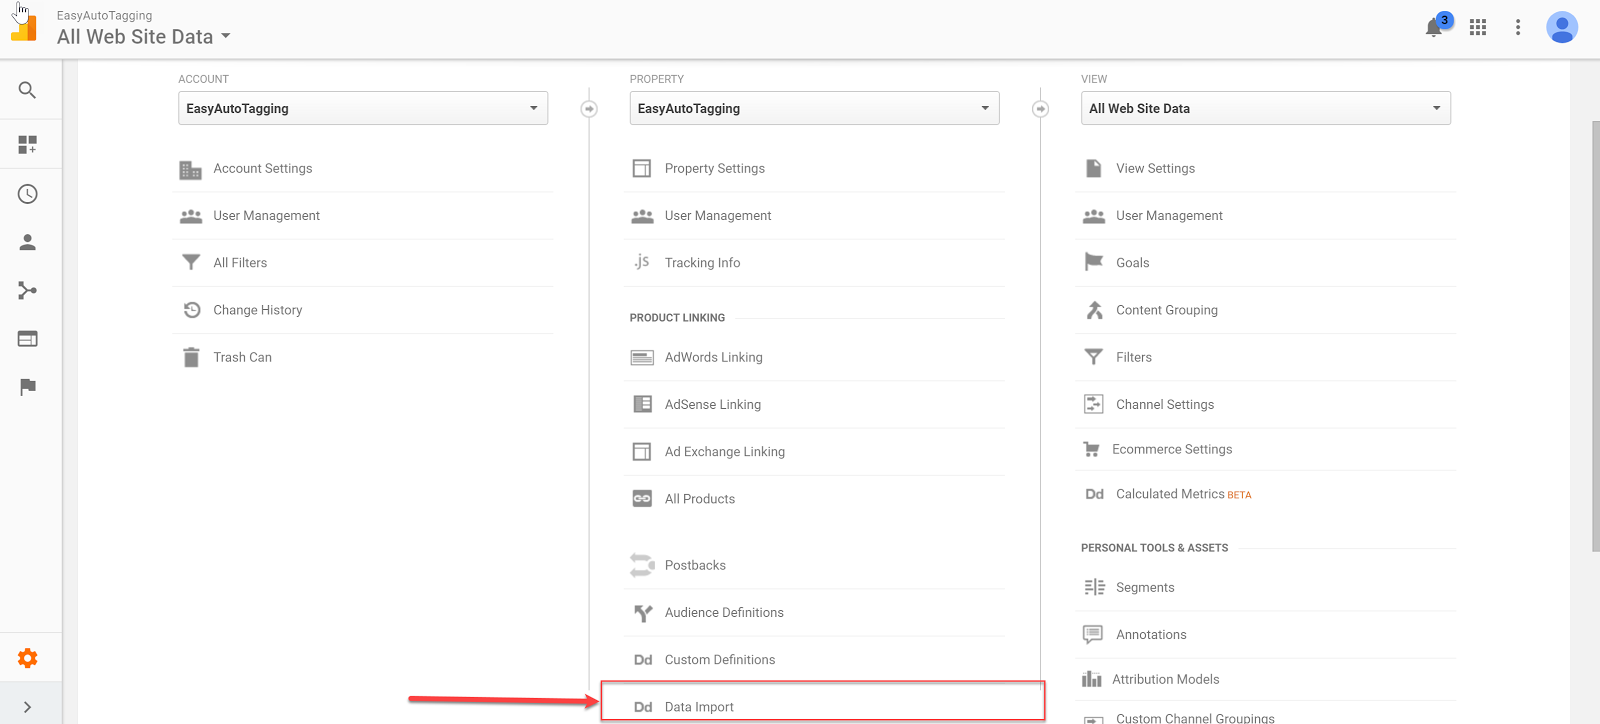
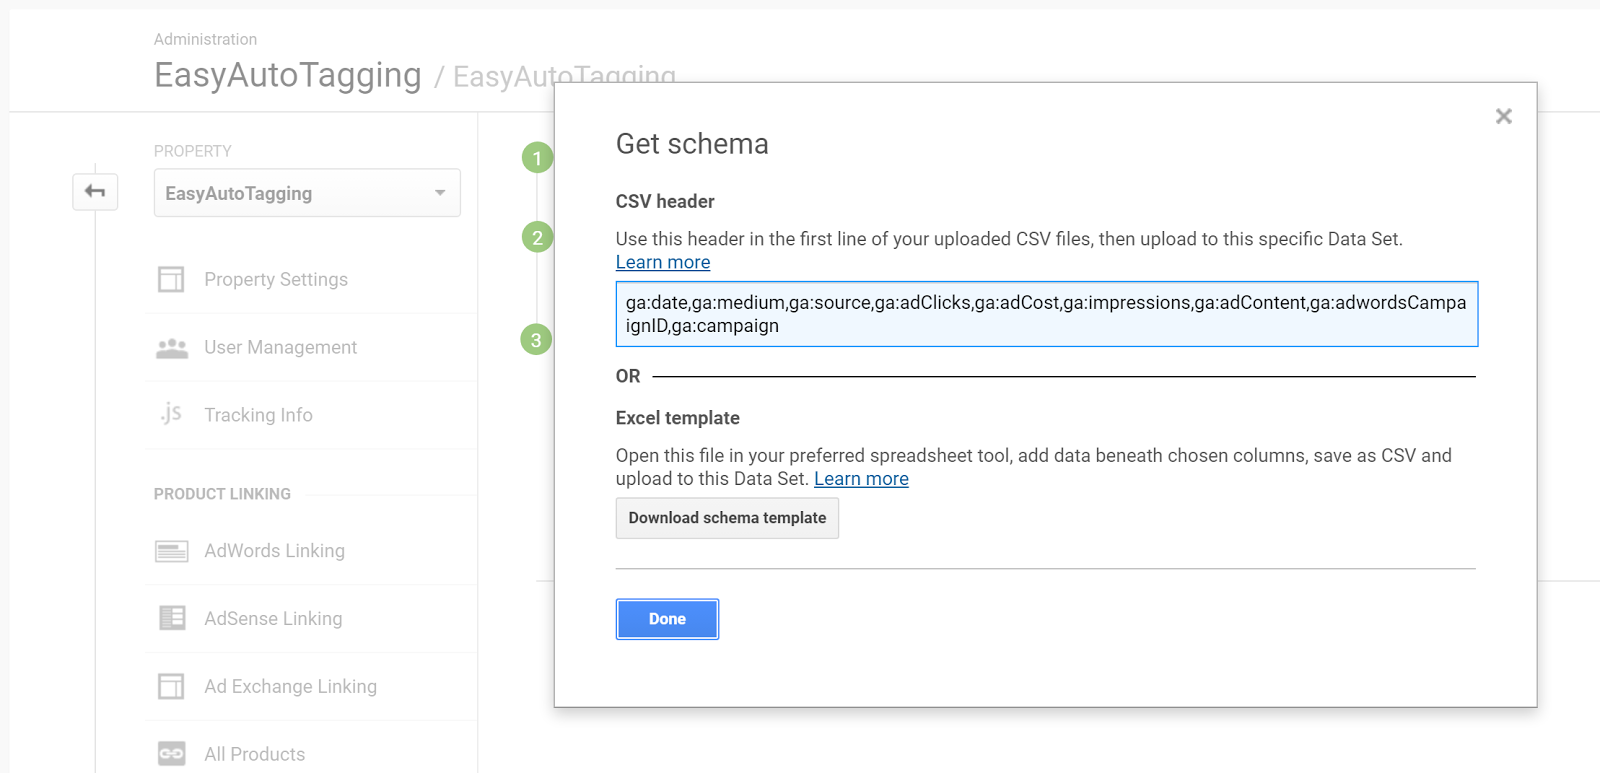
Once you have these cleaned up, head over to Google Analytics and go to Admin > Data Import
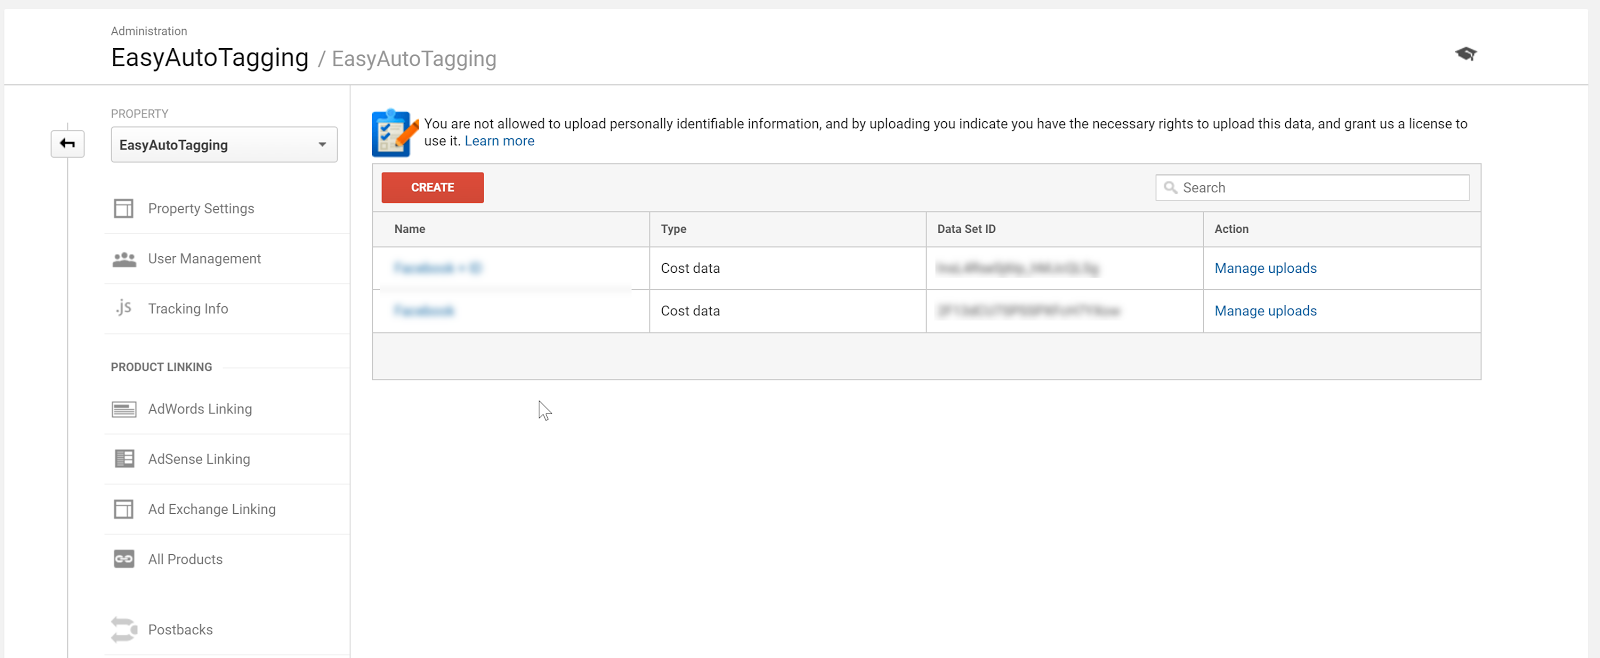
Select your cost import dataset. I go into the detail on how to set up cost, impression, click DataSet in Setting Up Cost Data Sets.
Copy and paste the headers into your CSV respectively of column values.
For source, you need to manually add the source as Facebook and/or Instagram depending on campaign/ad set placement.
Format the date column from 5/3/2017 to this 532017
Your final results should look like this:
Go back to Data Imports in Google Analytics and click on manage uploads > Upload File and upload your CSV doc.

Option 2: Automated Daily Import
With EasyAutoTagging’s GA Connector you can easily link your Facebook campaigns to Google Analytics using the same UTM values assigned when generating URL parameters.
Just follow the set up in How to Track Granular Facebook Campaign Performance in Google Analytics
With automated daily imports of your Facebook campaign data, you can now generate detailed insights across platform metrics, and session behavior in a single location when tracking Facebook Ads in Google Analytics.
Ok let’s get started:
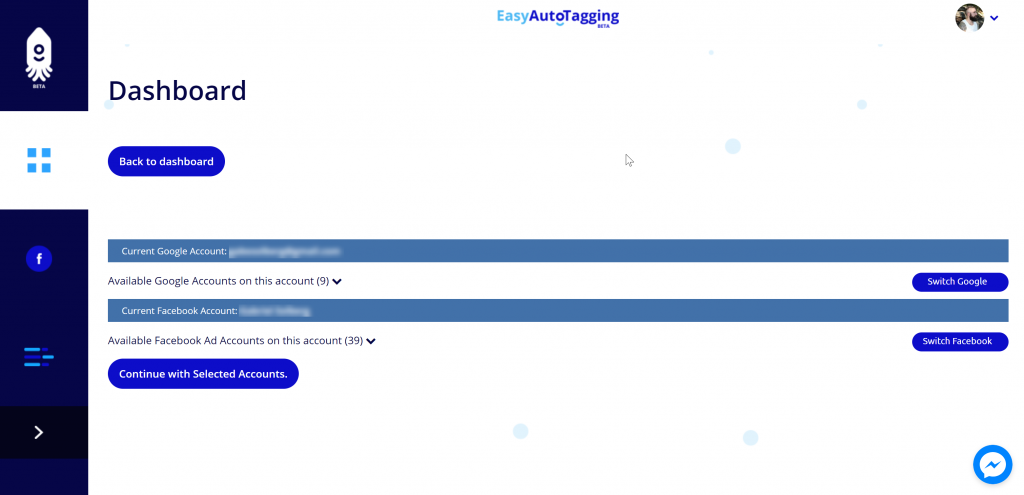
Log in to EasyAutoTagging.
Create a new connection group and connect to your desired Google Analytics and Facebook accounts.
Click continue.
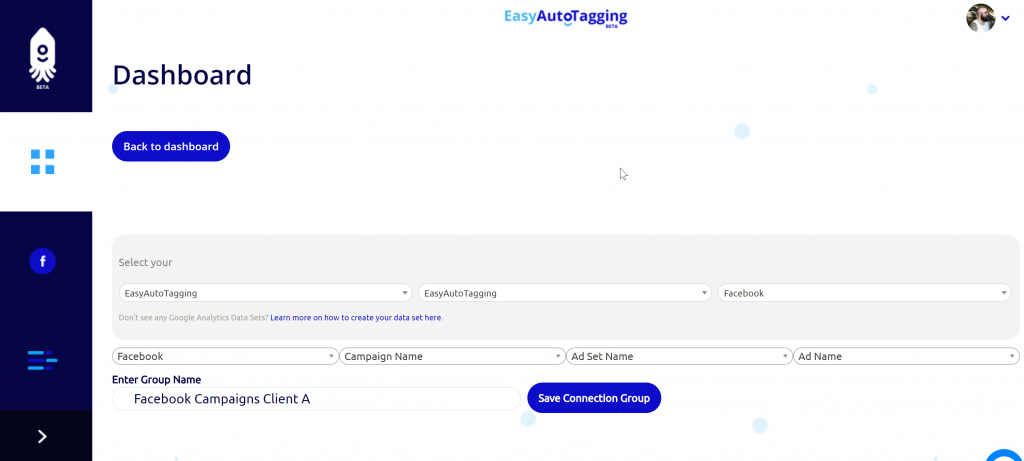
Next select your Google Analytics Account, Property and DataSet and define your Parameter Values. (source, medium, campaign, content)
Note: You can choose a pre-defined or enter custom parameter values. To ensure proper mapping, please make sure that you import parameter values exactly match your defined UTM parameter values.
Assign a name and save the Connection Group.
Note: If you do not have a data set created you need to create one in Google Analytics first. You can see how to do this in Setting Up Cost Data Sets
Once you saved the connection group, you can add facebook campaigns as needed.
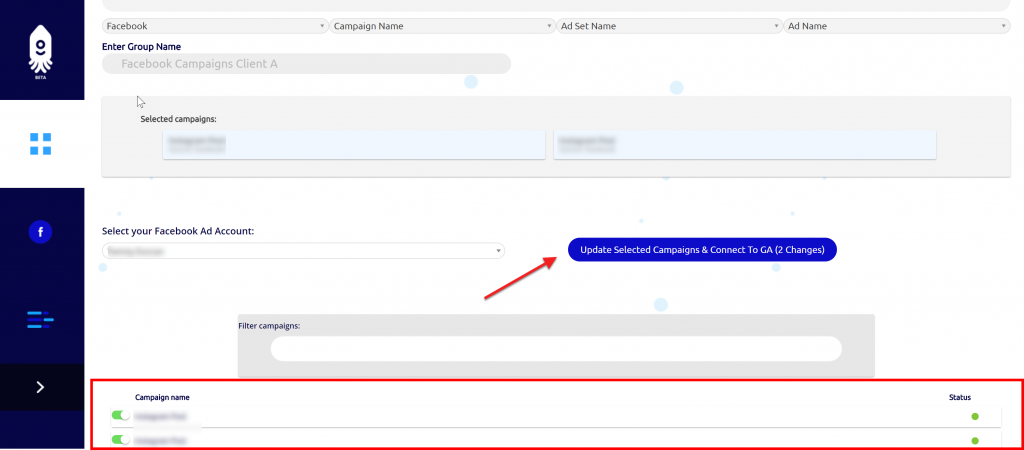
You will get notified via email once the initial upload of all campaign data to date has completed and all connected campaigns will continue to import data daily.
Seeing the data in Google Analytics
Ok, now that we have all campaigns tagged and are tracking Facebook Ads in Google Analytics, where can we see our Facebook ad analytics?
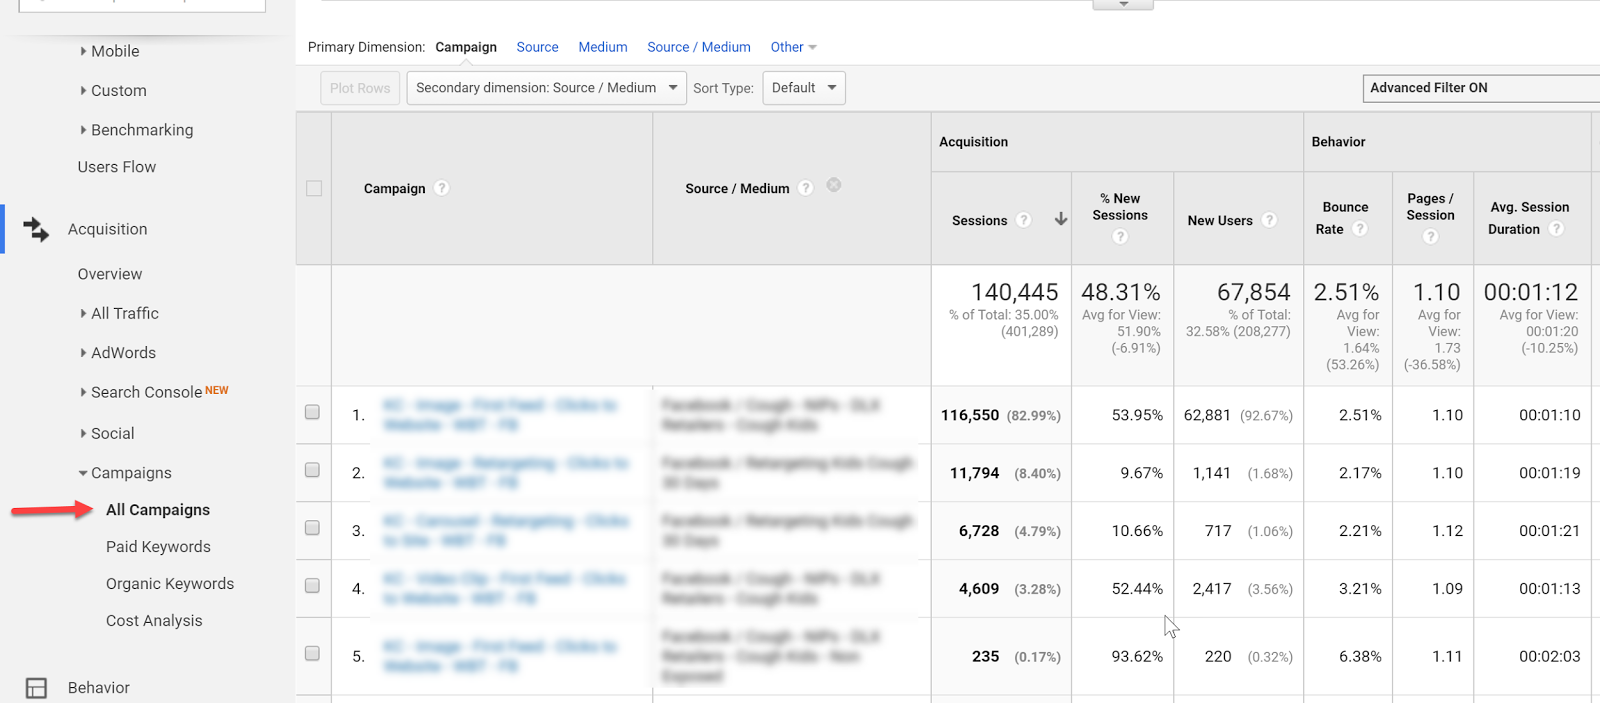
Let’s start with two default views that Google Analytics gives us:
Campaign View
In the campaign view, we can see an overview of campaign performance.
For more granularity, we can add secondary dimensions to see ad content or source/medium breakdowns.
Cost Analysis View
The Cost Analysis View shows cost, impression, clicks, CTR, CPC, and some primary on-site metrics on a campaign and/or source/medium breakdown allowing us to analyze platform alongside sessions data.
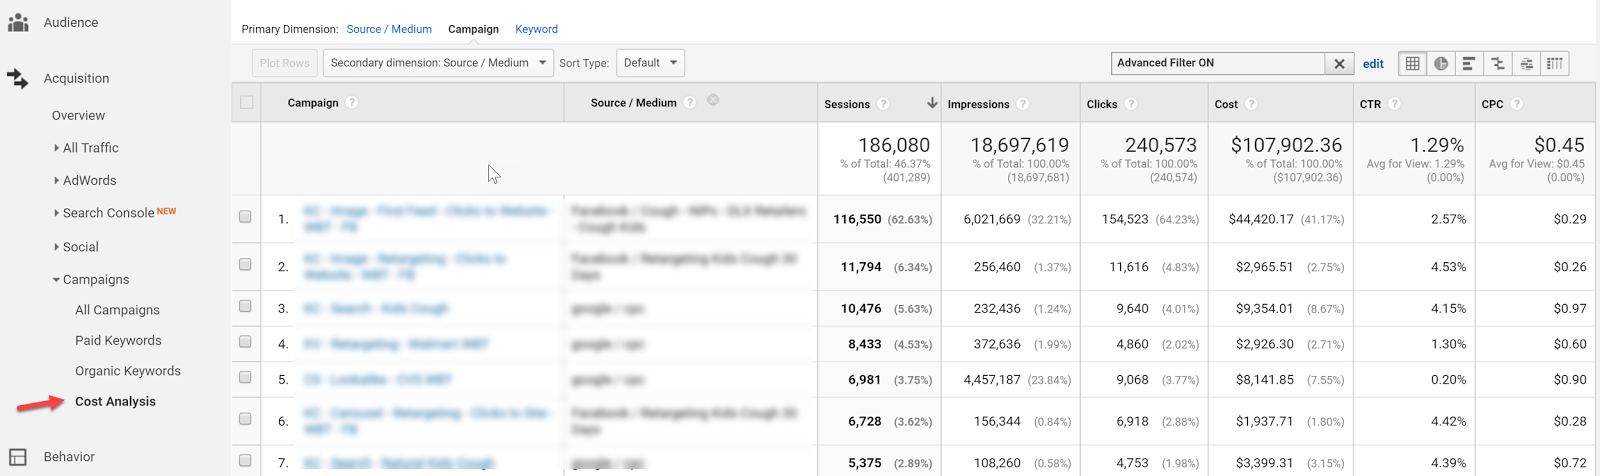
Both of these views, although isolated from each other within Google Analytics, can already provide a wealth of insights, but let’s take tracking Facebook ads in Google Analytics one step further with Calculated Metrics and Custom Reports.
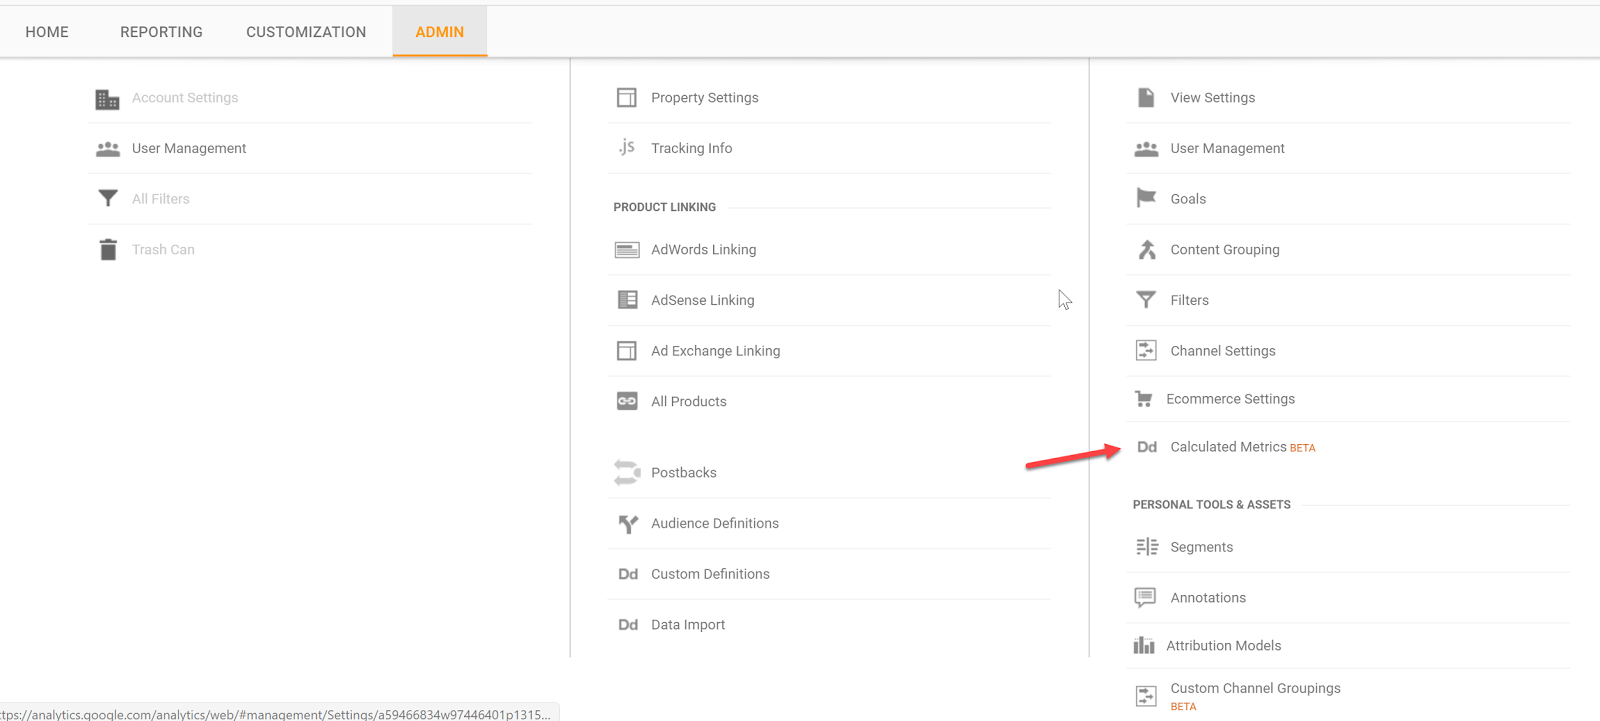
Calculated Metrics
Google defines Calculated Metrics as follows:
Calculated Metrics are user-defined metrics that are computed from existing metrics and drive more relevant analysis and enable greater actionability without leaving the product.
Ok, so here are a few example metrics that we might want to see in our reports.
Note: Keep in mind that one can only create 5 calculated metrics per view in the standard Google Analytics version.
CPV – cost per visitor (this will always be different than CPC since many platforms have a clicks to session drop off up to 25%)
Goal
CP Goal
Goal Conversion Rate
Let’s get started…you can find calculated metrics in your Admin section
Add a new custom calculation, call it CPV and define the formatting type as Currency (Decimal):
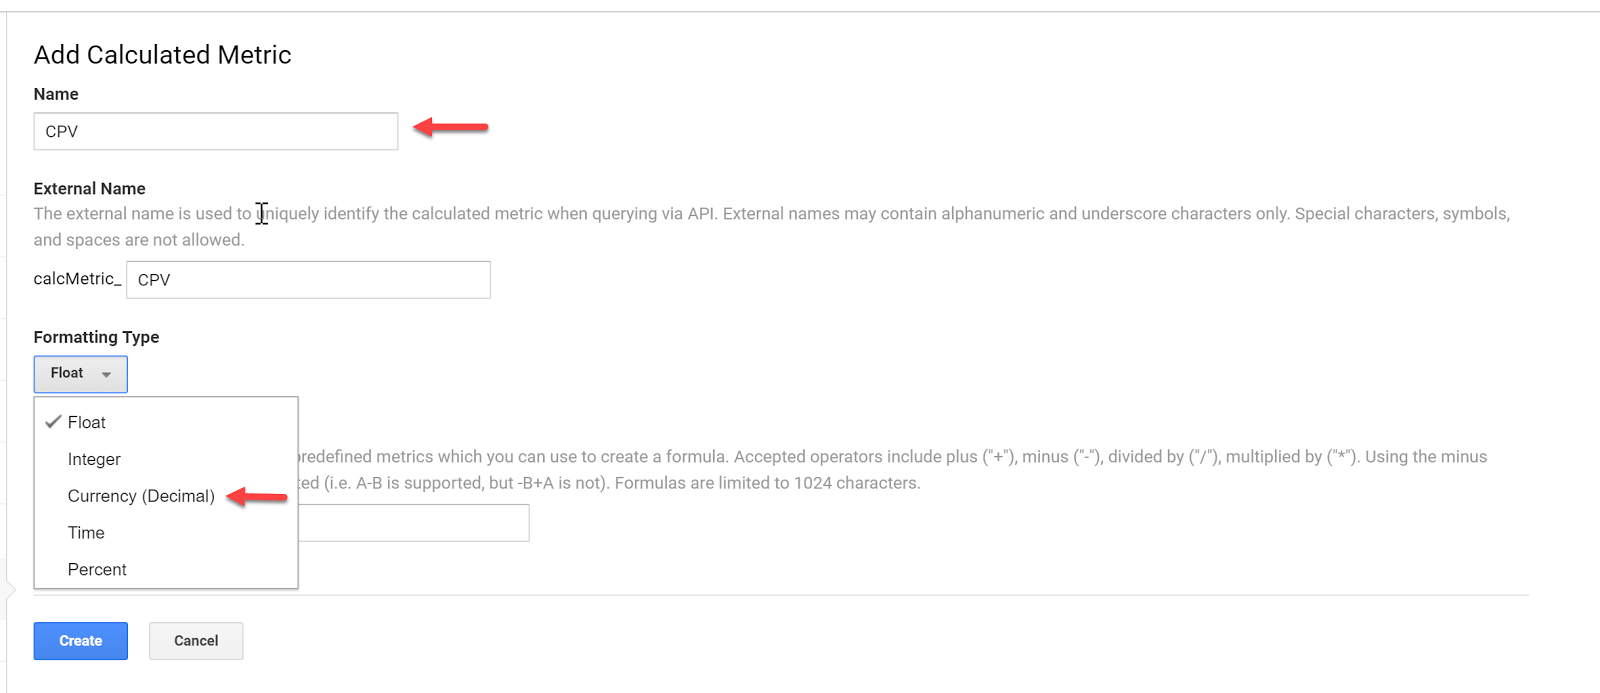
Enter the formula and click Create:

Do the same for your specific goal conversion rate and cost per conversion. In this case, we will use engaged user.
Now that we have the custom calculations in place, we can go ahead and set up our custom reports.
Custom Reports
Having all data aggregated doesn’t mean you have to use Google Analytics for reporting – it just makes it easier to pull all your Google Analytics Facebook data from one place.
But for the sake of this article, let’s stick with custom reports within Google Analytics.
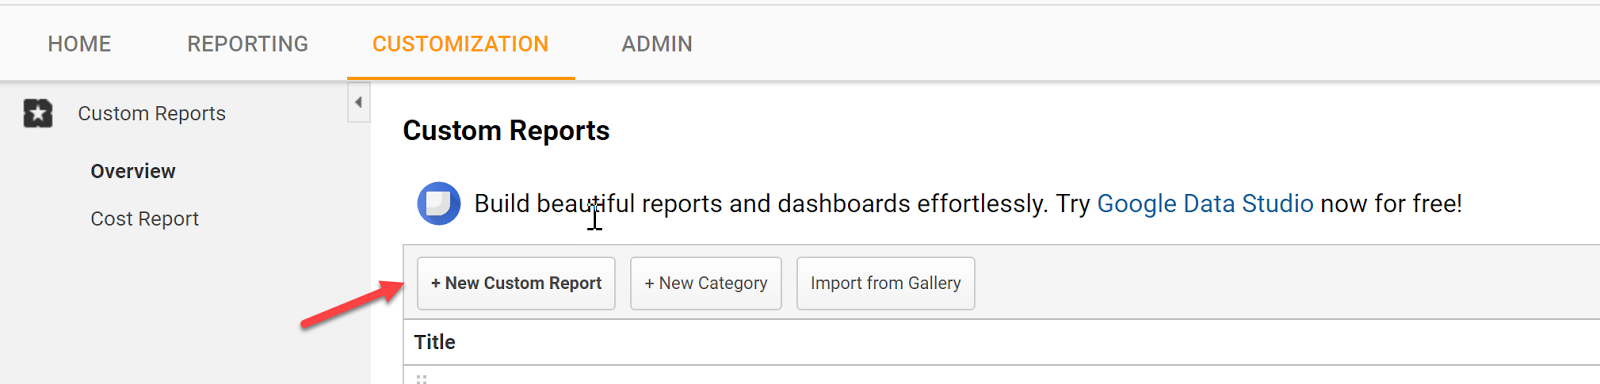
Let’s go ahead and set up a custom report.
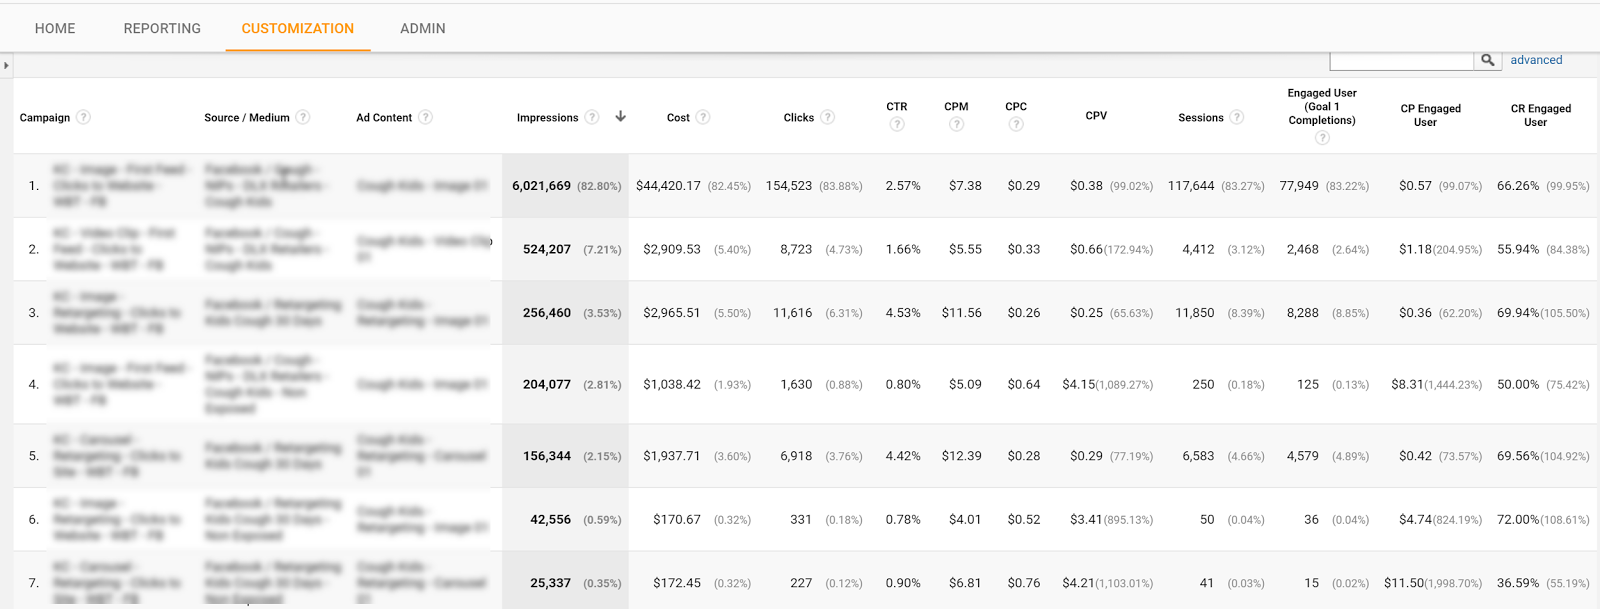
Go to Customization and click create a New Custom Report
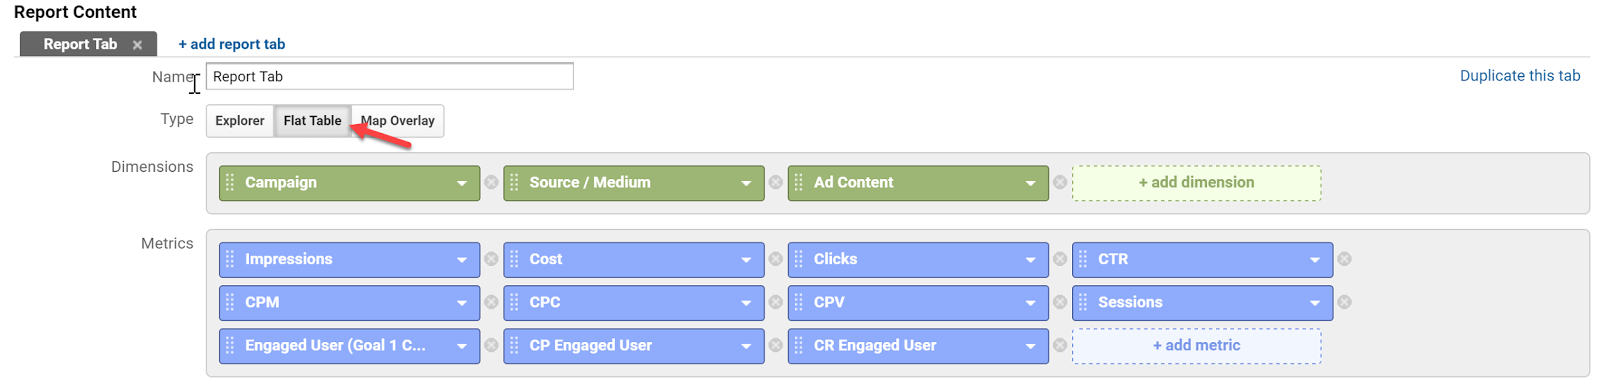
Select a Flat Table and add:
Dimensions:
Campaign | Source / Medium | Ad Content
Metrics:
Impressions | Cost | Clicks | CTR | CPM | CPC | CPV | Session | Engaged Users | CP Engaged User | CR Engaged
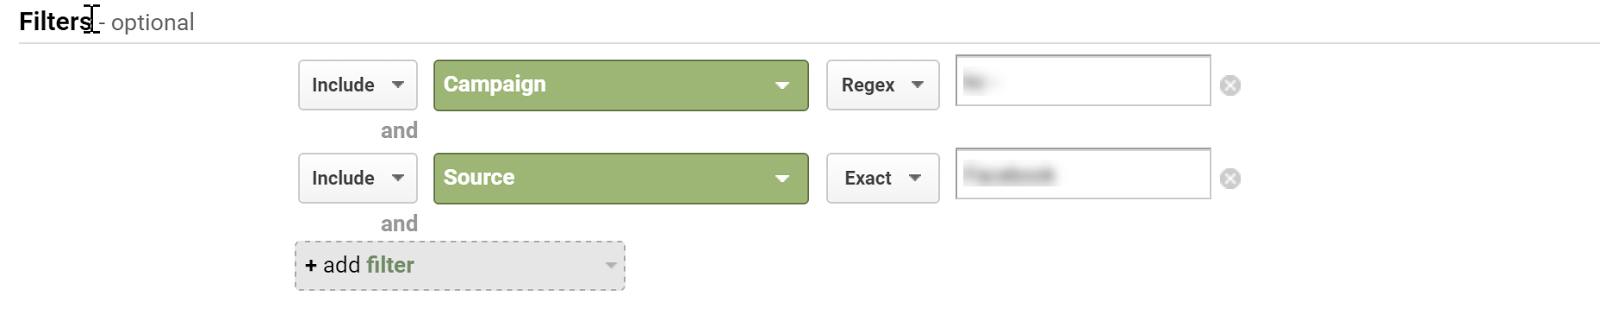
Apply Filters as needed:
Select your view:
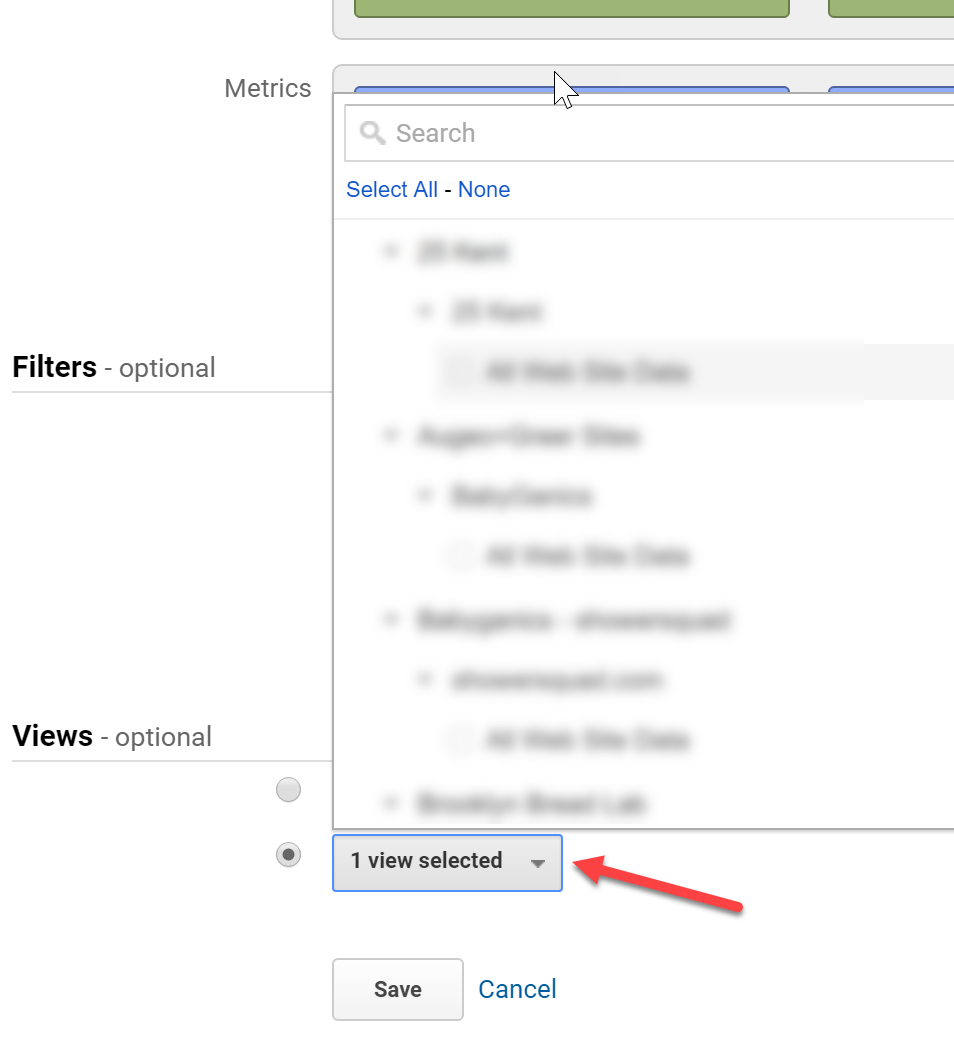
Label the report and hit save.
You can now see all of your campaign platforms and on-site data in one place.
Tell us in the comments what you have done to make tracking Facebook ads in Google Analytics a seamless process?
Content retrieved from: https://easyautotagging.com/tracking-facebook-ads-google-analytics/.
How You Can Use Facebook Ads to Promote Your Blog
Posted on August 13th, 2018
We’ve all heard about the wonders of Facebook ads for our blogs. You’ll find at least one mention of them on any marketing blog you come across.
But what you may not have found is a guide on how to correctly promote your blog with Facebook ads.
You see, Facebook ads are a fantastic way to promote your blog and gain new readers. But most bloggers aren’t aware of the steps needed to convert cold traffic into valuable readers.
If you’re feeling lost, don’t worry. In this post, I’m going to try to cover as much as I possibly can about creating Facebook ads for your blog, and how you can do it correctly.
[video_page_section type=”youtube” position=”default” image=”http://track-n-test.com/wp-content/uploads/2018/08/youtube-banner1.jpg” btn=”light” heading=”” subheading=”” cta=”” video_width=”1080″ hide_related=”false” hide_logo=”false” hide_controls=”false” hide_title=”false” hide_fullscreen=”false”]https://www.youtube.com/watch?v=iR6ATUw0BIU&vl=en[/video_page_section]
But first, you’ll need a Facebook page:
1. Create a Facebook page.
Facebook pages can be an extremely helpful tool to promote your blog.
If you haven’t already, go ahead create your page. Regardless of whether you’ll use it as a social channel or not, you can’t create an ad without one!
Once you’ve created your page, it’s time to log into your Facebook Ad Manager and start creating your ad.
2. Choose an objective.
When you create a Facebook ad, it’s important you use proven formatting techniques to maximize your metrics. Before I go any deeper, let’s start from the beginning:
To create a Facebook ad, go to the Facebook Ad Manager and click on the “Create Ad” button. Once you click the button, you’ll be presented with a ton of different ad campaign goals. For this guide, I’m going to stick with the “Traffic” goal.
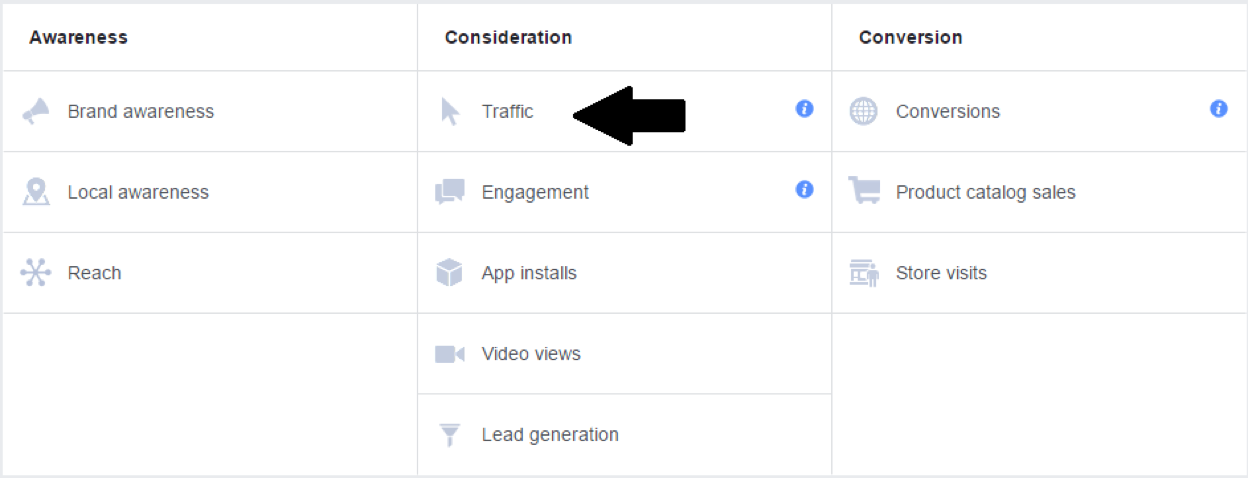
Now, some may argue that Facebook’s “Boost Post” option is better for promoting single blog posts.
Don’t get me wrong; boosted posts are a great way to promote your blog on the fly. However, the “Traffic” objective allows you to have much more control over your ad spend, targeting options, and copy.
Once you’ve set your goal, name your campaign and you’ll be ready to set your budget and targeting options.
3. Set your budget and targeting options.
Setting the budget for your Facebook ad will determine whether you come out broke or with a great ROI, so it’s important that you do it right.
When starting off with a brand new ad, it’s a good idea to set the budget of your advertisement for only $5 a day.
This way, you’ll be able to measure the strengths and weaknesses of your ad without spending a fortune on an under-performing campaign.
Later, it’s likely that you’ll start spending more money on well-performing ads, but I’ll touch on that later.
Now let’s get into the nitty gritty: targeting.
If you didn’t know already, one of the main reasons that Facebook ads are so popular in the marketing world is because if their over-the-top targeting options. Facebook ads allow you to target anyone from Android phone users to church-going reptile owners.
When setting your targeting, it’s important that you aren’t shooting for too broad of an audience. It’s easy to get trapped in the illusion of, “Wider Audience = More Engagement”, but this simply isn’t true.
Think of your audience as a single person. What qualities do they have? What are their interests? Who might they follow on Facebook?
If your ad is being seen by too wide of an audience, chances are you’re not going to be receiving a ton of clicks. And when you aren’t getting enough clicks, you’ll start to pay more for the ones you do get!
As you can see from this chart by AdEspresso, studies show that the lower the relevance of a Facebook ad, the higher the amount of money paid per click:
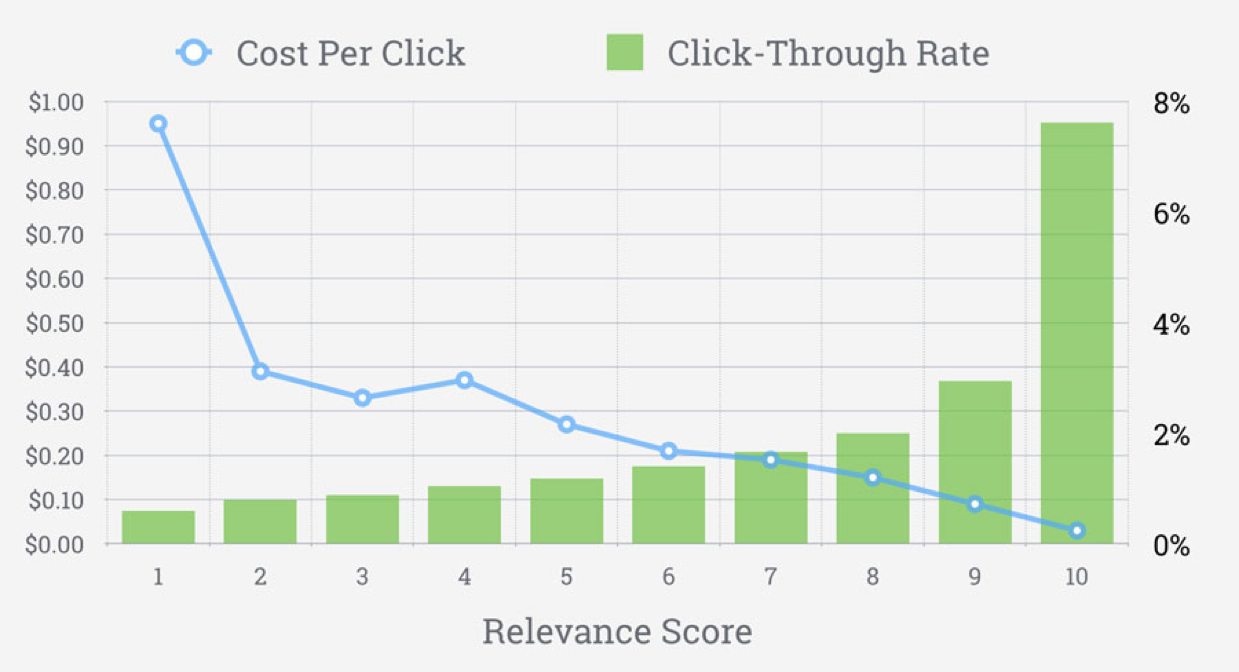
Facebook ads relevance score. Source: Adspresso.com
And I don’t know of anyone who wants to pay more for the same results.
4. Write the ad copy.
Believe it or not, writing the ad text is half the battle.
According to Joanna Wiebe of Copyhackers,
“Everything about the success of your body copy hinges on a single thing: your hook. To find your hook, you need to know exactly for whom you’re writing the ad… and what they care about. Because the goal of the hook is this: make me care.” – From The Beginners Guide to Writing Facebook Ads
When you’re trying to drive cold traffic to your blog, telling your potential readers, “Check out my new blog post! It’s about [topic]… I think you’ll like it!”, will almost never work.
If readers have no idea who you are, there’s little chance they’ll click your links unless they have a good reason to.
So instead of taking the easy route, write a brief and enticing summary of your post that and place it inside the “Text” field of your ad. Here’s an example of what I mean:

Giving readers a glimpse into the problems you’re solving in your post will prove to them that you’re not out there to just take their money.
After you’re finished writing your post summary, come up with an engaging question to ask your target audience at the beginning of your ad.
For instance, if you wrote a blog post called, “5 Easy Methods to Earn New Clients for Your Business”, you could write a question like, “Struggling to find clients for your online business despite putting in hours of backbreaking promotion?” at the beginning of your post.
Asking an engaging question will entice readers to finish reading the rest of your summary. So if you included a call to action at the end of your text, that reader will most likely click to read the rest of your post!
Once you’ve written a killer summary, you’re ready to find a featured image.
5. Choose a featured image.
When creating your ad, it’s important that you’re using images that capture your audience’s attention. This means that using dark colors and bland images is generally not a good idea.
If you look at some metrics from a separate advertisement I ran, you can see that when I used a graphically designed image with light and dark blue colors compared to a stock image with bright warm colors, the stock image received almost 50 more clicks compared to the other post.
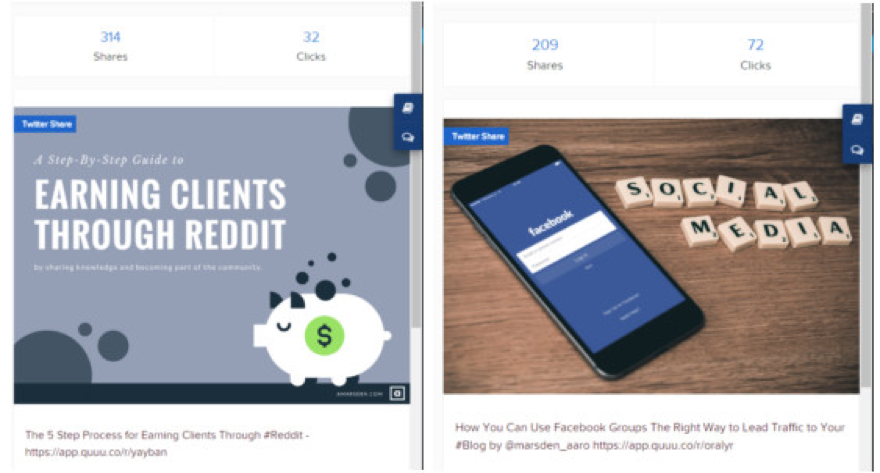
Not only did the brighter image receive 40 more clicks, it also had 100 fewer shares!
Furthermore, Facebook strongly prefers that no more than 20% of an image to be filled with text, so most Facebook marketers choose to use simple stock photos as their featured images.
If you choose to use stock images, be sure that they’re relevant to the topic of your post. Also, be sure that the images you’re using aren’t copyrighted.
To avoid any copyright problems, I use sites like Pixabay and Unsplash to find relevant images for my ads. You can also use Facebook’s built-in stock image library to find safe and pre-formatted images.
Once you’ve got some nice visual content, it’s time to write a killer headline.
6. Write a headline.
As Neil Patel puts it, “The primary purpose of the headline is to get the first sentence read.” And he’s right; without a gripping headline, there’s no real incentive for readers to continue reading your post at all.
The headline of your ad is the very next thing that potential readers are going to see after your featured image. This makes it the perfect place to draw in users and earn their click.
Writing a headline for your Facebook ad is exactly like writing a title for your blog post. It should be short, catchy, and include some relevant keywords from your blog post. If you don’t already have a nice catchy headline, here are some things to keep in mind when writing it:
- Use “How To’s” and “How You’s” in your Facebook headline, followed by a common barrier that most people face when encountering a problem. (ex. “How You Can Promote Your Blog with Facebook Ads Without Having to Spend Money on A/B Testing”).
- Use numbers (ex. “5 Simple Ways…”)
- Keep it short.
- Make it as specific as possible. For instance, let’s say that you wrote about how your target audience can increase their search presence in Google. Instead of saying, “Learn How You Can Rank Higher on Google”, say something like, “Learn How You Can Increase Your Organic Traffic by 50% In Only 2 Months”.
- Try to convey a sense of urgency. You can do this by asking a question (ex. “Are you making these crucial mistakes when trying to promote your blog?”)
If you’re still stuck creating a catchy headline, feel free to use one of the many headline generators on the web. Just be sure that you refinie your results!
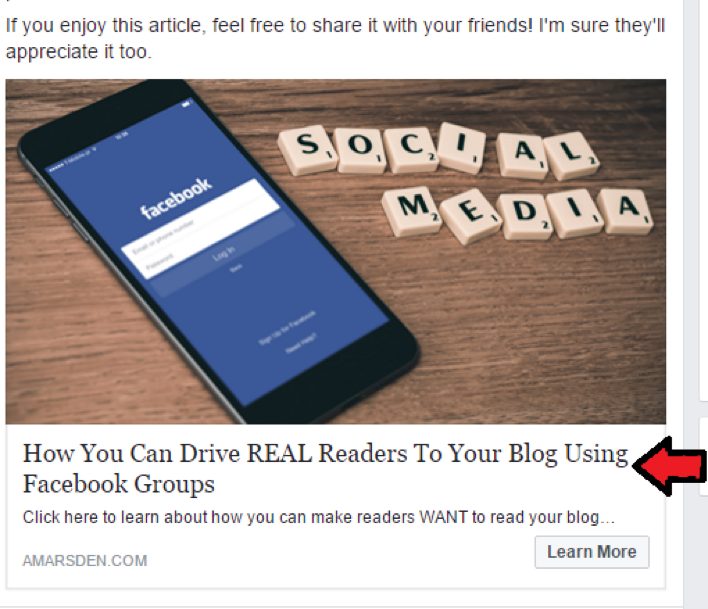
Lastly, include a nice call to action in the News Feed Link Description (NFLD) of your ad.
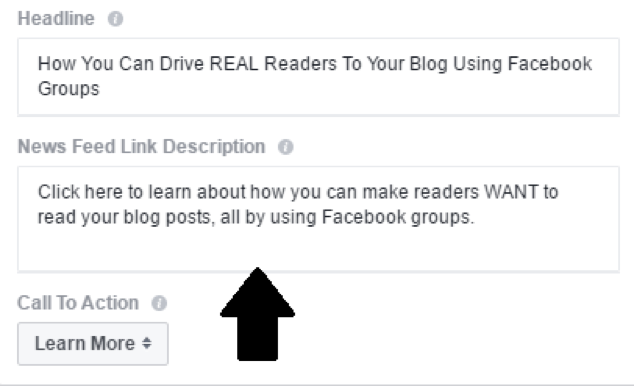
Your NFLD should be a combination of the main idea from your headline and a call to action. For instance, in the ad I created above, my NFLD read, “Click here to learn about how you can promote your blog…”.
Finish your ad off with a proper button that users can click to read your blog post, and that’s it! You’re ready to publish your post.
Yay!
After your post is published, be sure to keep a watchful eye over your metrics. Try your best to analyze what’s working with the advertisement and what’s not.
If you don’t have the budget right now to conduct A/B testing, don’t worry about it. Just focus on bettering your Facebook ad skills and learning, and you’ll be creating great ads in no time.
How have you used Facebook ads to promote your blog? Do you have any useful tips for other bloggers trying to use this platform? Let me know in the comments!
Content retrieved from: https://blog.getresponse.com/facebook-ads-to-promote-your-blog.html.