


5 Key Considerations for Setting Up a Baidu PPC Account
Posted on August 16th, 2018
- Lena Xu
- March 13, 2014

Baidu is the world’s largest Chinese search engine and holds more than a 60% share in the Chinese search engine market. Worldwide, Baidu is the 5th largest destination online, in terms of traffic ranked relative to other sites, based on data from Alexa.com
As such, Baidu presents an attractive opportunity for B2B marketers looking to achieve visibility in the Chinese market. Baidu PPC Advertising is one mechanism for B2B companies to enter Chinese market via online marketing.
Unfortunately, setting up a PPC Advertising initiative through Baidu isn’t as easy as it sounds, especially for those B2B marketers used to Google AdWords and Bing AdCenter; even though the functionality is quite similar, administration is considerably different.
B2B marketers looking to set up a Baidu PPC account should take the following 5 points into consideration:
Baidu Divisions and Resellers Only Accept Local Clients
Baidu “only accepts local clients,” a rule that could help advertisers save lots of time when communicating with various Baidu resellers or Baidu divisions.
 In other words, the Baidu Beijing division or resellers only accept the clients located and marketing in Beijing. They would not even be able to create an account for a client looking to target an audience in Shanghai or even from Shanghai (you have to go through Baidu Shanghai division or Shanghai reseller to do this!).
Foreign companies without an existing Chinese presence “on the ground” need to create the account through Baidu overseas resellers. For example, A US company would need to work with a designated Baidu US reseller for creating a Baidu account; they cannot go directly to Baidu or though the Beijing reseller.
However, there is an exception if a US company has an existing Chinese presence such as a China branch company or China factory. For instance, if a US company has a branch company in Shanghai, and the website it plans to promote on Baidu PPC ads is mainly related to the Shanghai branch company, the company would not be “defined” as an “Oversea client” by Baidu.
If an organization’s annual PPC advertising budget is large enough, it’s possible to create a Baidu PPC account through Baidu headquarters in Beijing, regardless of whether you’re a local or a foreign company. This is called becoming a “Key Account Client.” The minimum ad spend requirements for “Key Account Clients” are different for oversea clients and China clients, and they are also different for the different cities and regions in China. You have to contact Baidu headquarters for more detailed information or to learn about applicable requirements.
Additional Points:
- Providing China Local Presence to Prove You Are a Local Client: If foreign B2B marketers want to prove they’re local clients, they have to provide the relevant information about having a local presence (i.e., a local website link or local certificate of incorporation).
- Complicate Communication Process: The communication process for creating a Baidu PPC account is far more complicated than creating a Google Adwords account. As a result, patience is required when communicating with various divisions or resellers in the process of creating a Baidu account.
[video_page_section type=”youtube” position=”default” image=”http://track-n-test.com/wp-content/uploads/2018/08/youtube-banner1.jpg” btn=”light” heading=”” subheading=”” cta=”” video_width=”1080″ hide_related=”false” hide_logo=”false” hide_controls=”false” hide_title=”false” hide_fullscreen=”false”]https://www.youtube.com/watch?v=IpGcnvo4GmI[/video_page_section]
Certificate of Incorporation
Unlike Google Adwords, Baidu requires that you submit a copy of the Certificate of Incorporation before you apply for a Baidu PPC account (it needs to be written and translated in English and Chinese (Mandarin)).
If you are an overseas company, you also need to provide one local government website, which allows Baidu to get the registration information for your company. Note that right now, Baidu PPC advertising will not accept any kind of lottery or pharmaceutical website advertisements based on Baidu PPC policy.
Sign a Contract
Establishing a Baidu PPC account involves signing a contract, which contains the privacy terms and advertising policy. B2B companies have to agree to these terms and email (or fax) the Baidu division or reseller the signed contract before applying for a Baidu PPC account.
For foreign companies, the commitment of overseas internet clients is essential, which includes the terms of Baidu service and relevant rules; for instance, the keyword selection and website content should comply with the provisions of Chinese law and all the information advertiser submit should be true.
Additional Points:
- Reserve extra business days for the contract signing process: It takes time for the Baidu division or reseller to process the contract. For this reason, B2B companies should reserve extra business days for the contract signing process.
- Translating Work: Foreign companies may need to translate the Chinese contract into an English contract by themselves since some Baidu China resellers may not be able to provide an English contract as well as those who speak English as a first language.
- Legal Terms: Due to the differences between Chinese and Western law (as well as the cultural differences), foreign companies should pay close attention to the legal terms in the contract.
Fee for Account Creation & Down Payment
Baidu requires a company to pay for the account creation fee and pre-pay the down payment for PPC ad spend as well. Sometimes, the fee for account creation and down payment differ based on different divisions and resellers. For example, the down payment for the Baidu US reseller is CNY 5,000 while the down payment for the Baidu Suzhou reseller is CNY 10,000 (this varies year by year).
In addition, most of Baidu resellers require an annual service fee, which cannot be waived for any reason (including whether you need any services or recommendations of account management from them). Usually the annual service fee is CNY2,400/year.
Additional Points:
- Not Only PPC Ad Spend: The Baidu PPC account includes more than the PPC ad spend. A Baidu account management fee = the Baidu account creation fee + the reseller annual service fee + the Baidu PPC ad spend.
- Make Full Use of the “Annual Service Fee”: Do not hesitate to ask Baidu divisions or resellers for more detailed information and recommendations about the Baidu PPC management since, you’ve already paid for the services in your “Annual service fee.”
Payment Methods
The payment process can be inconvenient for a non-China company, since Baidu does not accept any form of international payment methods, including credit cards like Visa or Matercard; overseas third-party platforms like PayPal are also unacceptable.
For this reason, it’s advisable to for foreign companies to use a payment process through their Chinese bank accounts. Otherwise, companies have to transfer the ads budget to Baidu or Baidu resellers directly through international wire transfer.
Additional Points:
- Translating work: As with translating the contract, B2B companies may need to translate the banking account information from Chinese into English by themselves since some of Baidu resellers may only be able to provide the banking account information in Chinese.
- Reserve Extra Time for the Payment Process: It may take some time for banks and the Baidu division (or resellers) to process payments. B2B companies should reserve more time (1-2 weeks) for the payment process, especially for the international wire transfer process (2-3 weeks).
- Converting Currency: Most Baidu resellers accept only Chinese CN Yuan, so B2B companies may need to convert the US dollars into Chinese CN Yuan by themselves.
- Re-funding Contract: B2B companies may need to sign a new re-funding contract if they plan to change the banking account in Baidu PPC payment; however, this depends on different resellers.
Final Thoughts
As can be discerned from the points outlined above, Baidu account creation is not as simple as creating an account in Google Adwords. Nevertheless, Baidu PPC is still one of the most effective and efficient internet marketing tools B2B companies in China and, for this reason, the extra effort may pay off over the long term.
Stay tuned for more tips and recommendations regarding Baidu PPC marketing in the future. If you have any questions or comments about creating a Baidu PPC account, free feel to contact us or share your thoughts in the comments section below.
Content retrieved from: https://komarketing.com/blog/5-key-considerations-for-setting-up-a-baidu-ppc-account/.
How To Track Facebook Ads in Google Analytics [The Easy Way]
Posted on August 14th, 2018
Accurately tracking Facebook ads in Google Analytics consists of two primary steps:
- Clearly defined and consistent UTM Parameters so that you can identify Facebook traffic in Google Analytics
- Import cost, impression, and click data into Google Analytics so that you can map platform and session data
Analyzing performance holistically can be a daunting task given that Facebook and Google don’t always play nicely together.
But as a data-driven marketer accurately tracking Facebook ads in google analytics is crucial to understanding campaign performance.
So let’s explore a method for efficient Facebook ad tracking after we take a look at the current problem.
[video_page_section type=”youtube” position=”default” image=”http://track-n-test.com/wp-content/uploads/2018/08/youtube-banner1.jpg” btn=”light” heading=”” subheading=”” cta=”” video_width=”1080″ hide_related=”true” hide_logo=”false” hide_controls=”false” hide_title=”false” hide_fullscreen=”false”]https://www.youtube.com/watch?v=YGOehkY6VNk[/video_page_section]
Tracking Facebook Ads in Google Analytics is Time Consuming
Reporting works well within the confines of one specific vendor.
Google products, for example, work well together in that they allow the linking of Google Analytics (reporting) and Adwords (advertising platform), enabling one to see all data seamlessly in a single reporting interface.
Although Facebook has become a prominent advertising platform, it does not, like Google, have a diverse product portfolio and does not provide reporting outside of platform-specific metrics.
Note: Facebook does provide a reporting and Analytics Tool that is worth exploring.
Since there is no way to seamlessly connect the two platforms, what are our options?
- Analyze and report on each platform separately
- Map the data in a spreadsheet
- Perform manual exports & GA custom imports
All of these options, even with a sound system in place, can be extremely time-consuming, taking away from analyzing and optimizing campaign performance.
In this article, I will go over three available Google Analytics features that you can leverage when tracking Facebook ads in Google Analytics:
- Data Import
- Calculated Metrics
- Custom Reports
It Starts with Proper Campaign Tagging
Let’s go back to the beginning.
When setting up Facebook campaigns, many digital marketers use the Google Campaign URL builder to generate UTMS that look something like this:
/http://easyautotagging.com/?utm_source=facebook&utm_campaign=Spring%20Launch&utm_medium=cpc&utm_content=lifestyle%20image
Aside from the manual effort required, there is nothing wrong with this approach.
That said, defining the source as ‘facebook’ and medium as ‘cpc’ provides limited insight into audience/targeting performance.
[video_page_section type=”youtube” position=”default” image=”http://track-n-test.com/wp-content/uploads/2018/08/youtube-banner1.jpg” btn=”light” heading=”” subheading=”” cta=”” video_width=”1080″ hide_related=”false” hide_logo=”false” hide_controls=”false” hide_title=”false” hide_fullscreen=”false”]https://www.youtube.com/watch?v=ck5VEYhoUFo[/video_page_section]
Using Available Facebook Campaign Fields
There is a more straightforward way to tag your URLs without having to come up with a unique naming convention for UTM fields.
The easiest way to tracking Facebook Ads in Google Analytics is to create unique naming conventions for your Facebook Campaigns, Ad Sets, and Ads that you then use to tag your UTMs respectively.
Below is an example of what the UTM fields and their respective Facebook values would look like:
Campaign – “Campaign Name”
Source – “Facebook” or “Instagram”
Medium – “Ad Set Name”
Ad Content – “Ad Name”
Note: Using Ad Set Name (read audience) as the medium value can mess with your default and/or custom channel grouping in Google Analytics. You can either modify your channel grouping or map custom parameters to custom dimensions.
There are two ways you can go about tagging your campaigns:
Bulk exports/imports via the power editor
EasyAutoTagging which automates tagging all of your Facebook campaign ad URLs
I go into details of how you can do this in How to Track Granular Facebook Campaign Performance in Google Analytics.
Linking your Google Analytics Account
So, how can you see this data in Google Analytics?
First, we have to import Facebook campaign cost, impression and click data into Google Analytics in one of two ways:
- Manual Import
- Automated Import
Option 1: Manual Import
Without EasyAutoTagging, you are limited to exporting Facebook campaign data daily, weekly, or monthly, then manually importing it into Google Analytics via Data Imports.
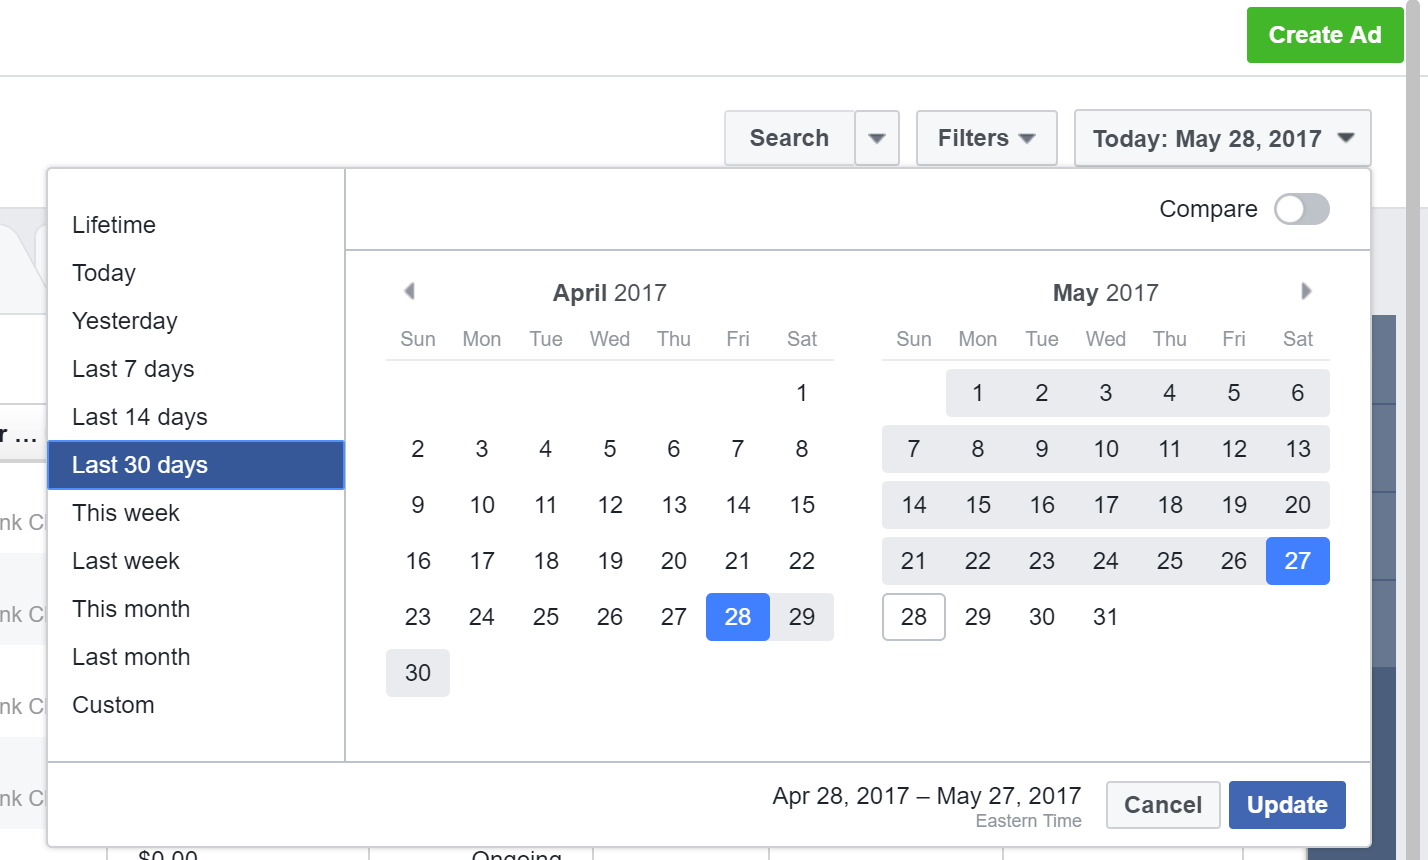
First, go to your Facebook accounts Ads Manager and select your desired date range:
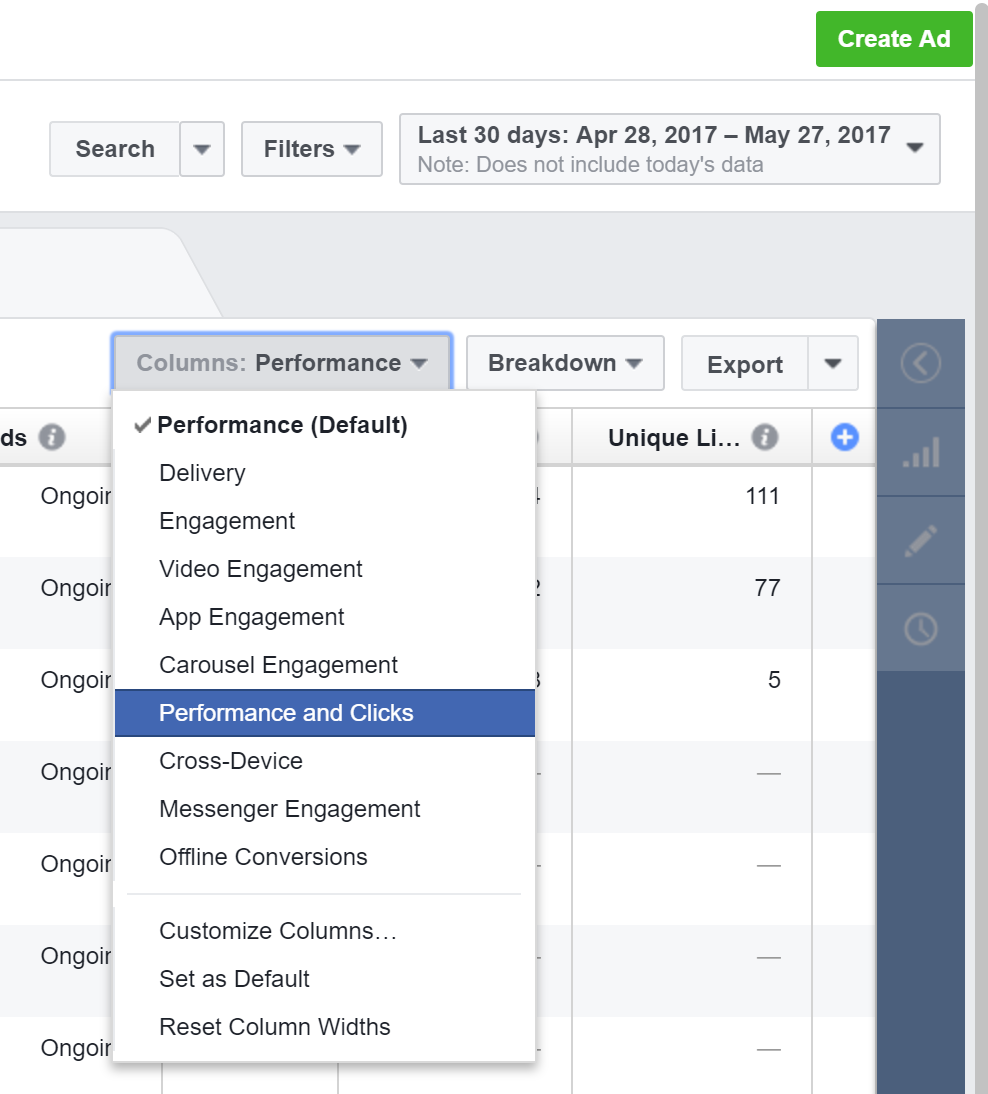
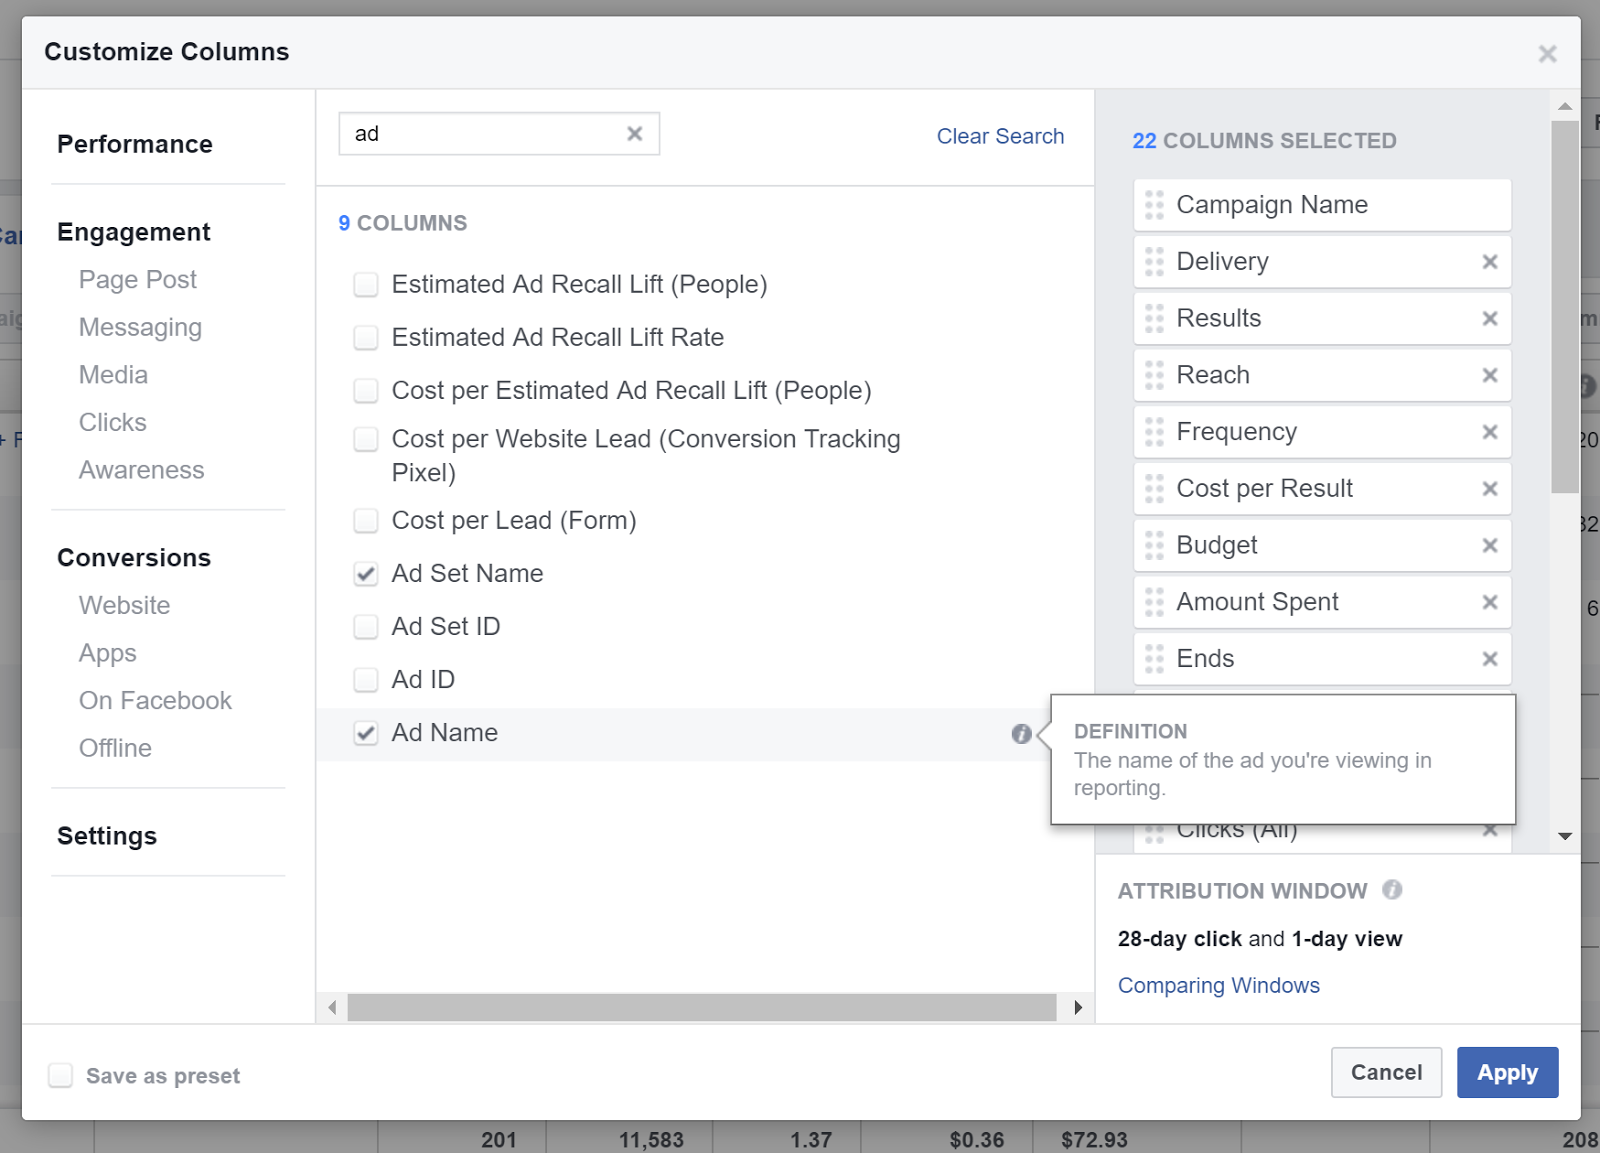
Select the Ads tab across the top and Go to Columns and Select Performance and Clicks:
Customize columns and add Campaign Name, Ad Set Name, and Ad Name:
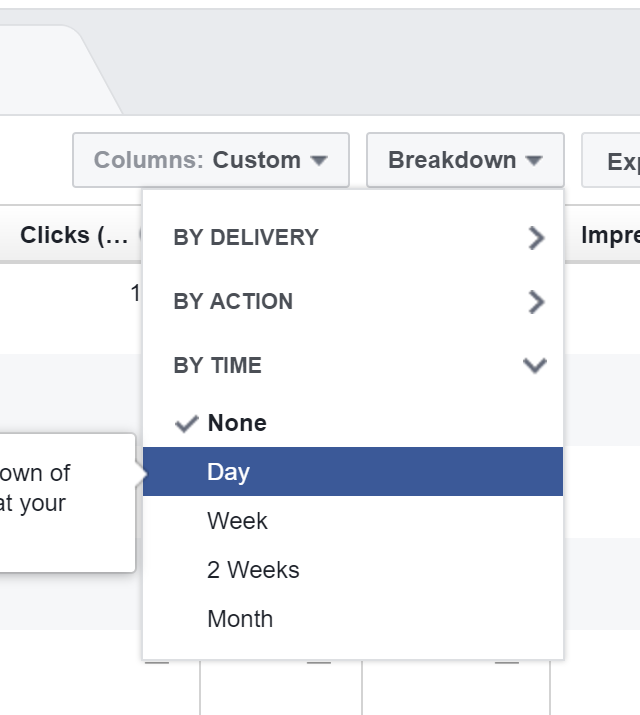
Click Breakdown > by time > Day
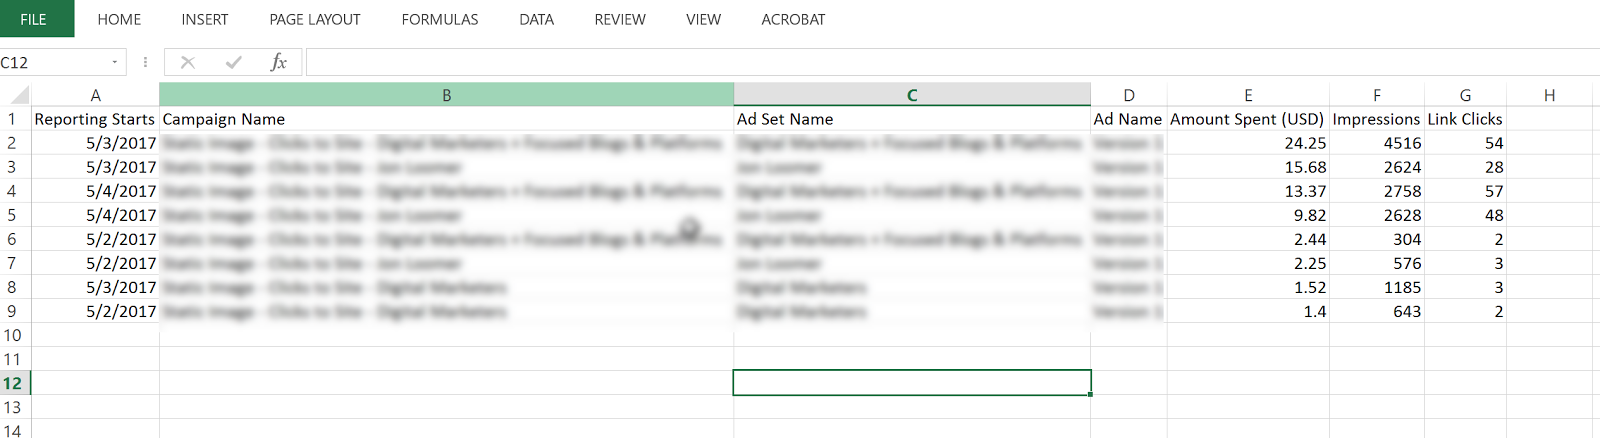
Select the campaigns you would like to import and export these to a CSV file:

Open the CSV and delete all columns except:
Day (Reporting Starts), Amount Spent, Campaign Name, Ad Set Name, Ad Name, Impressions, Link Clicks
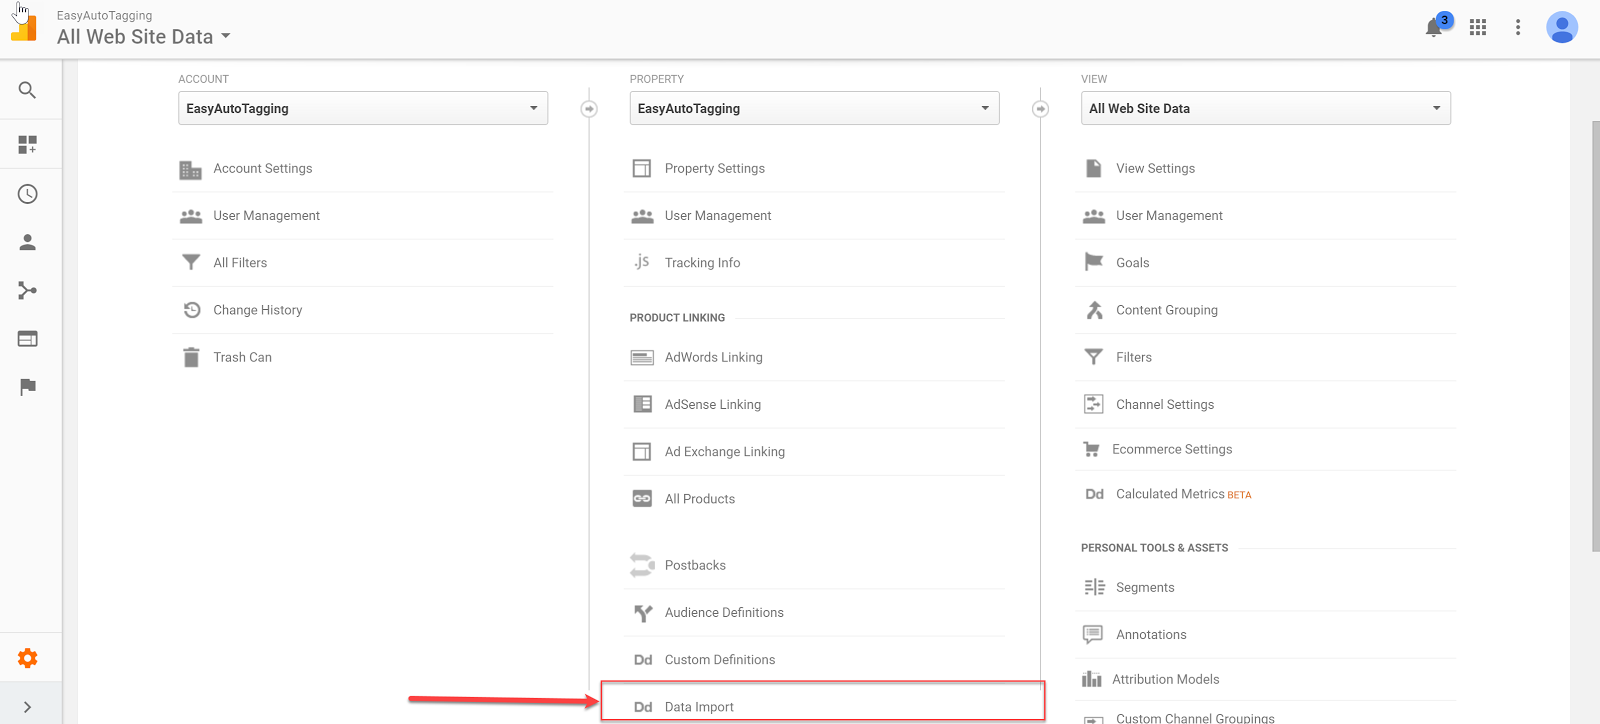
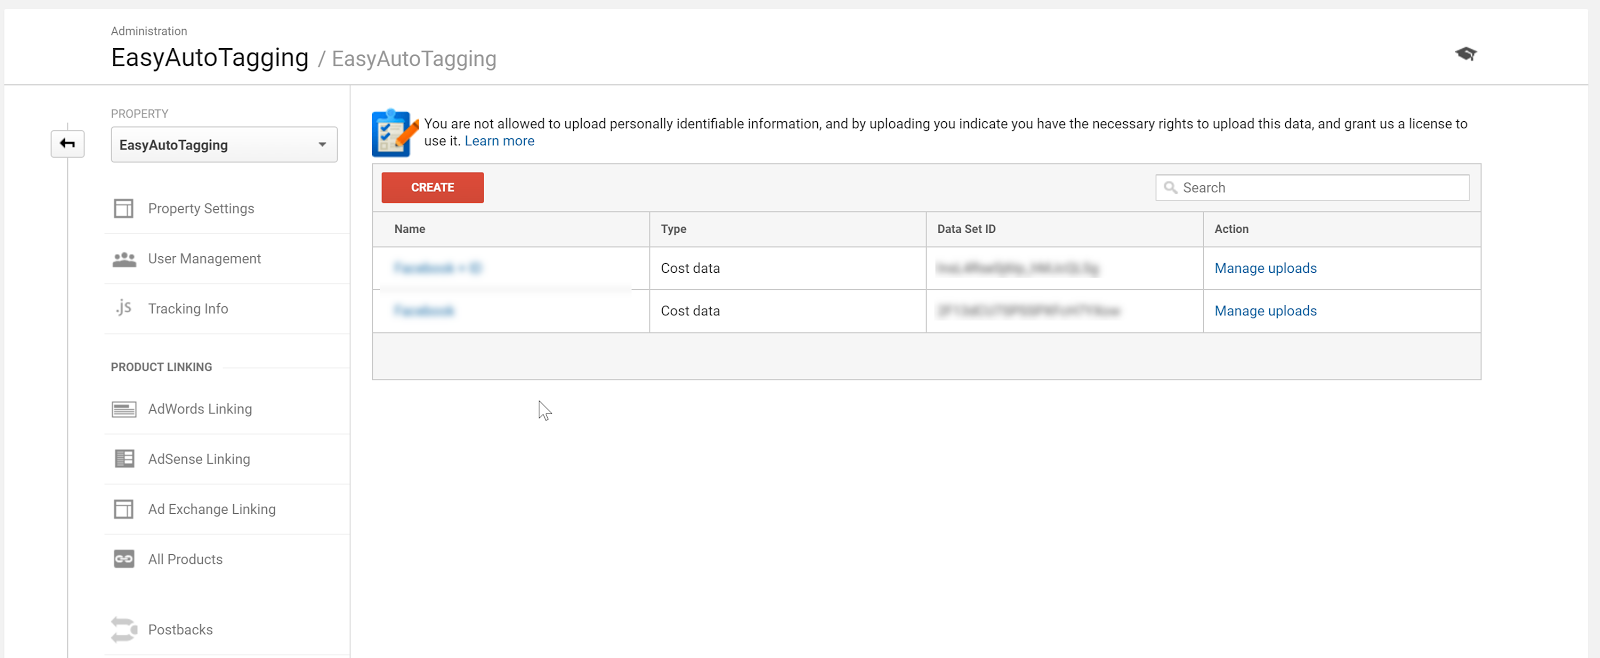
Once you have these cleaned up, head over to Google Analytics and go to Admin > Data Import
Select your cost import dataset. I go into the detail on how to set up cost, impression, click DataSet in Setting Up Cost Data Sets.
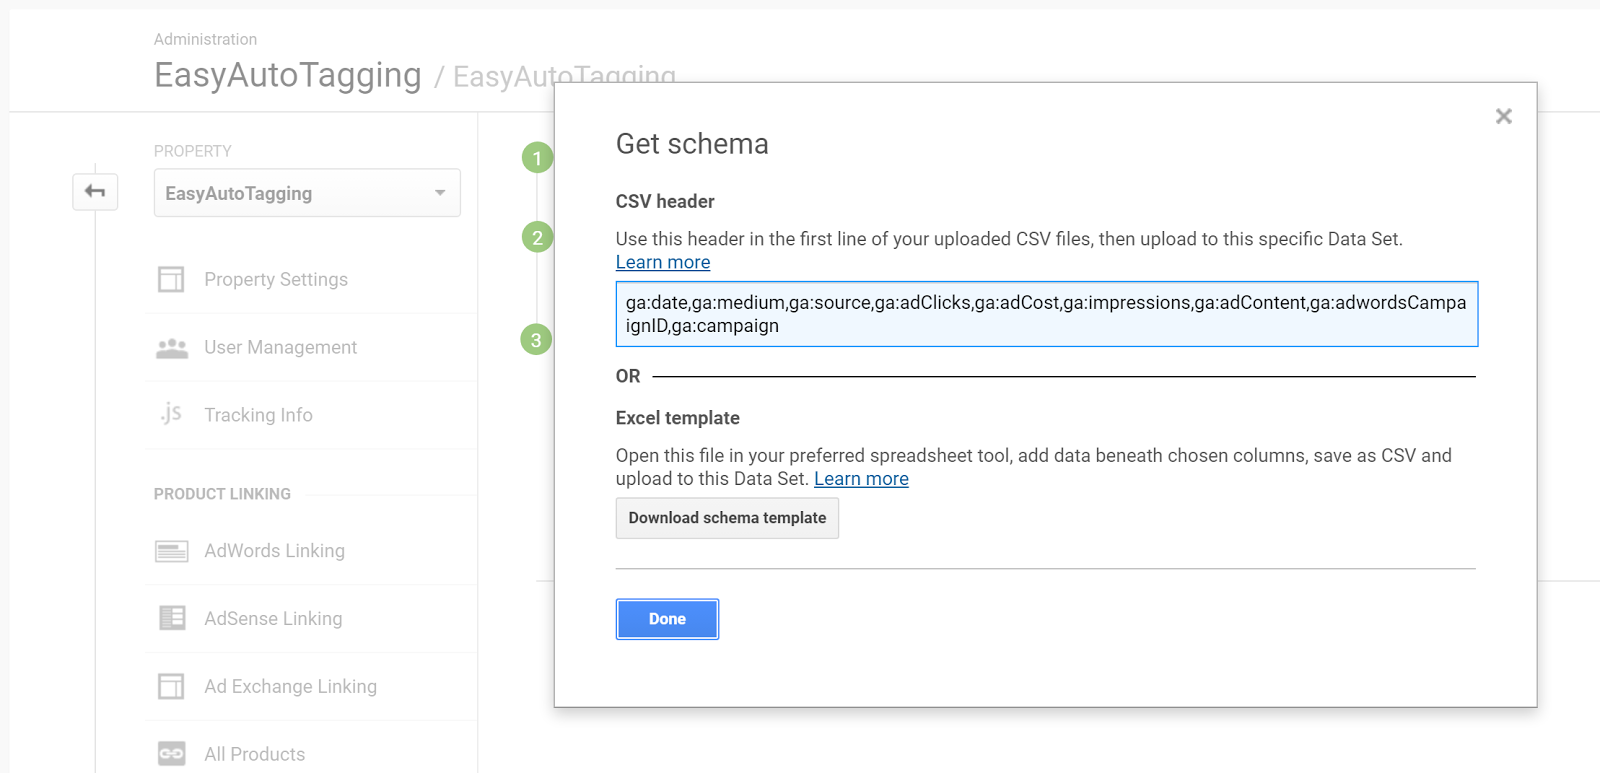
Copy and paste the headers into your CSV respectively of column values.
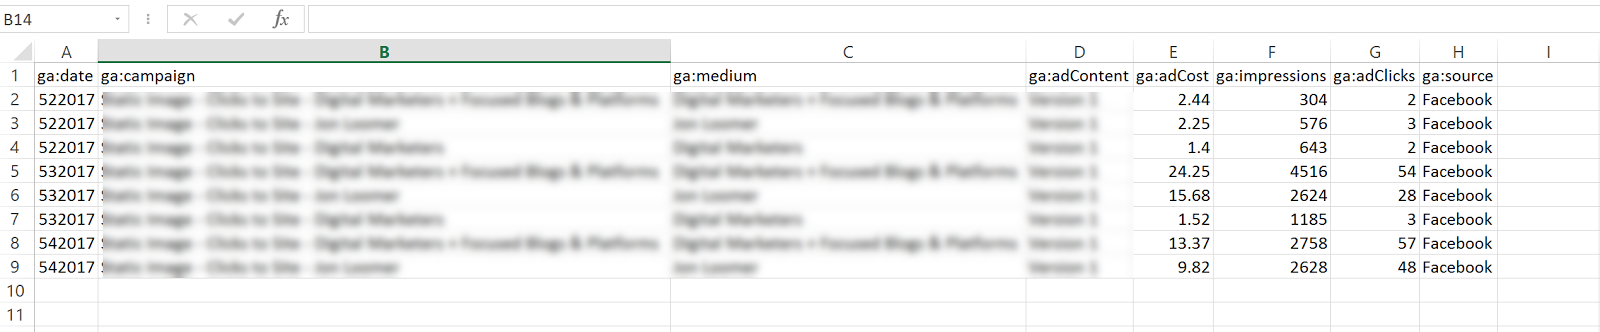
For source, you need to manually add the source as Facebook and/or Instagram depending on campaign/ad set placement.
Format the date column from 5/3/2017 to this 532017
Your final results should look like this:
Go back to Data Imports in Google Analytics and click on manage uploads > Upload File and upload your CSV doc.

Option 2: Automated Daily Import
With EasyAutoTagging’s GA Connector you can easily link your Facebook campaigns to Google Analytics using the same UTM values assigned when generating URL parameters.
Just follow the set up in How to Track Granular Facebook Campaign Performance in Google Analytics
With automated daily imports of your Facebook campaign data, you can now generate detailed insights across platform metrics, and session behavior in a single location when tracking Facebook Ads in Google Analytics.
Ok let’s get started:
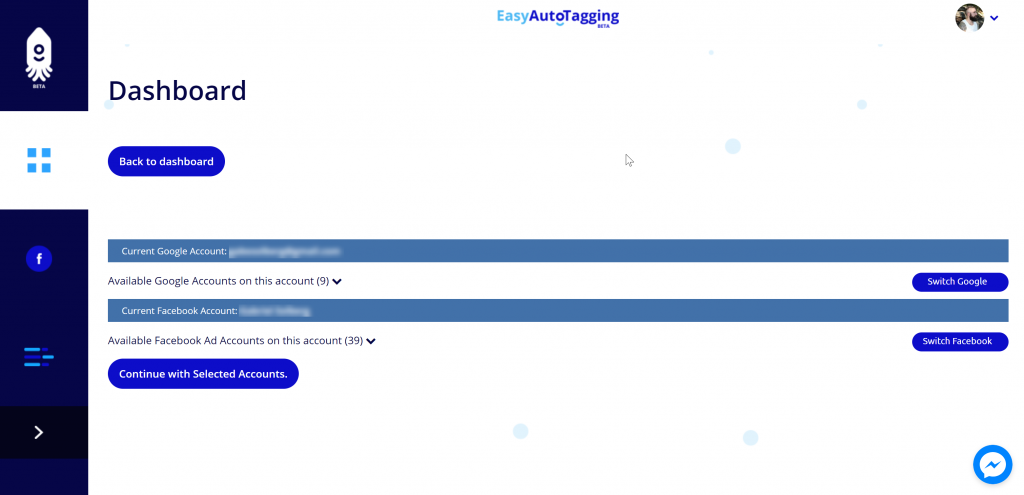
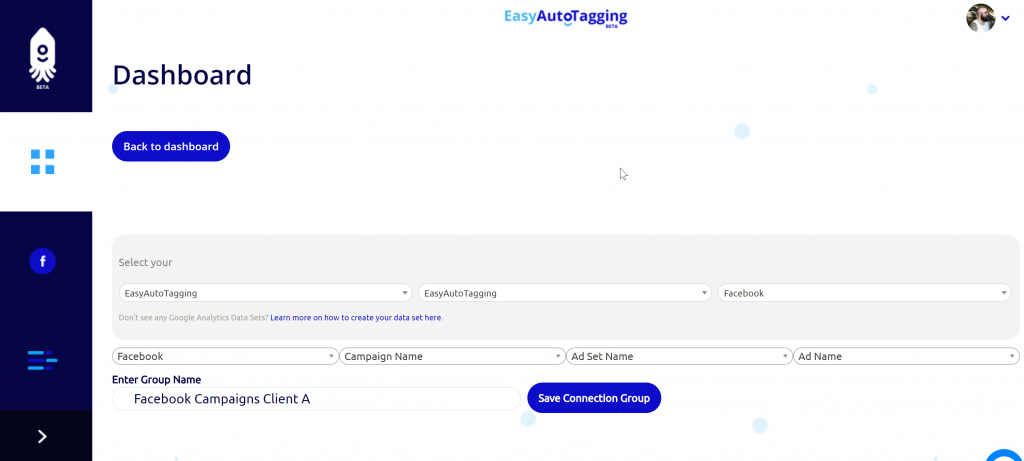
Log in to EasyAutoTagging.
Create a new connection group and connect to your desired Google Analytics and Facebook accounts.
Click continue.
Next select your Google Analytics Account, Property and DataSet and define your Parameter Values. (source, medium, campaign, content)
Note: You can choose a pre-defined or enter custom parameter values. To ensure proper mapping, please make sure that you import parameter values exactly match your defined UTM parameter values.
Assign a name and save the Connection Group.
Note: If you do not have a data set created you need to create one in Google Analytics first. You can see how to do this in Setting Up Cost Data Sets
Once you saved the connection group, you can add facebook campaigns as needed.
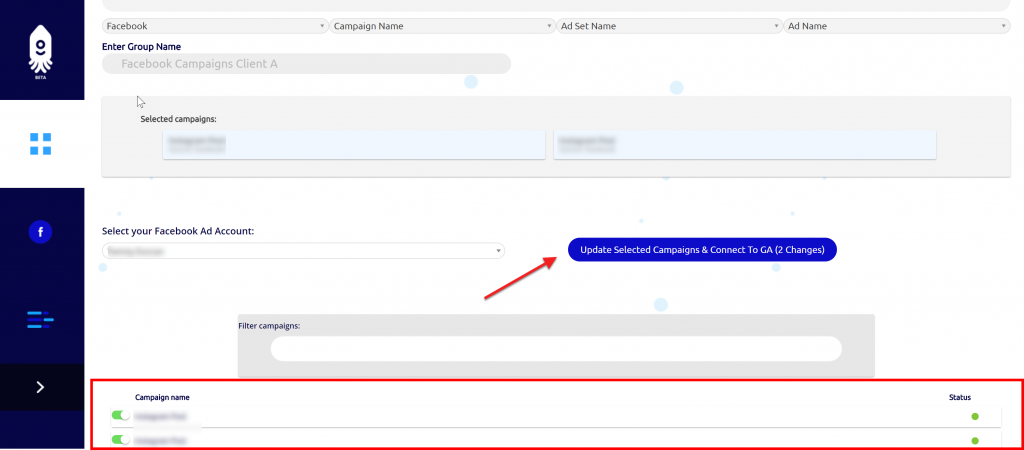
You will get notified via email once the initial upload of all campaign data to date has completed and all connected campaigns will continue to import data daily.
Seeing the data in Google Analytics
Ok, now that we have all campaigns tagged and are tracking Facebook Ads in Google Analytics, where can we see our Facebook ad analytics?
Let’s start with two default views that Google Analytics gives us:
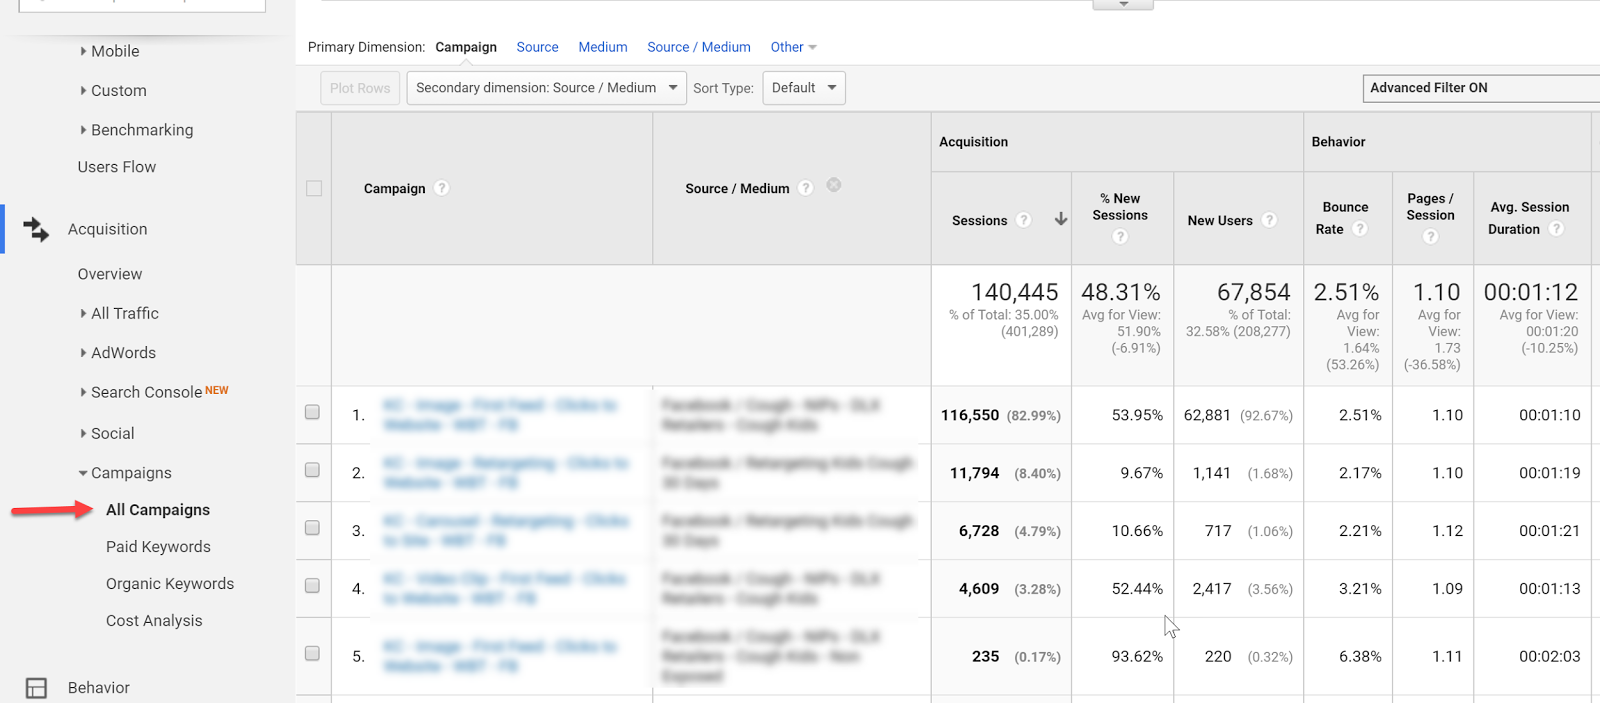
Campaign View
In the campaign view, we can see an overview of campaign performance.
For more granularity, we can add secondary dimensions to see ad content or source/medium breakdowns.
Cost Analysis View
The Cost Analysis View shows cost, impression, clicks, CTR, CPC, and some primary on-site metrics on a campaign and/or source/medium breakdown allowing us to analyze platform alongside sessions data.
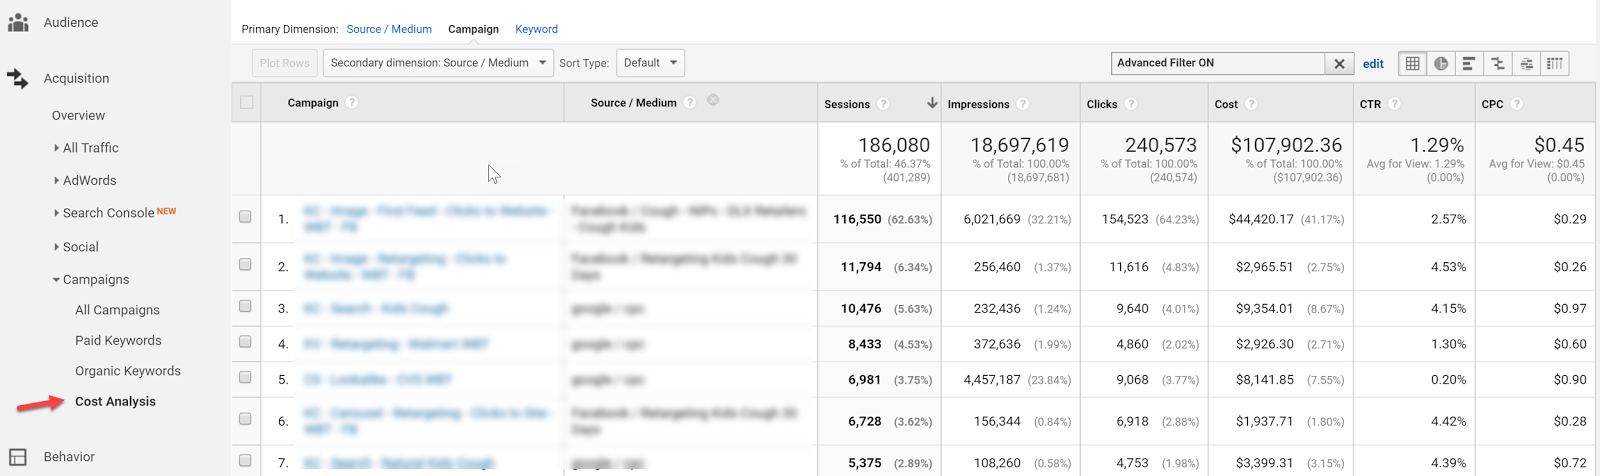
Both of these views, although isolated from each other within Google Analytics, can already provide a wealth of insights, but let’s take tracking Facebook ads in Google Analytics one step further with Calculated Metrics and Custom Reports.
Calculated Metrics
Google defines Calculated Metrics as follows:
Calculated Metrics are user-defined metrics that are computed from existing metrics and drive more relevant analysis and enable greater actionability without leaving the product.
Ok, so here are a few example metrics that we might want to see in our reports.
Note: Keep in mind that one can only create 5 calculated metrics per view in the standard Google Analytics version.
CPV – cost per visitor (this will always be different than CPC since many platforms have a clicks to session drop off up to 25%)
Goal
CP Goal
Goal Conversion Rate
Let’s get started…you can find calculated metrics in your Admin section
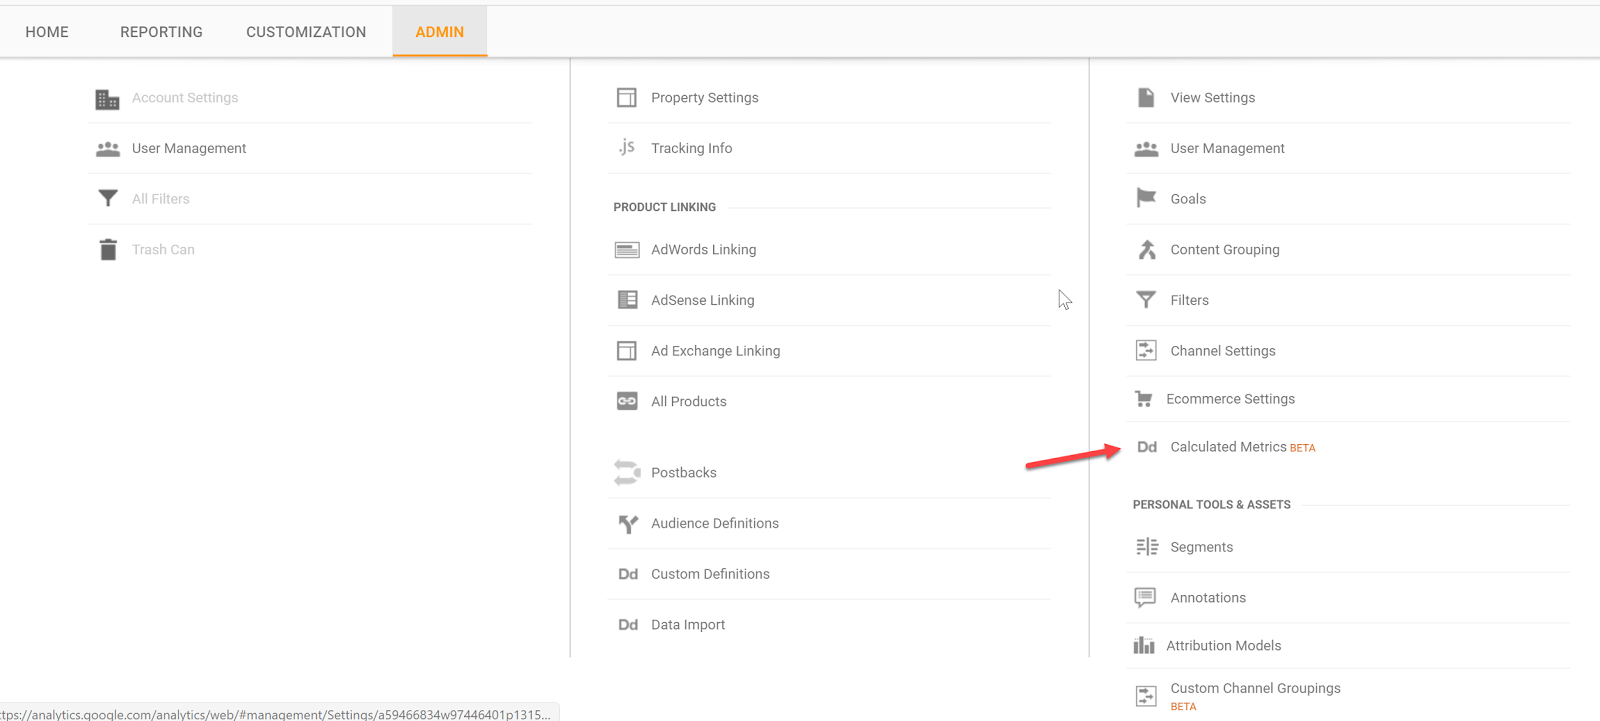
Add a new custom calculation, call it CPV and define the formatting type as Currency (Decimal):
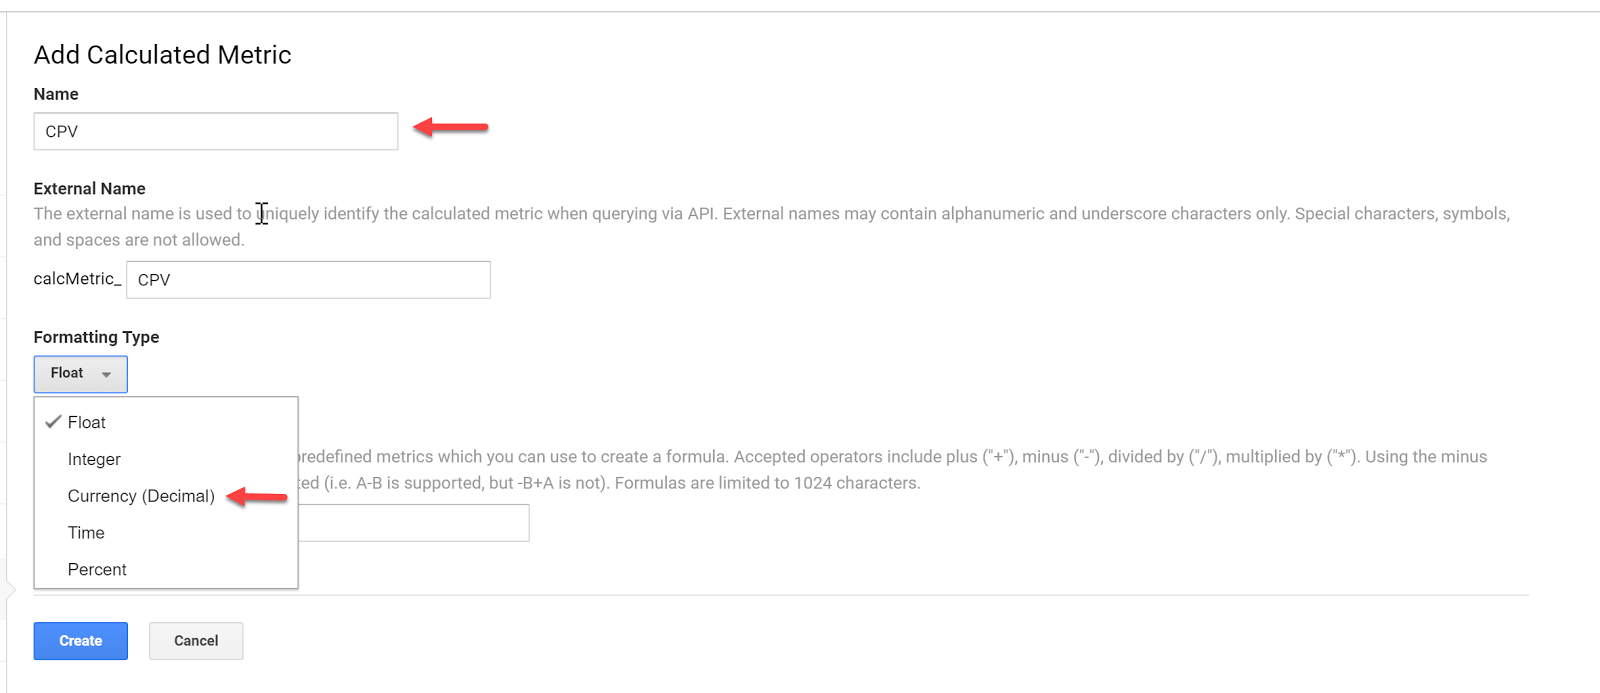
Enter the formula and click Create:

Do the same for your specific goal conversion rate and cost per conversion. In this case, we will use engaged user.
Now that we have the custom calculations in place, we can go ahead and set up our custom reports.
Custom Reports
Having all data aggregated doesn’t mean you have to use Google Analytics for reporting – it just makes it easier to pull all your Google Analytics Facebook data from one place.
But for the sake of this article, let’s stick with custom reports within Google Analytics.
Let’s go ahead and set up a custom report.
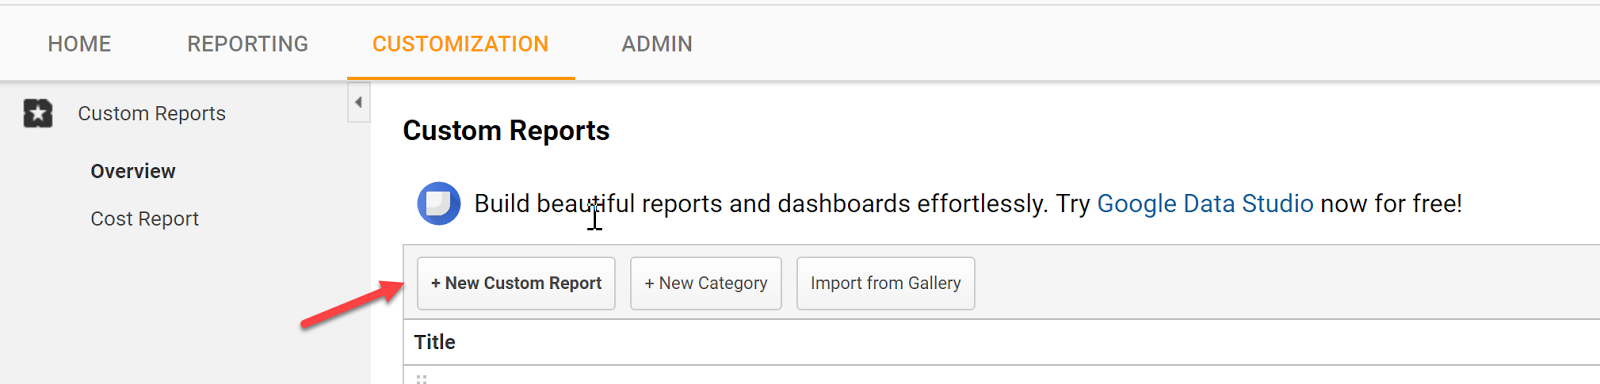
Go to Customization and click create a New Custom Report
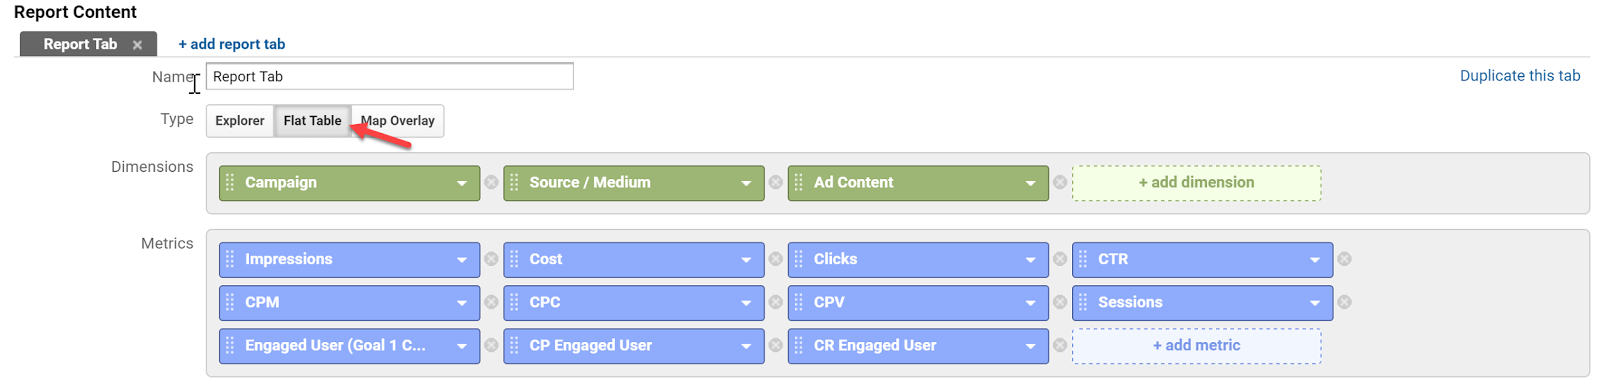
Select a Flat Table and add:
Dimensions:
Campaign | Source / Medium | Ad Content
Metrics:
Impressions | Cost | Clicks | CTR | CPM | CPC | CPV | Session | Engaged Users | CP Engaged User | CR Engaged
Apply Filters as needed:
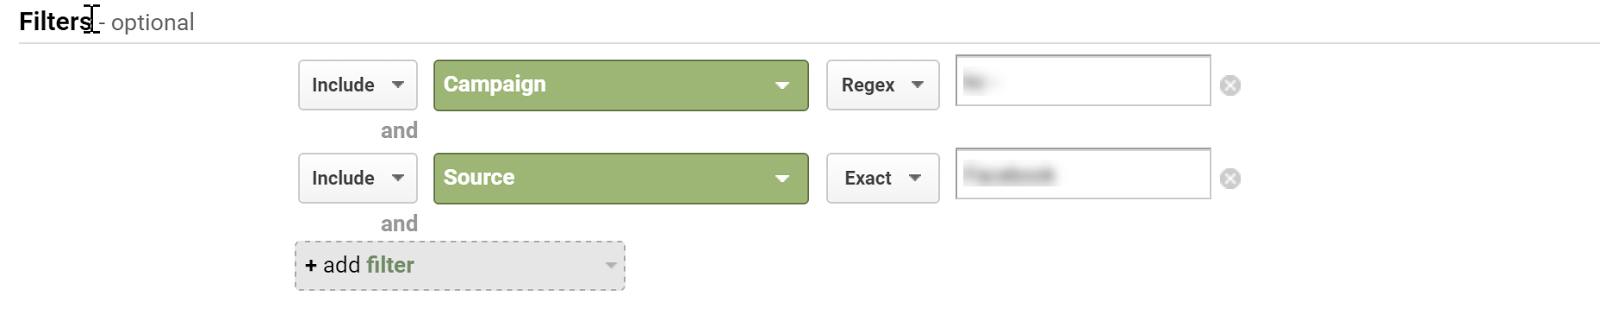
Select your view:
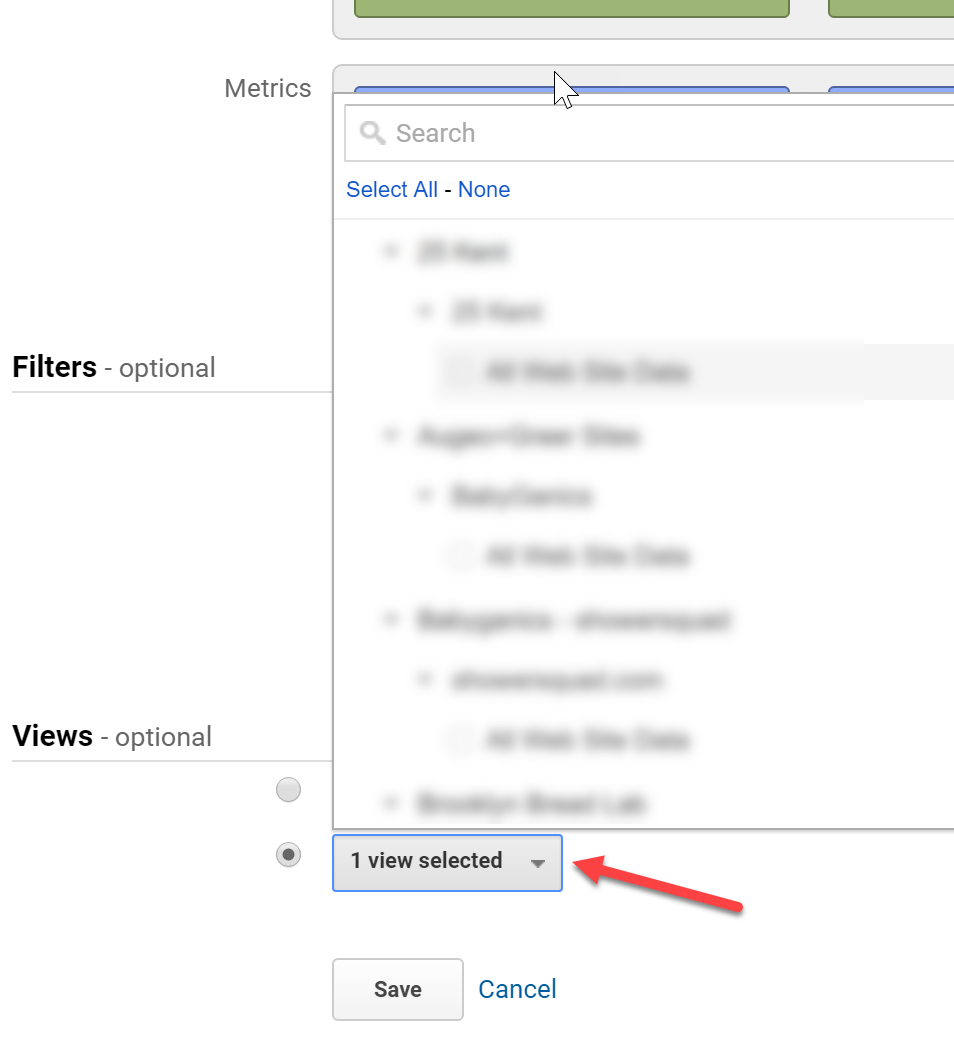
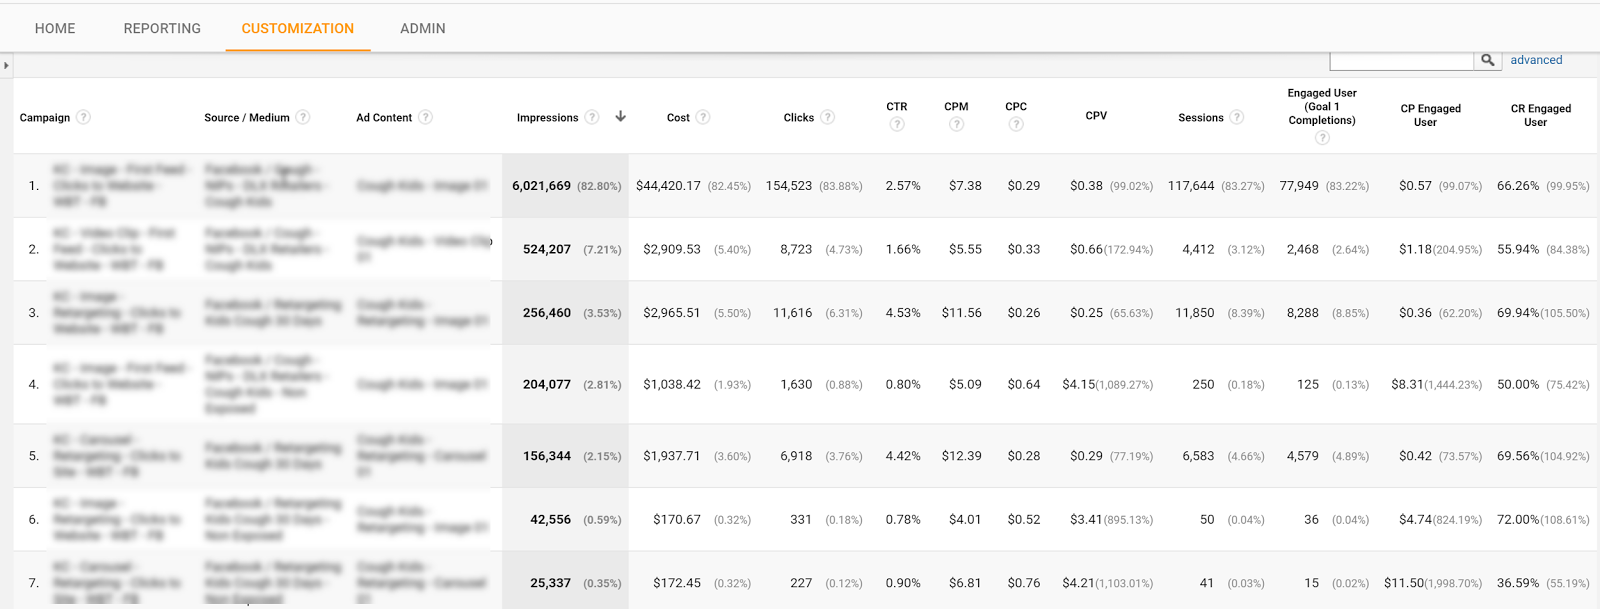
Label the report and hit save.
You can now see all of your campaign platforms and on-site data in one place.
Tell us in the comments what you have done to make tracking Facebook ads in Google Analytics a seamless process?
Content retrieved from: https://easyautotagging.com/tracking-facebook-ads-google-analytics/.
How to Increase Pageviews and Reduce Bounce Rate in WordPress
Posted on August 12th, 2018
Before we start
Lets cover some basics regarding terminology and technology. Bounce rate represents the percentage of visitors who enter your site and “bounce” (leave the site) rather than continue viewing other pages within the same site. Page view is a request to load a single page on an internet site. We use Google Analytics to track our data. You are welcome to use another analytics service, or you can simply install google analytics in your WordPress site.
Now that we have taken care of the basic terminology, you are probably wondering why the heck do these numbers matter?
If you are running a site that is primarily monetized by banner ads, then the number of pageviews matter. If you are trying to build a loyal audience, then the number of bounce rate matters. Also the lower your bounce rate, the better ads eCPM (cost per thousand) or CPC (cost per click) you will get. When the same user views the next page, your ad provider most likely has a better ad to serve them thus giving you a higher eCPM or CPC.
We have consulted with a lot of clients helping them increase their pageviews and reduce bounce rates. We have also done a lot of experiments on our own sites like List25. So all the methods that we will share are the ones that we have used in the past and know that they work.
P.S. These techniques will ONLY work if you have Good Content.
[video_page_section type=”youtube” position=”default” image=”http://track-n-test.com/wp-content/uploads/2018/08/youtube-banner1.jpg” btn=”light” heading=”” subheading=”” cta=”” video_width=”1080″ hide_related=”false” hide_logo=”false” hide_controls=”false” hide_title=”false” hide_fullscreen=”false”]https://www.youtube.com/watch?v=lxgE4HgXJ1g[/video_page_section]
Interlink Your Posts
Anytime that you can interlink your other posts within the post content, you are going to see an increase in pageviews. In WordPress 3.1, interlinking got even easier because you can simply search for the post you want to link while adding links. Interlinking techniques work great when you have a site with a lot of articles. If you are just starting out, then you will be a bit limited. So how do you go back and interlink older articles when you have something new? You can manually do it, but it will take some time. There are plugins that lets you automatically link keywords in WordPress (Although that article is showing you how we did this for affiliate links, you can use it for internal linking purposes as well). Not only does interlinking help you increase pageviews and reduce bounce rates, it also helps with SEO as well.
If you want to see an example of interlinking, then just look at the paragraph above.
Show Related Posts After the Post
One of the main reasons why the user leave your blog after reading the post is because you are not showing them what to do next. By showing the user with a list of “related posts” or “other popular posts”, you may get them to go on to visit another post in your site. There are a lot of ways you can add related posts to your blog. You can use a plugin called YARPP that has its advanced algorithm that picks the related post. You can show related posts by category or tags without using a plugin. You can also show related posts by showing other posts by the same author.
Show Excerpts on Front / Archive Pages
Showing excerpts on front/archive pages have two advantages. First, it decreases page load time. Second, it helps increase the pageviews. You should almost never show full posts on your front page or archive page. Imagine having like 25 images in one post, and then have 5 of those on one page. It would be a horrible user experience because of (slow load time and super long page) which would make the user leave your site. We have a tutorial on how to display post excerpts in WordPress themes. Most good theme frameworks like Genesis, Thesis, Headway etc. already have this option built-in.
[video_page_section type=”youtube” position=”default” image=”http://track-n-test.com/wp-content/uploads/2018/08/youtube-banner1.jpg” btn=”light” heading=”” subheading=”” cta=”” video_width=”1080″ hide_related=”false” hide_logo=”false” hide_controls=”false” hide_title=”false” hide_fullscreen=”false”]https://www.youtube.com/watch?v=th_CMRGAmYw[/video_page_section]
Splitting up Long Posts
Are you writing a super long posts? Well, you can split it into multiple pages using the WordPress <!–nextpage–> tag in your post. Simply add it wherever you want, and your post will split into multiple pages. You can see an example of how we split our posts into two pages or even into five pages. You have to be very careful when doing this because if you do not have a sufficient amount of content on each page, then the user might get pissed of. We have seen a lot of big name sites like Forbes, NY Times, Wall Street Journal and others utilize this technique.
Interactive Sidebar
Your sidebar can play a crucial role in increasing pageviews and reducing bounce rate. You can show your popular posts in the sidebar. You can even customize it to show popular posts by week, month, all time. You can also show your most recent posts only on single post pages. We have seen sites that create custom images to navigate to specific posts of theirs. You can integrate other sections of your site in your sidebar for example look at our WordPress Coupons section or the gallery section in the sidebar.
Encourage Random Browsing
On List25 we created a feature called I’m Feeling Curious. When a user clicks on this button, they will be redirected to a random post in WordPress. We put the button in our header bar which was a very hot spot. After seeing good results, we ended up putting it on WPBeginner as well and called it Explore.
[video_page_section type=”youtube” position=”default” image=”http://track-n-test.com/wp-content/uploads/2018/08/youtube-banner1.jpg” btn=”light” heading=”” subheading=”” cta=”” video_width=”1080″ hide_related=”false” hide_logo=”false” hide_controls=”false” hide_title=”false” hide_fullscreen=”false”]https://www.youtube.com/watch?v=0j8RrMJ5oeQ[/video_page_section]
Results
When we started out List25, we faced a lot of criticism. People were saying that sites like these fail to grow because it is hard to keep a loyal audience. We asked around and a lot of people who had done something similar in the past reported that the bounce rate for a siimlar site was soaring in 80% range. Average user would view only one page per visit and leave. We started the site out to get some base data. Our bounce rate was in the 75% range. We slowly started implementing the changes mentioned above. Bounce rate decreased from the average of 76% to 42%. Our pageviews per visit increased to 2.79 / pages per visit. Average time spent on page went to the average of 3 minutes and 40 seconds << This is the average time spent for our 1 million unique visitors! What are you doing to increase pageviews and reduce bounce rate? Share with us.
Content retrieved from: https://www.wpbeginner.com/beginners-guide/how-to-increase-pageviews-and-reduce-bounce-rate-in-wordpress/.
How to Set Up Shopify Ecommerce Platform
Posted on August 3rd, 2018
Not without the reason, Shopify (our full Shopify review here) is one of the most popular online store solutions out there. It’s main benefit? For a very affordable price, it lets you build a functional online store all by yourself. And not just any online store … what I’m talking about here is a truly quality result. Something that looks and works just like a pro would have built it.
So, in this tutorial, we’re going to discuss how to set up your first eCommerce store on Shopify. We’re covering the entire process, from a blank canvas to a fully functional eCommerce store ready to welcome your customers.
(This guide – “How to set up your eCommerce store on Shopify” – has been written with the beginner in mind, no coding or website building skills needed.)
But first…
What is Shopify?
Shopify is a complete, all-in-one eCommerce solution. Once you sign up for an account with Shopify, it allows you to:
- Build your online store all by yourself.
- Pick a design that suits your needs.
- Pick a unique name and domain for your store.
- Add your products and their details (price, description, etc.).
- Process orders from your customers.
- Handle online payments through solutions like PayPal and others.
- Run special promotions, discounts, and sales.
- And much more.
At the same time, Shopify is a way more affordable choice than hiring someone to build the store for you. Not to mention that it’s also more reliable over the long haul (the software itself is constantly upgraded, and there’s great customer support available).
To learn more about the ins and outs of Shopify, and find out whether or not it’s the perfect solution for your specific needs, feel free to visit our review. There, we point out all the pros and cons of Shopify and discuss the most important characteristics of the platform.
Table of Contents
- 1 What is Shopify?
- 2 How to get started with Shopify
- 3 How to set up your first online store with Shopify
- 4 Picking a design for your Shopify eCommerce store
- 5 Setting up page content in your store
- 6 Important things not to forget
- 6.1 Selecting a domain on Shopify
- 6.2 Enabling online payments within Shopify
- 7 How to make your Shopify store public?
How to get started with Shopify
Although this might seem hard to believe at first, in order to get started and set up your eCommerce store with Shopify, all you need is an hour of your time.
First, go to shopify.com and click the “Get started” button:

After that, you’ll be taken to the sign-up form. Just a classic thing … you’ll need your email, password, and a name for your store. I went with “Hats R Great”:
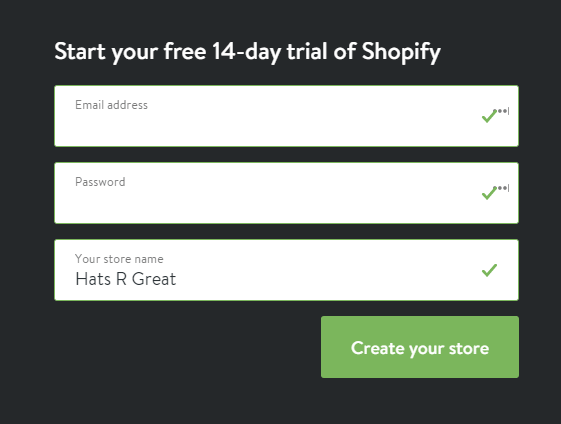
As you can see, there’s a free 14-day trial here, so you don’t need to spend any money to test things out and see if Shopify really fits you and your eCommerce store.
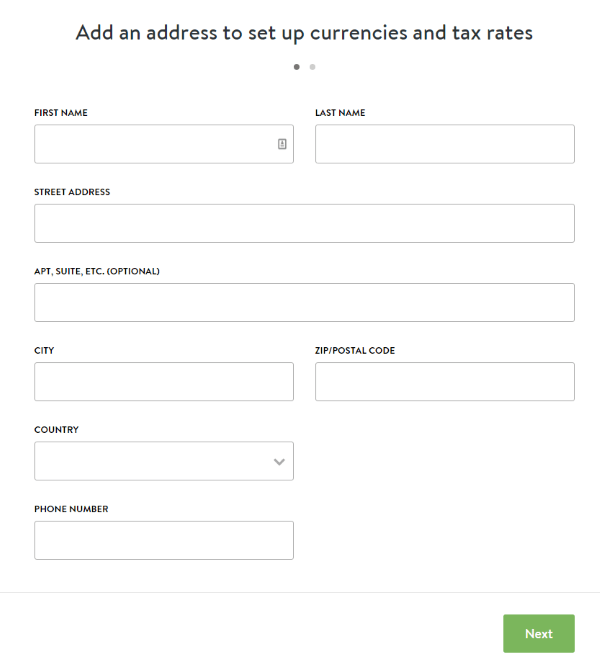
The next step is an important one from a legal point of view. Basically, if you want to operate like an actual store, you need to provide some details about your business.
Just a common web form:
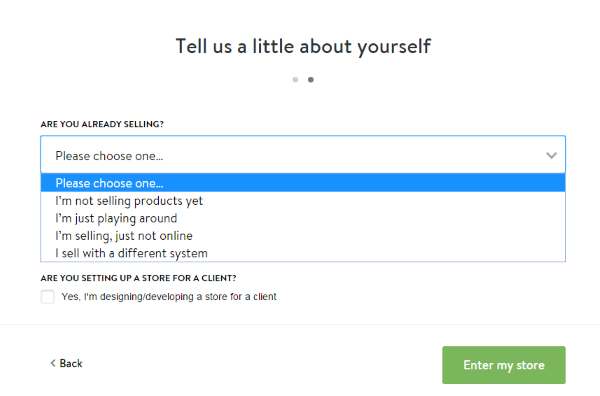
After you click “Next,” Shopify will ask you about a handful of additional business details. Based on what you select, Shopify will try to optimize your experience going forward:
At this stage, it’s time to start setting up the parameters of your new eCommerce store on Shopify.
How to set up your first online store with Shopify
Let’s start with looking through the main dashboard of Shopify:
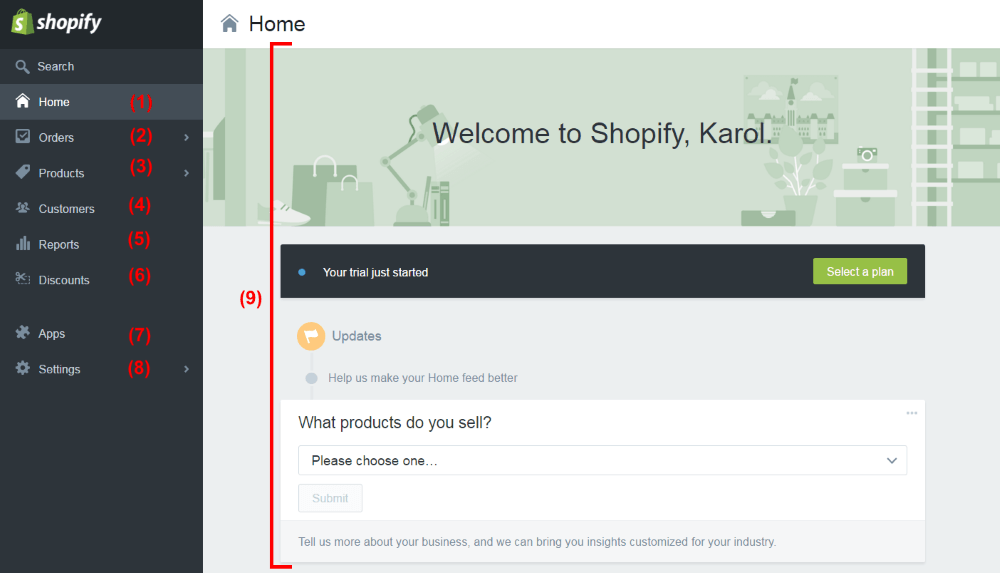
- (1) The homepage of your dashboard. It’s where you can get to the details of what’s going on with your Shopify store.
- (2) It’s where your first orders will show up, and where you’ll be able to manage every incoming order.
- (3) It’s where you can add and manage your products, inventory, product collections, gift cards.
- (4) It’s where you can manage your customers and every piece of info you have about them. This includes their past orders, their personal details, their stats (e.g. sales volume), and much more.
- (5) It’s where you can generate all kinds of reports about your store’s performance.
- (6) It’s where you can create discount codes and distribute them to people.
- (7) It’s where you can install new apps and extend Shopify with new functionality. Really cool stuff. For instance, you can install an app for SEO, for email marketing, and so on. Particularly useful for advanced users.
- (8) This is where all settings related to the store can be found. This includes things like your personal info, payments settings, checkout settings, taxes, shipping, and more.
- (9) The main screen of each panel.
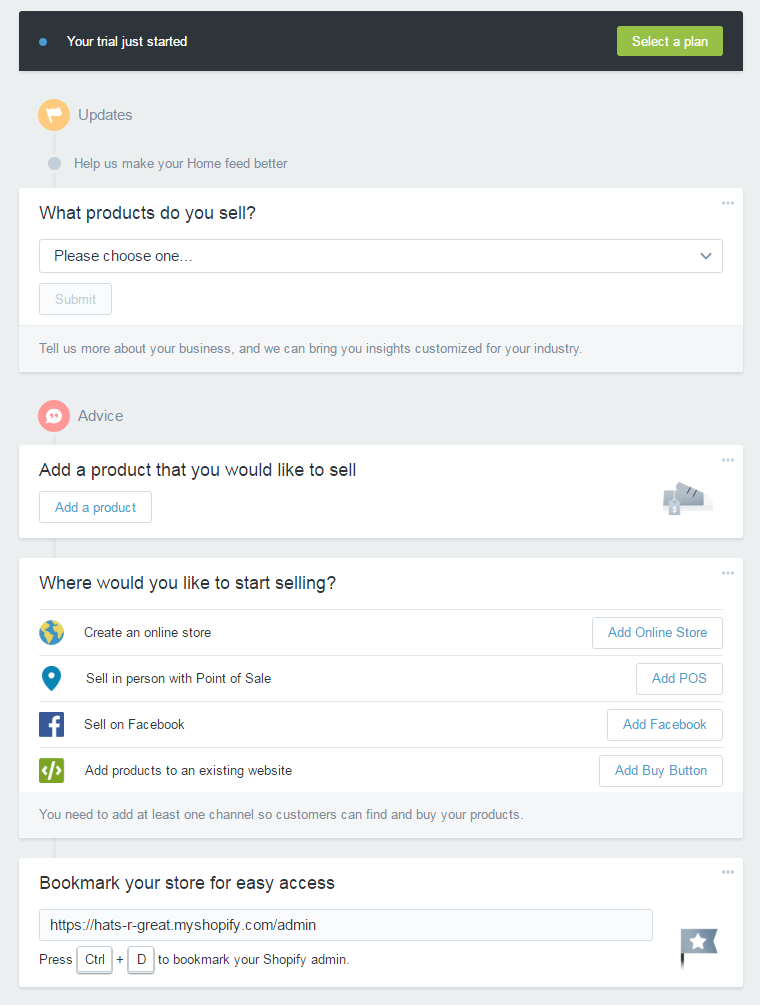
Let’s stop on that last item for a minute. When you visit the dashboard for the first time, Shopify will present you a list of actions that you can take to fully customize and launch your store to the public. Let’s do that.
In the case of my new store, here’s what Shopify tells me to do:
- From the first drop-down, I’m going to select “Fashion and Apparel.”
- Then, I’m going to add my first product. Just click on the “Add a product” button that you can see above. Shopify will then take me to the “Add product” page, where I’m able to complete the process:
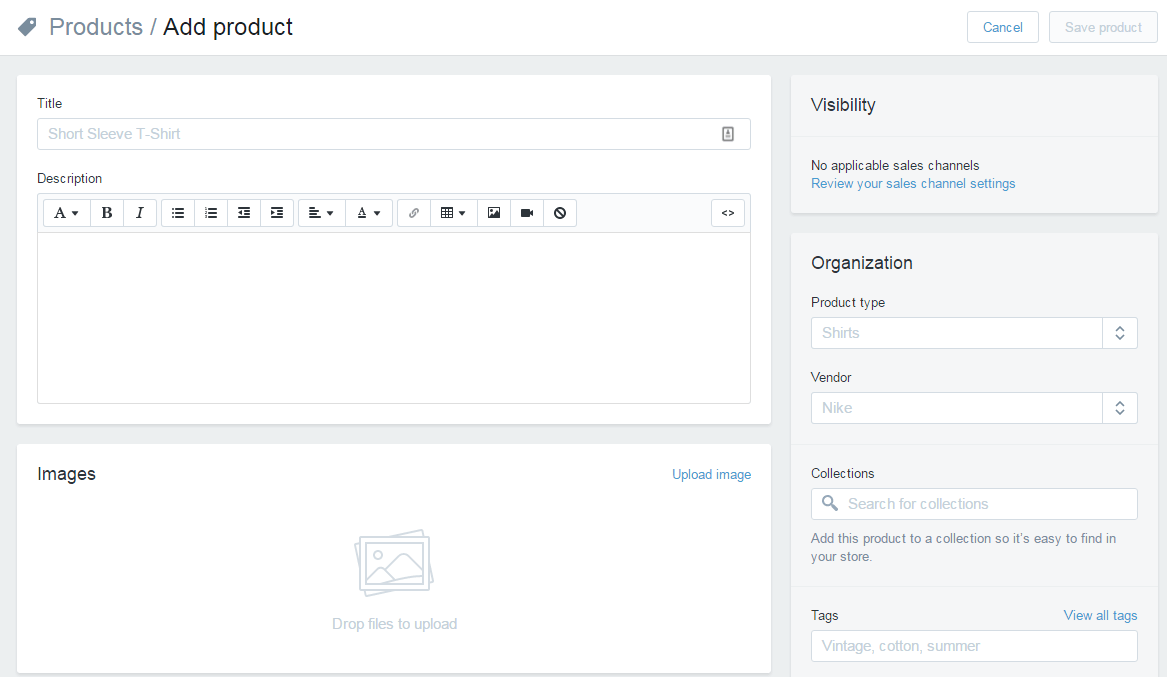
I’m calling my first product “French Bulldog Hat.” I’ll add some description, plus a picture of the hat.
The nice thing here is that adding images works through drag-and-drop. So just take an image from your desktop, and drag it onto the section marked “Drop files to upload.” Like so:
At this point, you can set legal parameters such as taxes, shipping variants, and also set your inventory (but that’s all optional).
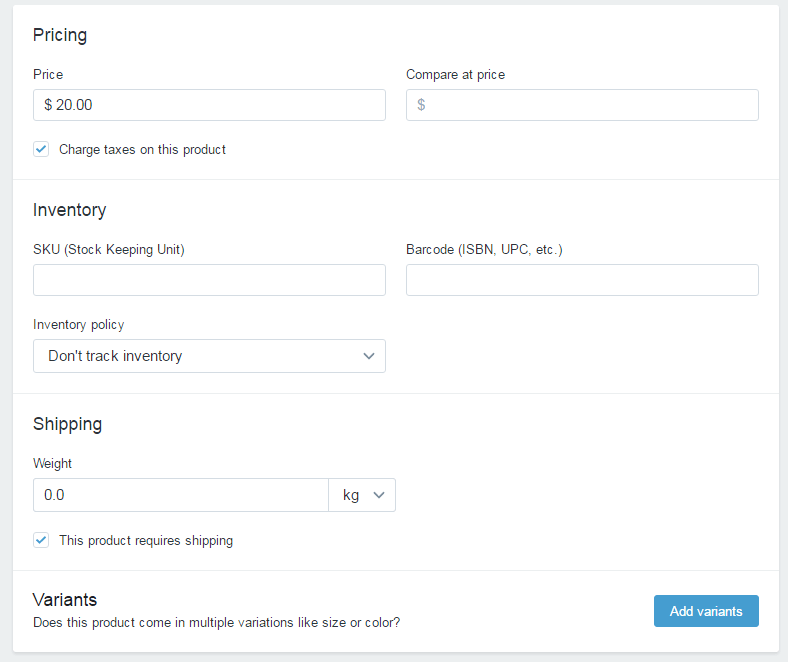
When you’re done, just click on the “Save product” button.
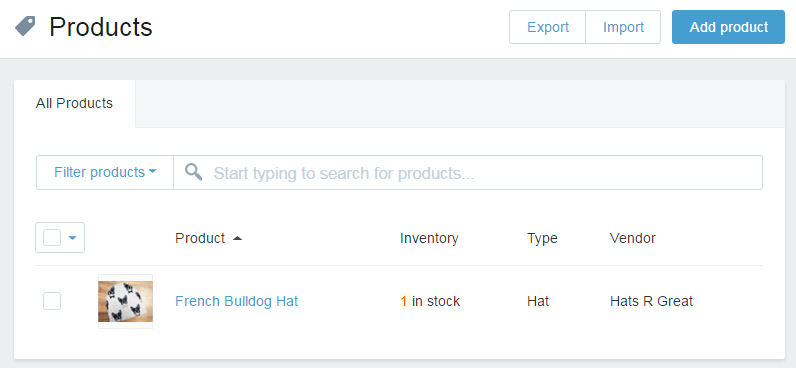
If you go to your products list right now, you’ll see the first product just waiting there to be bought!
Okay, let’s come back to the dashboard now and take care of the remaining settings of our eCommerce store on Shopify (the “Home” link in the sidebar).
At this point, we have an option to:

From those four, the most useful option is going to be “Create an online store.”
The remaining three are about, respectively, selling products in person in your actual brick-and-mortar store (Shopify can help with that too), selling directly via Facebook, adding stand-alone single products to your website outside of Shopify (this means that you can, for instance, add a buy button to your WordPress blog).
I’m just going to click on “Add Online Store.”
Picking a design for your Shopify eCommerce store
This is what you’ve been waiting for … it’s time to pick a design for your new eCommerce store:
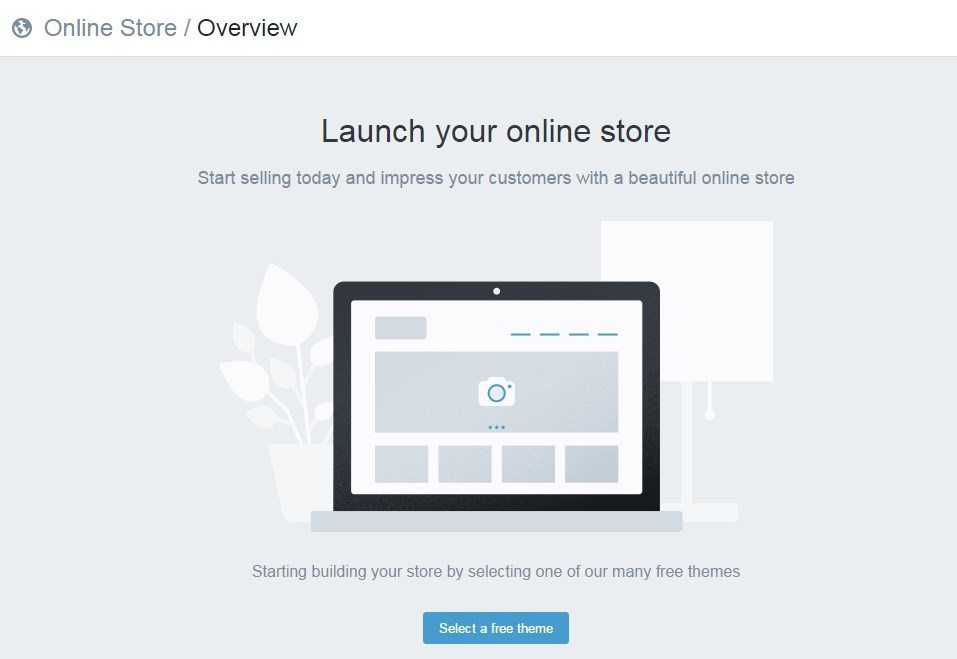
Let’s start by clicking the “Select a free theme” button.
Shopify offers a load of great-looking free designs. All you have to do is just pick one. No design skills needed at all to launch a truly good-looking eCommerce store on Shopify.
Okay, so browsing through what’s available:
… I think I’ll go with the one simply called … “Simple”:
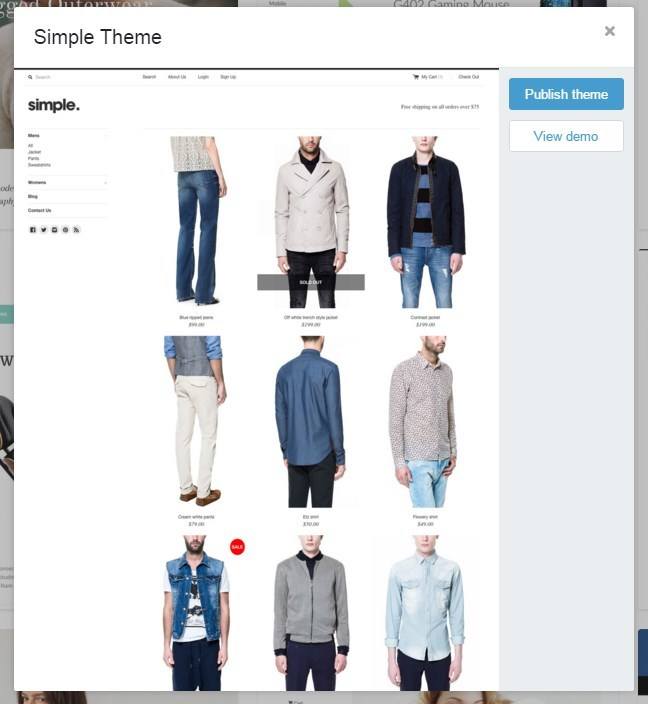
(Note. Every design offered by Shopify is optimized to be viewed on desktop, mobile and tablets. Also, when selecting your design, please don’t worry about the kind of products that are showcased in the theme’s demo. Those are just examples. After you launch your store, you can sell whatever you wish through any of the themes.)
At this point, let’s just give the “Publish theme” button a click, and your design will be set.
In the next step, Shopify will present you an example of what your store looks like, along with its appearance on mobile.
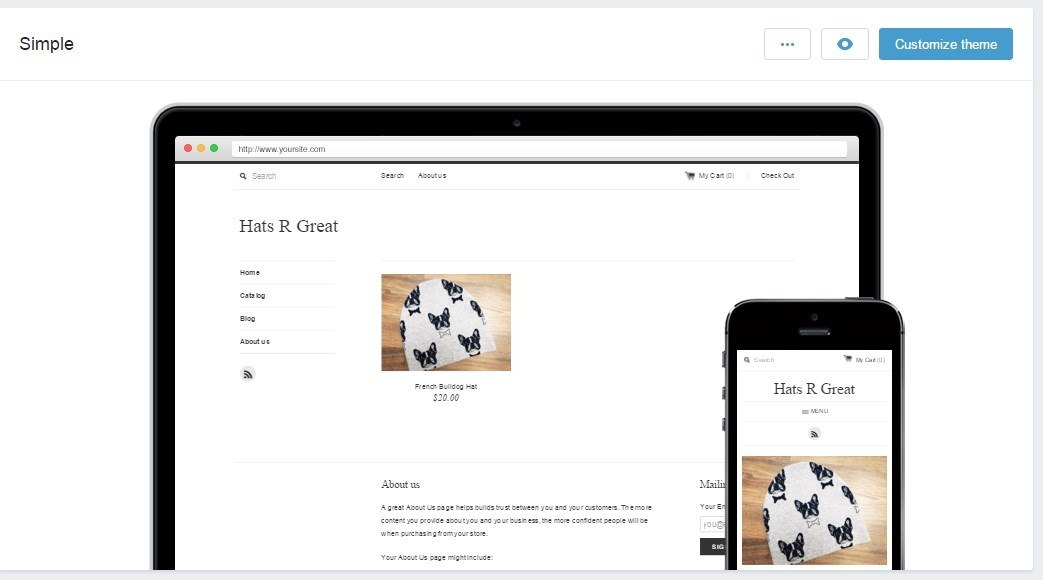
If you want to, you can click on the “Customize theme” button to adjust the design you’ve selected. There’s a couple of handy options here, and I invite you to experiment with them on your own, but let’s just point out some basic details. Here’s the customization screen:
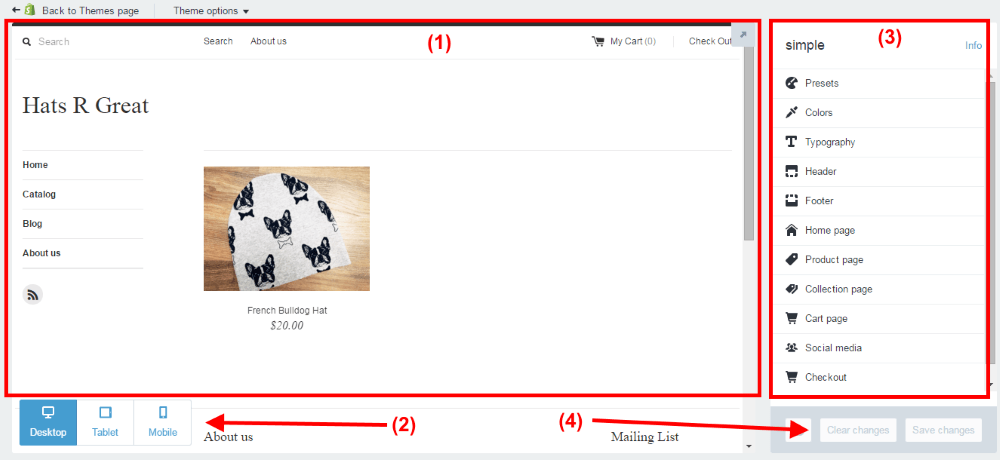
- (1) The main view of your eCommerce store on Shopify – this is what it currently looks like.
- (2) The device switcher – see what your store looks like on desktop, tablets, and mobile.
- (3) The options panel – this is where you do your adjustments.
- (4) The saving panel – save or cancel your changes there.
Right now is a good moment for you to go through the options panel, section by section and experiment with what’s there.
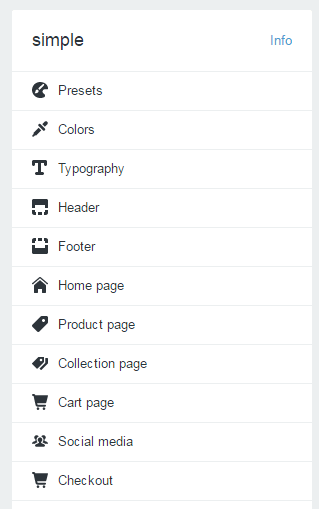
For example:
- Go into “Presets” – see if you like any of the pre-made variants of the theme’s design.
- Go into “Colors” – set the colors for your text, icons, headings, and etc.
- Go into “Typography” – change the default fonts (it’s the easiest way to give your store a unique look).
- Go into “Header” – set the logo that’s going to appear on your Shopify store. Like so:
![]()
- Go into “Home page” – choose a banner image for your store. Like so:
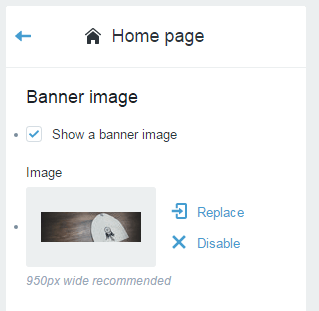
- Go into “Social media” – link your Shopify store with your social accounts.
When you’re done having fun there, just click the “Back to Themes page” link:

Setting up page content in your store
So, with the products and the design handled, let’s now include some texts onto your pages. Particularly, the homepage. For that, let’s go to Online Store / Pages (from the left sidebar):
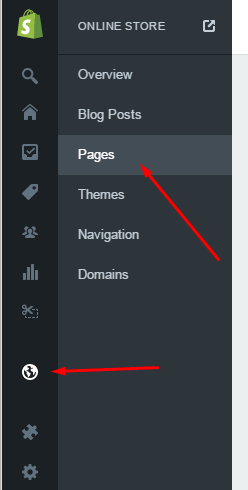
Once there, click on “Home page”:
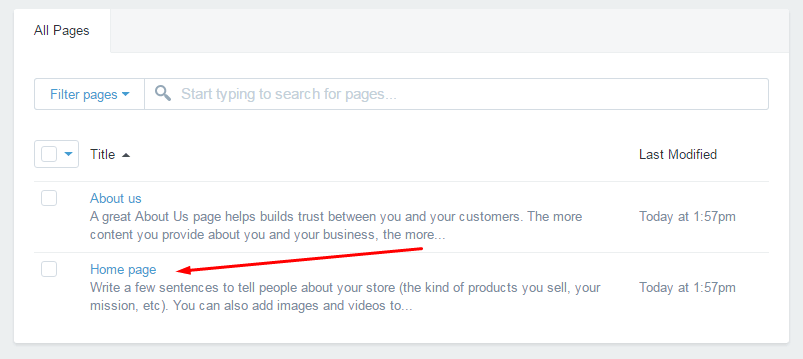
This is where you get to write a few sentences about your store:
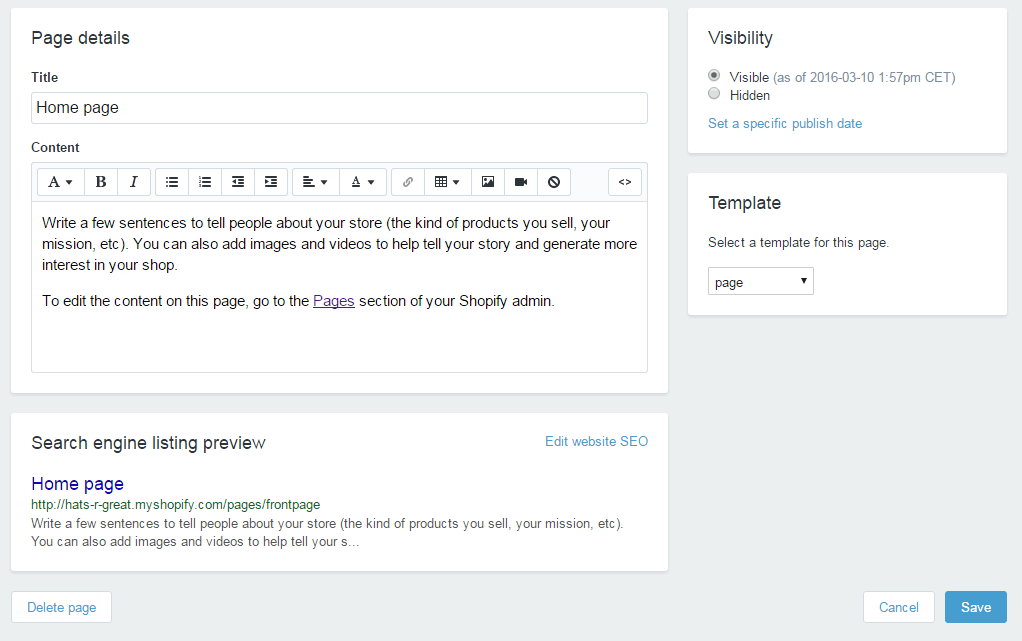
After you’re done with all that, you can save your homepage and see what your store looks like. At any stage, you can do that by clicking this icon:
![]()
Important things not to forget
Right now, you’re done with the basic process and you’ve learned how to set up your eCommerce store on Shopify. But there’s still a couple of required steps to get your store officially ready for customers.
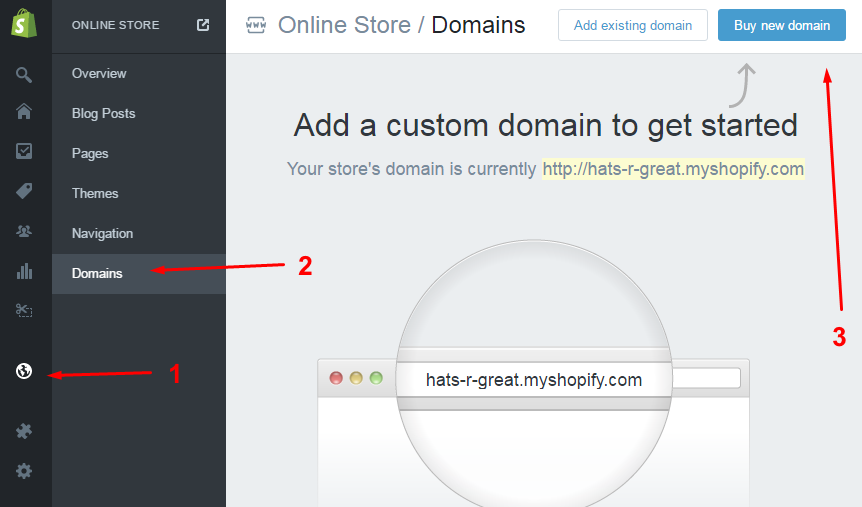
Selecting a domain on Shopify
By default, your store gets a subdomain, like:
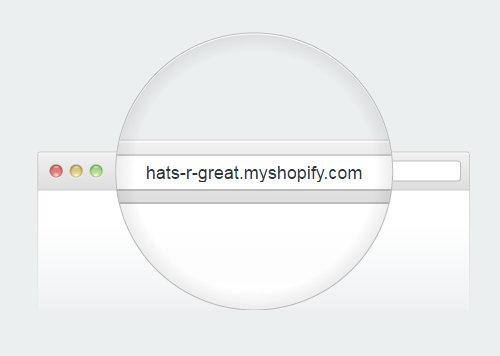
You can upgrade to a standard, custom domain right through Shopify. Just click the “Buy new domain” button, and Shopify will guide you through the process:
Enabling online payments within Shopify
Before your customers can buy anything, you need to integrate your store with an online payments gateway. This can be done in Settings / Payments.
By default, Shopify comes integrated with PayPal, it lets you accept credit cards through various other gateways, and also provides you with a handful of alternative payment methods.
The easiest way to get started is certainly working with PayPal. Shopify actually handles this out of the box for you. No need to adjust anything, as long as you use the same email address for your Shopify store and your PayPal. If not, you can change this in the settings by clicking the “Edit” button:

After every sale, Shopify will credit your PayPal account automatically.
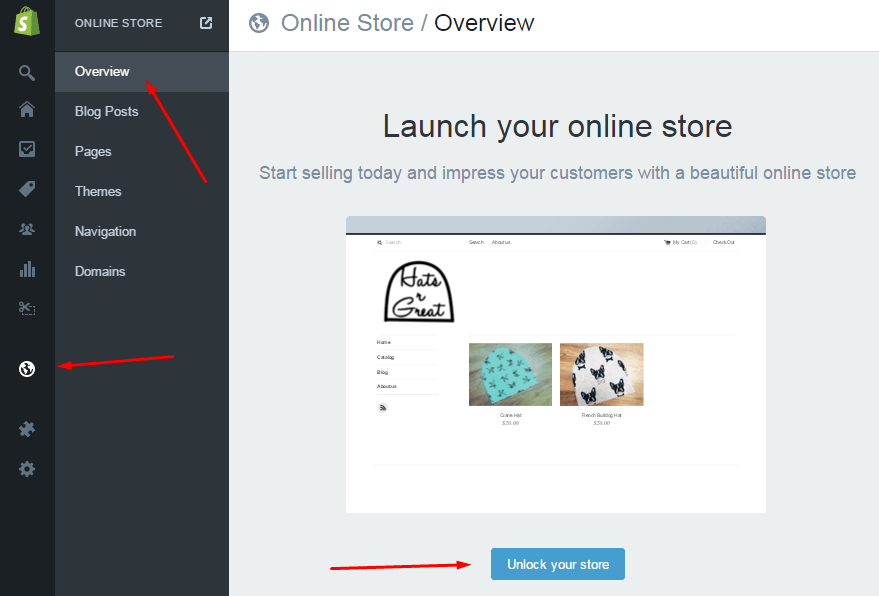
How to make your Shopify store public?
The last step on your way to setting up an eCommerce store on Shopify is to make it public. To do so, go to Online Store / Overview, and click the “Unlock your store” button:
After your 14-day trial is up, you’ll have to select one of the available plans with Shopify to continue operating. The current options are:
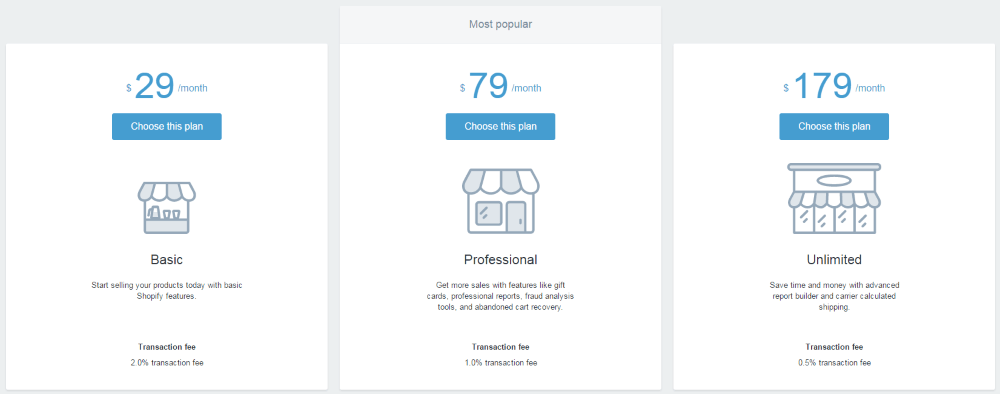
And that’s it! Right now, your new eCommerce store on Shopify is up and running. Shopify takes care of all of your products, sales, orders, and the overall appearance of your online store on the web.
So what do you think? Willing to give Shopify a try? Or maybe you have any questions related to how to set up your eCommerce store on Shopify?
Content retrieved from: https://ecommerceguide.com/guides/setup-shopify-store/.