


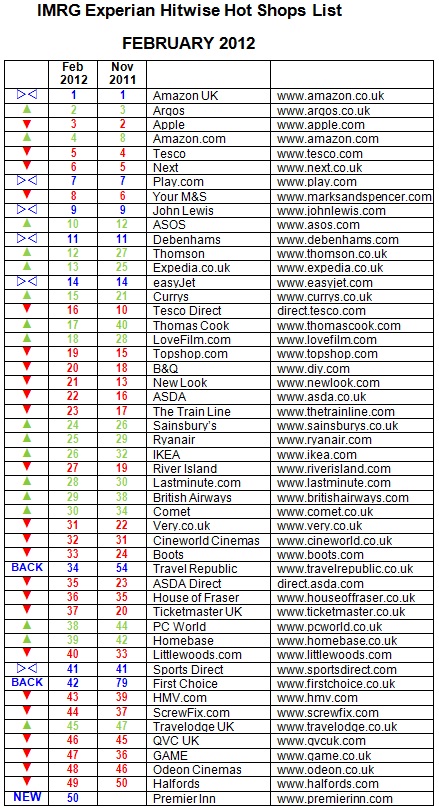
Top 50 online retailers in the UK: Argos reclaims second place from Apple
Posted on August 21st, 2018
[This an old post from 2012]
Argos is the second most visited online retailer in the UK behind Amazon, reclaiming second place from Apple, according to new data. The research, from Experian Hitwise and IMRG, indicates that Electronics retailers Currys (ranked 15), Comet (30), and PC World (38) all rose up the Hot Shops list this quarter.
Currys and PC World were also ahead year-on-year, up two and three places respectively on February 2011.
This quarter’s five fastest movers in the Hot Shops list were all travel brands. First Choice (up 37 places), Thomas Cook (+23), TravelRepublic.co.uk (+20), Thomson (+15) and Expedia (+12) all climbed in the rankings. Outside of the travel industry the fastest movers were LoveFilm.com (+10), Currys (+6), IKEA (+6) and PC World (+6).
Travel’s winter peak in January saw eleven travel brands rise in the rankings within the top 50. Premier Inn broke into the top 50 for the first time this quarter, and TravelRepublic.co.uk climbed 20 places on November to come back into the top 50.
Analysis:
As expected, this was a strong quarter for travel brands with the five fastest movers of the last three months all coming from this sector. Much like last year, it was the multi-channel travel agencies First Choice, Thomas Cook and Thomson that were the fastest-growing travel sites, although the airlines easyJet, Ryanair and British Airways all rose in the rankings too. By this measure First Choice’s decision last year to switch to purely all- inclusive holidays seems to have paid off, as the travel agency was ranked four places higher this year than in February 2011.
Post-Christmas shopping this year produced the biggest ever day of online shopping, with 96 million UK internet visits going to retail websites on Boxing Day 2011. In January it was the electronics providers and home improvements retailers that saw big increases in online traffic as consumers sought out big ticket items such as TVs, laptops, sofas, wardrobes and bathrooms. Currys, IKEA and PC World all jumped six places in the Hot Shops list since last
quarter, while Homebase and Comet were also among this quarter’s rising websites.
Online-only brands also had a strong quarter. Four of the top 10 in the Hot Shops list this quarter are online-only, including fashion retailer ASOS which climbed two places to 10th position. ASOS was also one of four fashion brands including Next, New Look and Very.co.uk that improved on its position year-on-year. Video rental and streaming site LoveFilm.com climbed 10 places to 18th in the list.
James Murray, Marketing Research Analyst at Experian Hitwise commented: “Travel has done well this quarter despite some really challenging market conditions. In early December many of Europe’s ski resorts were struggling with a lack of snow and things were looking pretty bleak, but massive snowfall in mid-December restored confidence and this together with people planning spring and summer breaks has seen the market bounce back well.
“As we predicted, 2011 was another record-breaking year for online retail with 343 million hours spent shopping online in December. As with Christmas 2010 there is still a gap between multi-channel retailers and online-only retailers. For the last three years multi- channel retailers like Next, Argos and John Lewis have consistently received more traffic than the online-only specialists like Amazon and Play.com. However, some online-only brands are starting to level the playing field, as witnessed by the rise of ASOS, LoveFilm.com and the specialist travel brands in the rankings.”
Tina Spooner, Chief Information Officer at IMRG, commented: “These figures are consistent with what we’re seeing from the IMRG Capgemini Index, where sales in January for the travel sector were up 16% year-on-year, following what was a challenging year in 2011 for the online travel industry. The story is similar for the electronics retailers as well, where growth levels remained below average for the e-retail sector throughout 2011 but returned to fairly steady double-digit growth toward the end of the year.
“The November Hot Shops list coincided with the launch of the iPhone 4S and the passing
of Steve Jobs, which resulted in surges of traffic to displace Argos from second place for the first time. However, Argos has now climbed back to its familiar position, which is unsurprising for a retailer that now makes 40% of its sales online.”
Methodology
The IMRG-Experian Hitwise Hot Shops List of the top 50 UK e-retailers* is the key indicator of online merchant performance. The List is published quarterly and tracks popularity, as indicated by visits, of those selling goods and services within the IMRG Capgemini Index Classification. This List is based on January 2012 data. The IMRG-Experian Hitwise Hot Shops List excludes eBay and price comparison / aggregator websites such as Kelkoo and Froogle.
** IMRG Capgemini Index Classification: Beer / wine / spirits; Books; CDs / tapes / records; Clothing / footwear / accessories; Computer hardware / peripherals / consumables; Consumer electronics; Digital downloads (e.g. music, software); Flowers; Food, beverages and household supplies; Furniture; Garden / DIY; Health and beauty; Home appliances (e.g. washing machines); Household goods (e.g. kitchenware, bedding); Jewellery / watches; Software; Sporting goods; Tickets (e.g. cinema, theatre, events); Toys; Travel (e.g. flights, holidays, hotels, car hire); Video games; Videos / DVDs
Source: www.imrg.org
www.hitwise.com/uk
Content retrieved from: http://www.digitalstrategyconsulting.com/intelligence/2012/02/top_50_online_retailers_in_the_2.php.
[Case Study] – Create Your Own Viral Site and Bank Hard
Posted on August 20th, 2018
January 24, 2016 by Rhys
Viral sites are big business these days with some of the biggest names in the industry selling for millions. By leveraging the power of social media to drive traffic you can create a profitable site in no time at all. In this case study I’m going to show you how to create your own viral site and bank hard.
Case Study Overview
- Create our own viral wordpress site
- Get the best content, rewrite and add to our site
- Post on Facebook and drive huge volumes of traffic
- How to monetize your site to make money.
Why Build Viral Sites?
Viral news sites are one of the only ways to make money by offering 100% free content. You’ve probably heard of sites such as Bored Panda, Buzzfeed and Daily Elite which are sites that specialise in viral content and as such receive millions of visitors everyday. In turn they make money from advertising through Google Adsense, paid articles and paid advertisements. Once you’ve built up a solid visitor base and following you can sell these websites for large profits. Just last year the Daily Mail bought Daily Elite for $47 million USD. Yes $47 million!
Viral sites are easy to build and maintain however you do need to ensure you continue writing content so visitors return. If you start building viral sites you can’t stop posting content when you reach 100 articles. Later in the course I’ll show you how I get help building viral sites so you don’t actually need to focus on writing content everyday – that get’s boring! Let someone else handle that process for you.
Part 1: Create Your Viral Site
When I build viral sites I like to follow a set process which involves choosing a suitable domain name, linking to the web hosting provider I use, then using a particular template that is perfect for such websites.
Choosing A Site Name
You need to choose something unique and nifty that’s a little bit different. You can look at BuzzFeed and BoredPanda as perfect examples here. You could stick with something with the words Bored or Buzz or Feed. Try not to copy someone else’s domain name, especially if you plan on trying to sell the site at a later date.
Things that might help you pick a suitable name include markets you intend to target. I’m from New Zealand so I’m going to target the 4 million kiwis (nickname) that live in our country. I’m going to focus on bored people so the name I came up with was BoredKiwi.com. Quite similar to bored panda but there’s a clear difference in our target market and domain name.
Viral Host did a good article on how to choose a suitable domain for a viral site. Also you can checkout domain suggestion tools which might help with inspiration. Always pick a .com or .net domain so your not limiting yourself to local countries.
Once you’ve decided on a name, I’d register it with either Godaddy or Namecheap.
Web Hosting For Viral Sites
If your site explodes with viral traffic then shared hosting probably won’t cut the mustard. Now don’t panic you don’t need to rush out and buy VPS or dedicated server hosting just yet. The main problem your going to face running a wordpress blog on shared hosting with lots of traffic is your page loading times and the pressure on your shared hosting server. The best way to solve this is to setup Cloudflare which offer a free solution to get you started. You’ll find their $20/mo plan is much better but to get started it’s free.
What is Cloudflare and how does it work? Cloudflare offers a solution to supercharge your website by offering a CDN feature which distributes your content around the world on their servers to that your content is closer to your visitors thus speeding up your website. They offer solutions to protect your websites from a range of online threats from spammers to SQL injection to DDOS protection which means if your main host goes offline, cloudflare will keep your site online.
You can get more information here, simply enter the name servers they provide you into your domain provider.
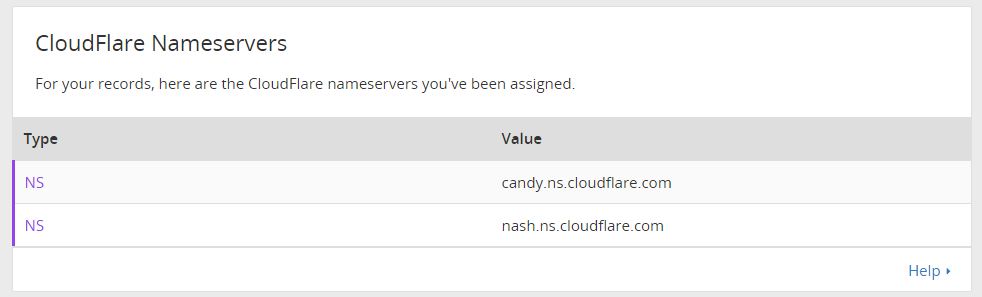
After creating Cloudflare, get the nameservers as below.
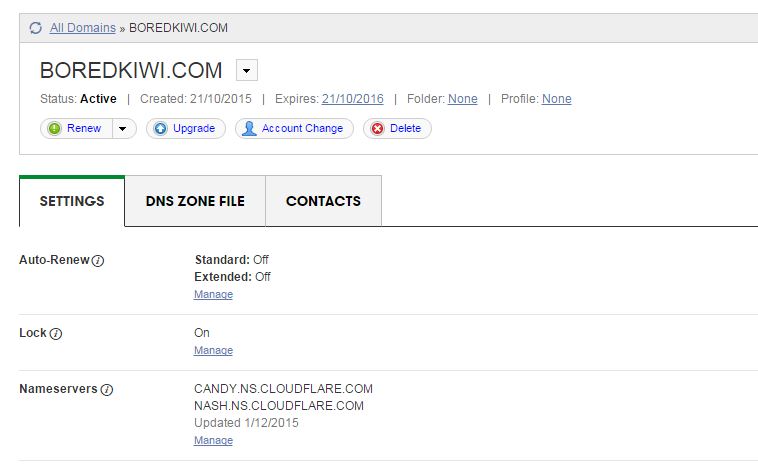
Now you’ll want to add this into your Godaddy or Namecheap account. For Godaddy this is under Domain Management > Manage DNS.
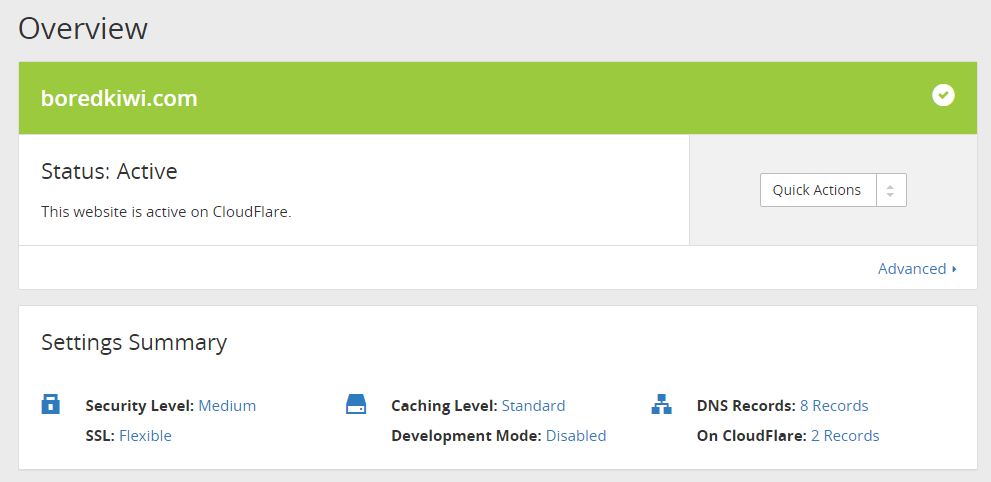
Lastly you’ll need to add your hosting companies nameservers into Cloudflare and then you’ll see this message meaning your all setup. Once setup your site will already start to load super quick.
WordPress Setup + Template Selection
I build my viral sites using WordPress. If you use any big name web hosting these days you’ll be able to install WordPress through your Cpanel control panel (if your using Linux hosting). There’s many guides out there on how to setup wordpress but I’d recommend this course.
Next you’ll want to choose a suitable template. The one I use for all my viral sites is Newspaper by MyThemeShop. It costs $59 however I think it’s worth every cent. The theme ranks your posts in Google within hours and looks great on tablets, cellphones and even desktops. The social sharing options are very helpful when building a viral site.


The reason I use this theme is as follows:
100% RESPONSIVE LAYOUT OPTION
NewsPaper Theme was built in with responsive design. Automatically It will adjust any types of devices. Now a days more than 60% visitors are visiting world most popular sites via mobile phone. So, it’s situation demand to make a responsive website, NewsPaper Theme is made with mobile friendly option.
ATTRACTIVE FEATURED POST SECTION
By featured section you will be able to add your extra oriented post by highlighting your article. Featured post will include HD images to grab more attention. Featured post section make an important role to advertise on your site.
SPEED OPTIMIZED
It’s the great option to reduce your bounce rate by Speed optimized option. Google give priority those sites take less time and load fast. So, increase your visitors and pageviews using NewsPaper Theme.
FULLY SEO OPTIMIZED
All MyThemeShop themes are search engine optimized including NewsPaper Theme. It will help search engines to crawl and index your content quickly. Without search visitors you will not get proper ranks. NewsPaper Theme will increase your search visitors by giving more impression.
HIGHLY DECORATED CATEGORIES SYSTEM
NewsPaper Themes allow multiple categories option to decorate your posts. It’s grab more attention for new visitors about what they want to know. Simply make categories and give your site a professional look.
GOOGLE ADSENSE OPTIMIZED
When it comes to monetize blog, Adsense is most popular monetization method quality blog and websites. NewsPaper Theme is Google Adsense and others ad optimized theme that will increase your CTR’s and CPM’s rate. So, make money blogging via NewsPaper theme.
CLEAN CODING
To help search engines and schema.org to understand your blog, Mythemeshop developers made this theme with neat and clean code . Search engines will easily understand theme code for SEO purpose.
SOCIAL MEDIA INTEGRATED
Whenever you make content in NewsPaper Theme, it will go for viral quickly. Facebook, Twitter and more popular social sharing button are included with this theme.
EASY OPTION PANEL
Easily you can customize your theme options from one place. Specially newbies can monitor their themes from option panel.
Option panel are includes General Settings, Styling Options, Header, Homepage, Single Posts, Social Buttons, Ad Management, Theme Typography, Sidebars, Navigation, Theme Translation Panel, Import / Export Options etc and more.
24*7 SUPPORT
Full Support is not appear in maximum themes club. But in Mythemeshop something different, i got instant support from Mythemeshop expert team. Just you can ask them a query, definitely they will answer your query in right away.
This concludes the first part where our site is now built ready for adding content.
Part 2: Finding Content, Writing Articles
Now that our website is build we’ll need to start adding content. There’s many other sites out there that you can get inspiration from to re-write articles from for your own website. One of those websites I like to use is called ViralViralVideos.com where they seem to post videos all day everyday of viral content. Most of the videos are hosted on Youtube so you can simply right click on the video and choose, ‘Get Embed Code’ and then embed it onto your own WordPress blog. You can take the authors text and spin it or reword it to suit your own style of website. There’s literally thousands of websites like this online, you just have to find them.

Other resources include the big players in this industry including TheLadBible, BoredPanda, BuzzFeed, DailyElite. Of course Reddit and Twitter are also two of the best sites for finding topics to post about. You want to look for something that you would probably share with your own friends as sharing is the number one way to spread your posts on social media.
How To Write Viral Articles
The best way to write viral articles is to use the structure such as, ‘9 of the Best Ways To…’ or ‘Watch What This Man Does… What He Does Next Will Blow Your Mind!!’ or ‘Watch What Happens When ….” Basically you want to encourage users to click on to your articles. Later in the article I’ll be showing you how to market these on Facebook so you should write articles such as this.
Here’s an example from my BoredKiwi website.

Other styles you can use are articles such as “6 of the World’s Scariest…” or “5 of the Best Ways To…” and of course the “How To…” Videos are always a good way to drive traffic.

Buy Viral Articles
It’s great writing your own articles but it gets boring after a while so the best way to ensure your website is stuffed full of high quality content for your readers is to buy articles from sites such as iWriter.com. iWriter allows you to sign up as a buyer and connects you with writers all over the world who’ll write articles from 150 – 2000 words for prices ranging from $1.50 for 150 words to $40 for a 2000 word article. As all your articles will be no more than 300 words you can get lots and lots of articles for your site with not much effort.
Once someone has created an article for you, simply upload it to your site, add a few pictures or videos and then post to your social media pages (we’ll show you later).
There’s plenty of guides on how to create iWriter jobs however this is what my typical job looks like.
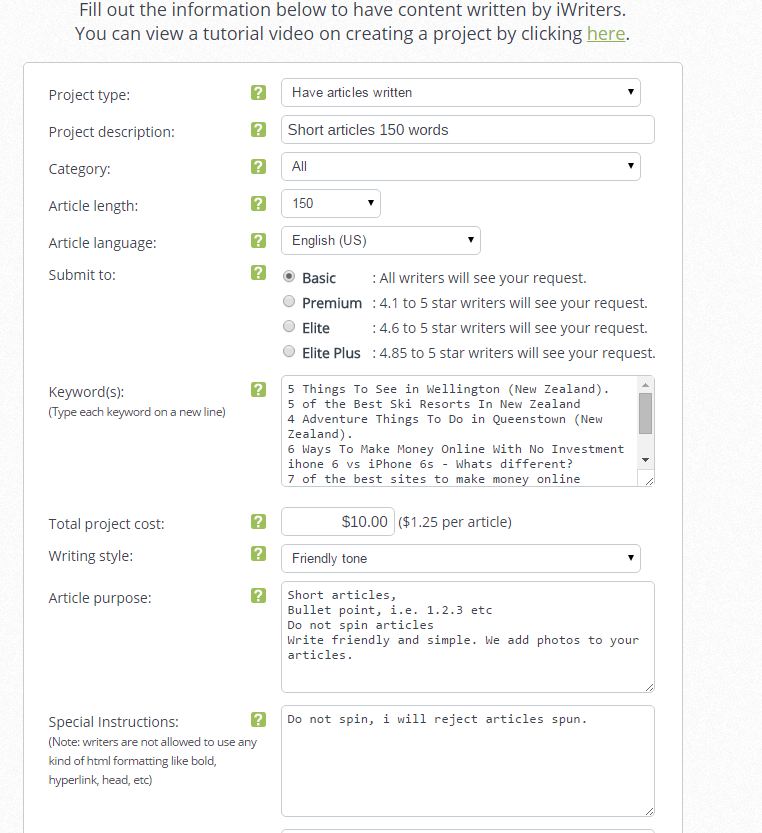
- Project Type: Have articles written
- Project Description – I like to keep this at 150 words. Most writers will write more than this
- Category – purely for iWriter’s reference, I leave it all
- Article length: 150 words. You can try longer articles if you want
- Submit to: The cheaper articles can be done by any one, stick with it
- Keywords: This is effectively the name of your articles (1 per line = 1 article)
- Project Cost: $1.25 per article x 8 articles for me for $10 – Super cheap
- Writing Style: Choose between Professional or Friendly – I always choose friendly
- Purpose: Here you need to tell them what you want, see my example
- Special Instructions: Make sure you tell them you’ll reject spun articles.
That’s really all there is too it with iWriter. Your articles will likely be done within 12 – 24 hours. You’ll probably have a few spelling mistakes however you can reject articles or request rewrites however remember your paying $1.25 for 150 words so you’ll have to factor in that you might need to fix some typos etc. You’ll be able to download the articles once completed. If you find a high quality writer you can then hire them (at the new rate of $2.50) to write all your articles next time.
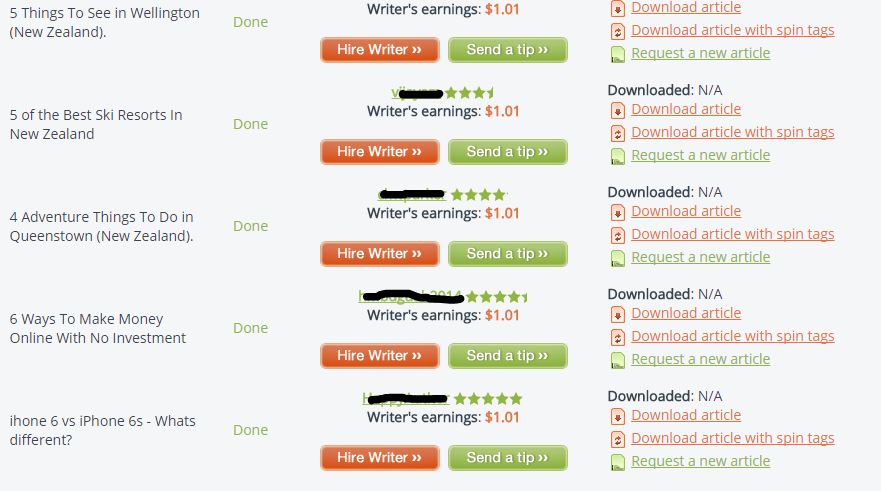
So now we have our articles you can post them on to your new website, if your using WordPress and MyThemeShop your screen might look like mine below.

Part 3: Drive Traffic From Facebook
You’ll want to use Facebook to drive traffic to your website. Be sure to go to Facebook pages manager and setup a new page. There’s plently of guides online on how to do this so I won’t describe the process here however once you’ve got setup you’ll want to ensure you’ve set yourself up with a logo and banner image to match your site. I’d recommend using AdExpress here – checkout our review. You should end up with something such as this,
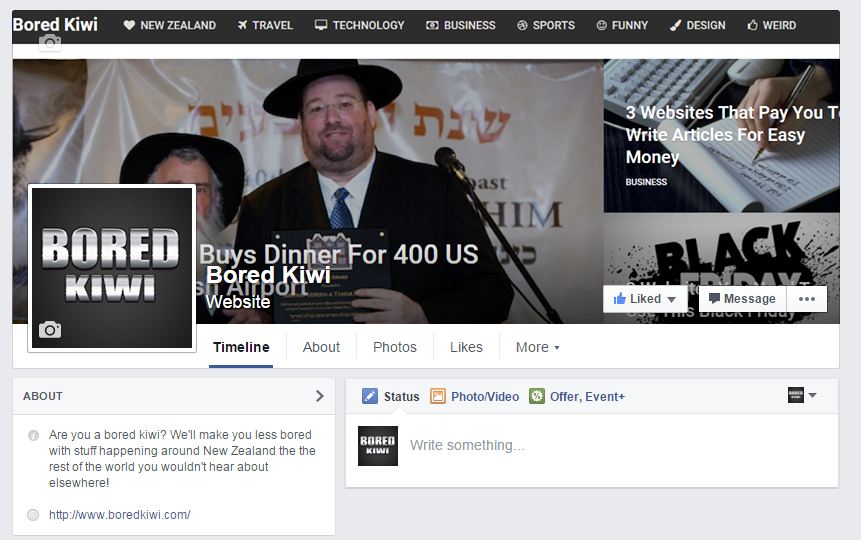
Now Facebook has recently implemented a feature that requires all new Facebook pages to have 50 likes before you can register a sub domain such as Facebook.com/boredkiwi – This is quite annoying as someone could come along and steal your chosen url to match your site – I personally think for SEO and traffic building it’s important to have something that matches your site so the best way is to buy 100 likes from Fiverr.com to get you started. Then register your Facebook url.
Now your ready to post your first article on to Facebook.

So this article didn’t go viral but I boosted it using Facebook Ads and the results were quite incredible for $15. Now remember you only need a couple people to visit the link then hit the share button on our website or on the Facebook post. In this case the article got lots of shares via my website which churned out a few thousand visitors in 24hrs.
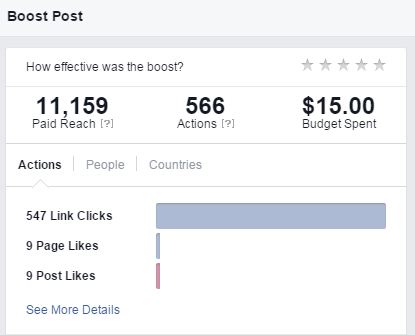
There are many other ways to promote your posts, for example if you have 5000 friends then you only need a few of those to share your post and it could start going viral. I have a friend who has 10 accounts with 5000 people (this is Facebook’s limit) which he posts his articles in and they go viral very quickly. Another friend uses Facebook groups – for example there is some groups out there with 250,000 members that will see your posts if someone shares them into that group.
Part 4: Monetize Your Site
The best way to start monetizing your site is to put Google Adsense or a similar ad network (pop unders) on your site where you get paid a small commission on every visitors. Let’s say your site had 5,000 visitors a day – you’d probably be making at least $10 a day on Google Adsense which is $300 per month. Now imagine if you had 500,000 visitors a day? Go figure.
Here’s my Adsense stats form my first few days running this BoredKiwi site.
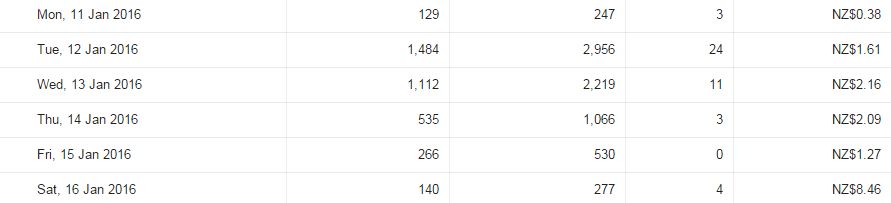
<!– –>
Filed Under: Case Studies
Content retrieved from: http://www.imrhys.com/create-your-own-viral-site-and-bank-hard/.
14 Powerful Plugins Every WordPress Blog Should Have
Posted on August 19th, 2018
Tung Tran
- Last Updated February 21, 2018
It’s no doubt that WordPress is very powerful, flexible and feature-rich.
And it also has a large database of both free and premium plugins to boost it up even further.
With so many options to choose from, it can be difficult to sort out the good from the, well, not so good.
In this article, I’ll be featuring a list of my favorite plugins that I usually use to optimize my sites for better performance. Let’s dive in!
More…
Table of Contents
-
- 0.1 1. Akismet
- 0.2 2. Yoast SEO
- 0.3 3. Google Analytics by Yoast
- 0.4 4. W3 Total Cache
- 0.5 5. Gravity Forms
- 0.6 6. Thrive Content Builder
- 0.7 7. ThriveLeads
- 0.8 8. Thirsty Affiliates
- 0.9 9. SumoMe
- 0.10 10. Duplicator
- 0.11 11. WP Limit Login Attempts
- 0.12 12. Comment Redirect by Yoast
- 0.13 13. Reply Me
- 0.14 14. Ad Inserter
- 1 Conclusion
1. Akismet

Akismet comes as a default plugin for every new WordPress installation. It checks new comments against a giant database and automatically filters out the ones that look like spam.
Although I hated it a few years back for frequently trashing out my legit comments, Akismet’s spam detecting algorithm has been improving a lot since and I rarely see that problem happening these days.
You’ll need a free Akismet.com API key to activate it. There are also paid plans available for heavy users or businesses.
2. Yoast SEO

With over 1,000,000 installs, this is one of the most popular plugins in WordPress.org
And it’s also consistently rated as the #1 SEO plugin for WordPress by many experts and users.
WordPress is already very technically good for SEO, but Yoast SEO really takes it to the next level.
The plugin helps improve your site with a wide range of features like:
-
- Make your blog posts more SEO-friendly
- Prevent content duplication and low-quality indexation issues
- Drive more traffic from social by optimizing CTR
- Create optimized XML Sitemaps
- and more…
3. Google Analytics by Yoast

This plugin simply inserts the Google Analytics tracking code into your site’s header for you if you’re not the technical type.
It also helps to set up outbound links and downloads tracking in a few clicks. It enables you to view detailed reports through internal dashboards without leaving WordPress as well.
The plugin has recently been acquired by Syed Balkhi, and he rebranded it as “Google Analytics by MonsterInsights”.
4. W3 Total Cache
This plugin improves your site speed by optimizing server performance, page load times, and provide easy CDN integration.
This is a must-have as faster sites tend to rank higher and get more organic traffic.
You can combine this with a good hosting service like Traffic Planet Hosting, and your site should be blazing fast.
5. Gravity Forms

Gravity Forms is the most advanced form builder for WordPress, yet it’s so simple and easy to use.
You can use this plugin to create contact forms, email optin forms, order forms, surveys, etc.
It also integrates with Zapier which opens up the possibility to create hundreds of powerful automations to help you save time and increase efficiency.
6. Thrive Content Builder
Launched in 2013 by Shane Melaugh, Thrive Content Builder has rapidly got it name among online marketers because of its ability to quickly create good-looking conversion-focused articles and landing pages.
Gael from Authority hacker published a case study on how reformatting a piece of content with Thrive Visual Editor has helped grow one article’s traffic by 9275%.
7. ThriveLeads

This is another good product from ThriveThemes and it’s one of the plugins and themes you’ll get when you sign up to be a Thrive member.
ThriveLeads can really skyrocket your list growth by making it easy to create optin forms, lightboxes, slide-ins, and more.
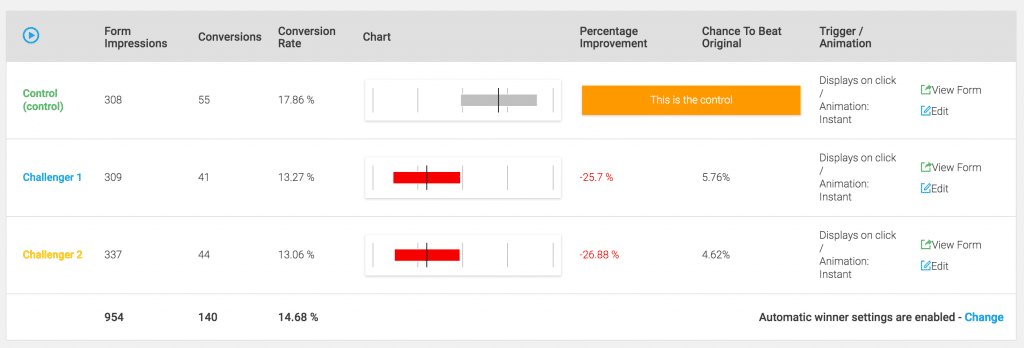
It also saves you money by having an internal A/B testing option which is very easy to use.
Here’s an example of a test I recently ran on the previous post.
8. Thirsty Affiliates
Thirsty Affiliates is an affiliate link management for WordPress that helps you organize and cloak affiliate links.
It’s free, simple, fast and easy to use. There are also some premium add-ons to power it up.
9. SumoMe

SumoMe is a set of tools designed to grow your traffic. Some of my favorites are:
- Google Analytics Dashboards – Similar to Yoast, you can quickly have a glance at how your site is performing with this one
- Welcome Mat – this newly launched feature will help turn any page into an email magnet by displaying a full-screen call to action when a new visitor lands on your site.
- Image Sharer – When enabled, this will display a few sharing buttons when you hover over any image.
- Social Sharing Bar – Better than any options available, this floating bar can help you increase social sharing from visitors.
10. Duplicator

This plugin gives you the ability to migrate, copy or clone a site in just a few clicks.
There’s not much to say about Duplicator. It just works!
My developer also use this to perform regular backups for my websites.
11. WP Limit Login Attempts

This plugin adds a layer of protection to your blog by blocking an IP from making further login attempts after a specified limit on retries is reached.
This prevents your site from all brute-force attacks.
12. Comment Redirect by Yoast
As the name implies, this plugin automatically redirects first-time commenters to a page of your choice.
I usually send them to a welcome page with an optin form to make a good first impression and convert them into email subscribers at the same time.
13. Reply Me
This plugin shows a checkbox that allows people to get notified by emails when anyone replies to their comments.
It’s simple but it helps a lot to increase return visitors to your blog.
14. Ad Inserter
This plugin makes it very easy to insert ads or any HTML/Javascript/PHP code anywhere on your website.
It also has many additional options, which you can read more about in the plugin directory page.
Conclusion
Plugins can make WordPress even more powerful, but they can also slow down your site or create conflicts, so you should be careful when installing new ones.
Above are the 14 essential plugins that I always use and they work great together to make my sites faster, more SEO-friendly, and convert better.
What are your set of favorite WordPress plugins? Do you want to add any to this list?
Feel free to let me know in the comment section.
Content retrieved from: https://www.cloudliving.com/powerful-wordpress-plugins/.
10 WordPress Plugins to Turn Your Site Into an SEO Powerhouse
Posted on August 18th, 2018
What steps have you taken to ensure that your WordPress blog is friendly for search engines?
If you can’t answer this question, now’s the time to take a step back and reassess your situation. Conversely, even if you’ve taken some action, there’s still a good chance that there are still improvements that you can make.
In the past, I’ve discussed the best plugins for a new WordPress site. I’ve also touched on some of the top plugins for creating high-quality content.
While all of this is important, you don’t want to overlook anything that you can do to improve your blog’s SEO.
WordPress is well known for being SEO friendly “out of the box.” Even so, with thousands of WordPress SEO plugins to choose from, a few additions to your blog may be all that you need, in order to reach the next level. From WordPress SEO by Toast to XML sitemap, know that there’s a WordPress SEO plugin that can help get you there.
Below, I’m going to discuss 10 WordPress plugins that can help turn your site into an SEO powerhouse. These plugins won’t guarantee high search engine rankings, but they’ll definitely improve your chances of SEO success.
Are you ready to get started?
1. Yoast SEO
Have you come to the conclusion on what’s the number one WordPress SEO plugin for your website?
There are plenty of other options out there, but my favorite is Yoast SEO.
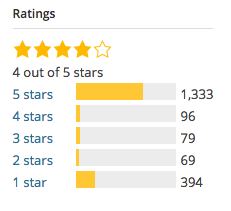
WordPress SEO by Yoast is the most popular SEO plugin on WordPress for a reason. This can be seen in the approximately 2,000 reviews, with an overall rating of 4 out of 5 stars.
If you want to improve your WordPress SEO, both by creating better content and by optimizing your site, this plugin may be the best place to start.
There are many features to focus on, with some of my favorites including:
- Page analysis tool.
- Technical WordPress Search Engine Optimization
- XML Sitemaps functionality
When it comes to page analysis, you need to know exactly what you’re doing. SEO by Yoast makes sure that you’re always on the right track.
For example, Yoast SEO can quickly scan any page for images, ensuring that each one has an alt tag that matches the primary keyword for the post. Along with this, it checks your content for length and confirms whether or not your meta description is up to par. And, that’s just the start.

When you look at this, it’s easy to see what you’ve done right and if you’ve done anything wrong. In the event that a green check mark is absent from a particular line, you can address the issue before publishing – for example, heading back to your meta description to make a tweak or two.
If you need guidance with each aspect of your site’s SEO, the WordPress SEO by Yoast plugin has your back. Thanks to its simple, yet detailed approach, it’ll never let you down.
2. All in One SEO Pack
If you don’t want to use Yoast SEO, which is the one I prefer, you can always give the All in One SEO Pack a try.
The name pretty much explains it all.
Since its release in 2007, this WordPress plugin has been providing webmasters with an easy to use solution to many SEO related challenges.
The biggest benefit is the fact that you don’t need any experience to get started. If you can read and you can input the right data in the right fields, then you can use this plugin.
For some inputs, you may not need to touch anything (unless you want to, of course).
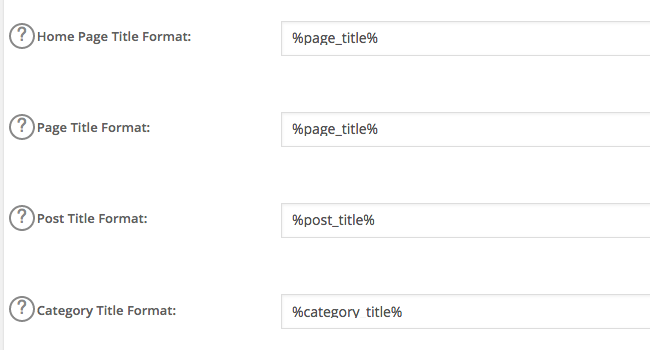
With the above, you can stick with the defaults, which is often best, from an SEO perspective. Or, you can alter the format to better suit your needs.
Top features of All in One SEO Pack include:
- XML Sitemap and Google Analytics support.
- Automatic optimization of titles for all search engines.
- Automatic generation of META tags.
- Helps you avoid duplicate content, which can have a negative impact on search engine rankings.
- Ability to override any setting.
Overall, All in One SEO Pack gives you as much or as little control as you want. As you gain experience, you can take on more responsibility, through the advanced features of this plugin.
3. Google XML Sitemaps
What are you doing to ensure that your site’s content gets indexed?
If you don’t have an answer to this question, you’re missing the boat. Sure, the search engines may find your content without being pointed in the right direction, but you don’t have to sit back and hope for the best.
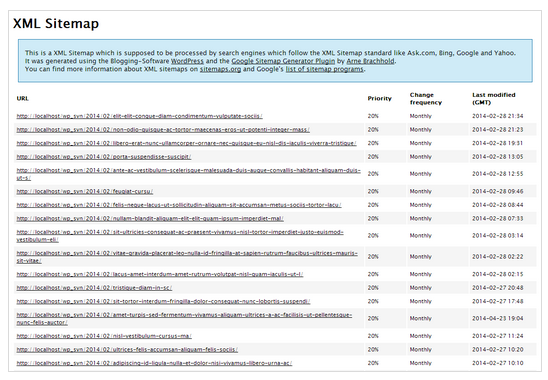
With the Google XML Sitemaps plugin, a sitemap will be generated automatically. Subsequently, its easier for search engines to index your blog.
Best yet, once you create a sitemap and are comfortable with the settings, you never have to do anything else. Instead, the plugin does everything for you, updating your sitemap after each new piece of content that you publish.

There are many “Basic Options” to address, so make sure that you focus on the importance of each one. If all else fails or if you don’t know what you’re doing, stick with the plugin’s default settings.
Once you create a sitemap, it’ll look something like this:
Pro tip: submit the sitemap URL to Google via Google Search Console.
The Google XML Sitemaps plugin does everything right, all in an easy to understand and efficient manner. You couldn’t ask for anything more from a sitemap creation tool.
4. Broken Link Checker
As you create more and more content, you’ll find one thing to be true: it can be difficult to keep up with the management of your blog.
This is where tools, such as the Broken Link Checker plugin can help.
The name says it all, with this plugin checking your content for broken links and missing images. If you’re lucky, you’ll never be alerted that there is something wrong with your site. Of course, don’t expect this to happen.
It’s good to know that the plugin can keep a watchful eye on your website, notifying you of any broken links. This allows you to focus on what you do best, such as creating content, while never having to worry that broken links are working against you.
Some of the top features include:
- Ability to monitor links in posts, pages, comments and even custom fields.
- Detects any link that doesn’t work.
- The option to give broken links a different appearance in posts.
- The option to prevent search engines from following broken links.
Being that this is a guide on how to use SEO plugins, the final point is the most important. You don’t want your site littered with broken links, as it can have a negative impact on your rankings and user experience.
With the option to prevent search engines from following these links, you never have to worry about the consequences that could happen before you’re able to remove or alter the link.
The Broken Link Checker plugin is both simple to use and powerful. With more than 400,000 active installs and a high rating, it’s worth checking out.

5. Google Analytics by MonsterInsights
Do you use Google Analytics to track website visitors, top keywords and other, similar data?
If so, you should check out the Google Analytics by MonsterInsights plugin. Not only does it have approximately 11 million downloads, but its feature list is well worth checking out:
- Use of Google Analytics API for simple installation.
- Ability to use the asynchronous or universal tracking code.
- Access to a beautiful data metric dashboard within WordPress.
- Outbound and internal link tracking.
- Access to both demographics and interest reports.
The primary benefit of Google Analytics by MonsterInsights is the ability to review your Analytics data from your WordPress dashboard. You don’t have to jump back and forth between your website and Google Analytics. Instead, everything is exactly where you want it to be.
The general settings panel is where you’ll start.
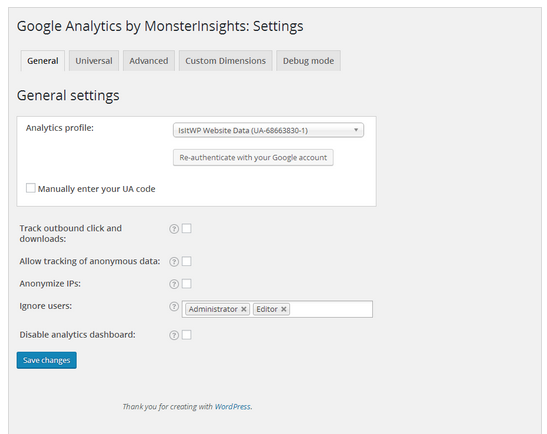
Once you make all the right choices here, it’ll only be a matter of time before you’re collecting data that you’re able to access from your WordPress dashboard.
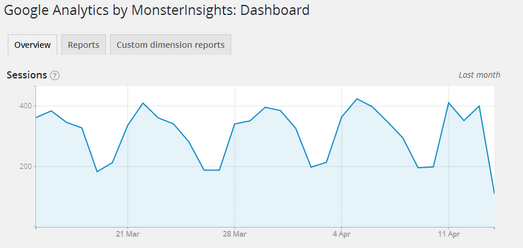
Here’s an example of a dashboard displaying the number of sessions on a website:
You aren’t required to use this type of Google Analytics plugin. You could always visit Google Analytics direct, when you want to review data for your website. However, this can be time consuming.
If you want to review your website stats in a more efficient manner, this plugin could be your key to success.
6. W3 Total Cache
When was the last time that you thought about the speed of your WordPress website? Do you understand that this can impact your search engine rankings?
Many people overlook just how important it is to provide a lightning quick experience. Google has made it clear that site speed is a ranking factor, so this isn’t something you want to overlook.
If you’re having trouble in this department, it’s time to consider the benefits of the W3 Total Cache plugin.
With this, you can improve site speed, as well as the overall user experience. With a long list of users, including big names, such as AT&T and Mashable, you know that you’re in good company if you install this plugin.
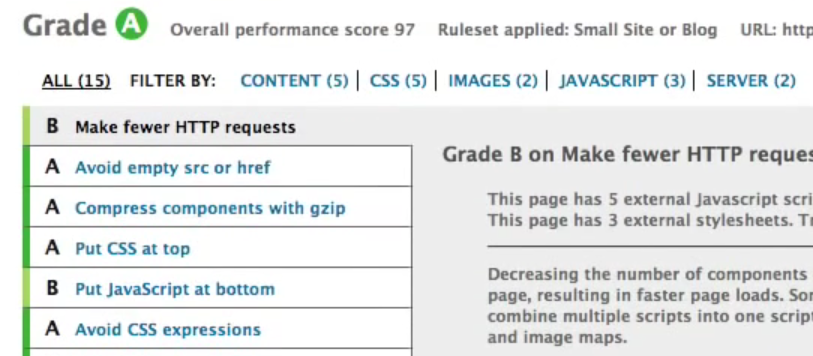
There are many benefits to using the plugin, but here is my favorite, as shared on the official download page:
“At least 10x improvement in overall site performance (Grade A in YSlow or significant Google Page Speed improvements) when fully configured.”
That’s saying something. With such a bold claim, it only makes sense to review this plugin and see if it can do something special for your website.
From the caching of pages and posts to the ‘minification’ of 3rd party JavaScript and CSS, you never have to wonder if the features of this plugin are worth your time. You’ll like what you see soon after the install is complete.
(via YouTube)
7. All In One WP Security & Firewall
What impact would a security breach have on the way that people use your website?
Despite the fact that WordPress is extremely secure, this doesn’t mean that you can forget about all of the risks that are out there.
To protect your website, to the best of your ability, use All In One WP Security & Firewall.
There is nothing wrong with extra security, beyond what WordPress already provides, as this will help keep your site running efficiently.
For example, there are many user account security features:
- Password strength tool.
- Stop user enumeration.
- Ability to detect any accounts with an identical display name and log in. This is a poor decision, from a security perspective, as it gives hackers half of what they need to access your dashboard.
But, how will I know if my website is secure, you might ask?
This is another area where the plugin can help, as it provides a security points score, based on the current set up.
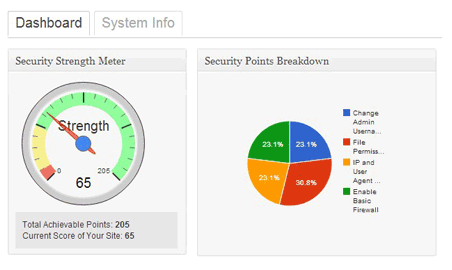
(via Tips and Tricks HQ)
The last thing that you want people to see in the search results is this:
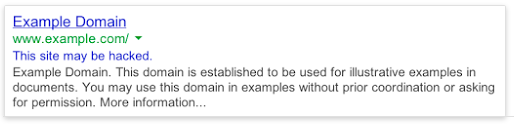
(via Google)
Not only will this chase people away from visiting your website, but it can kill your reputation. With all this working against your site, rankings can suffer as a result.
Using the All In One WP Security & Firewall plugin will give you greater peace of mind about the security of your WordPress site.
8. WPtouch Mobile Plugin
Is your WordPress website mobile friendly?
This may not have been a big deal in the past. But, in today’s day and age, it’s a must. There are a couple of reasons for this:
- More people than ever are browsing the internet via a mobile device, such as a smartphone or tablet.
- The lack of a mobile friendly website will have a negative impact on your search engine rankings.
There is a lot to know about Google’s mobile friendly update, including the fact that your website should be mobile friendly.
If you don’t have the time, money and resources to pay a developer or to upgrade your site on your own, then you can turn to the WPtouch Mobile Plugin.
This plugin “automatically adds a simple and elegant mobile theme for mobile visitors to your WordPress website.”
Easy enough, right?
Once the plugin is installed, you can use the administration panel to customize the mobile appearance of your blog. Best yet, you don’t have to alter the code to make key changes.
This plugin has nothing to do with the desktop theme, as this will still be displayed to those who are non-mobile visitors. It simply ensures that any mobile visitor to your website can review your content in a seamless manner.
Today, your WordPress website needs to be mobile friendly. If you want to make this happen without delay, use the WPtouch Mobile Plugin.

9. Yet Another Related Posts Plugin (YARPP)
Are you familiar with the fact that a low bounce rate is a positive SEO signal? How about the fact that you want to keep people on your site for as long as possible?
Both of these things show search engines that your site has a lot to offer, while also providing a strong user experience.
One of the best ways to improve in both areas is to install the Yet Another Related Posts Plugin.
Once installed and set up, the plugin displays posts and pages (or other content) related to the current content. The idea behind this is simple: you’re giving readers relevant content, which means that they will stick around longer.
Some of the things that I like about the plugin include:
- Option to choose between thumbnail and list view.
- Use of an advanced algorithm to ensure that the best posts are displayed.
- Templating features, so you can control exactly how results are displayed.
In today’s world of SEO, you need to lower your bounce rate and increase the amount of time that users spend on your site. A plugin like this can help you do just that.

(via YARPP)
10. Seo Optimized Images
It’s easy to get so caught up in optimizing your content that you overlook the importance of images.
But, there’s more to using images than simply inserting them into your content. You must also make sure that each one is optimized, as this will improve your rankings, while also helping drive traffic through Google Images search.
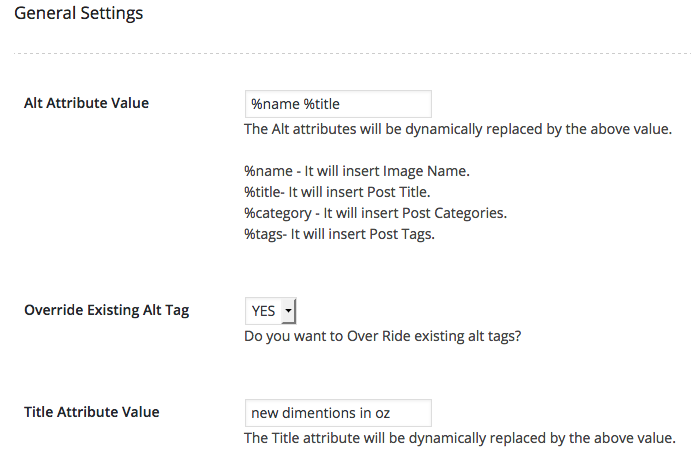
With the guidance of the SEO Optimized Images plugin, you can “dynamically insert Seo Friendly alt and title attributes” into every image.
When using WordPress, it’s extremely easy to add images to posts and pages. But, that doesn’t guarantee that you’ll optimize each one for optimal performance.
If you want to avoid any image-related SEO mistakes in the future, be sure to use this plugin. It’ll help your SEO, while also saving you time.
Conclusion
As you search available WordPress plugins, you’ll be surprised to find just how many are devoted to SEO-related tasks.
While it’s a good business practice to learn more about each WordPress SEO plugin at your disposal, you don’t want to bog yourself down with too many. To protect against this, get started by considering the 10 plugins detailed above.
Do you have experience with any of these? Would you add others to the list? Share your thoughts in the comment section below.
Content retrieved from: https://neilpatel.com/blog/10-wordpress-plugins-to-turn-your-site-into-an-seo-powerhouse/.
How to Add AdSense Auto Ads to Google AMP Pages in WordPress
Posted on August 17th, 2018
For AdSense publishers that use Google AMP by Automattic, after setting up auto ads and adding to your WordPress site, you must have noticed that Google ads don’t appear on the the Accelerated Mobile Pages (AMP) of your site.
This could cost you thousands of dollars in earnings, if a great deal of your visitors use their mobile devices.
After receiving several requests from my readers to publish a tutorial to correct this anomaly, I have decided to do just that. This tutorial will show you how to add AdSense on AMP pages.
Video Tutorial
If you don’t find the video sufficient, or you just want to know more, then continue reading.
You can easily display ads on AMP pages using several plugins. However, many of them come at an extra cost. You don’t have to spend a dime to get this done – It’s not as difficult as you imagine.
To display ads on AMP with this guide, we will be making use of the latest innovative feature called “Auto Ads”.
The auto ads feature allows you to add a simple code to your site, and after adding that code you can easily manage your ads directly from your AdSense dashboard.
Follow this guide: setup auto ads and add to WordPress
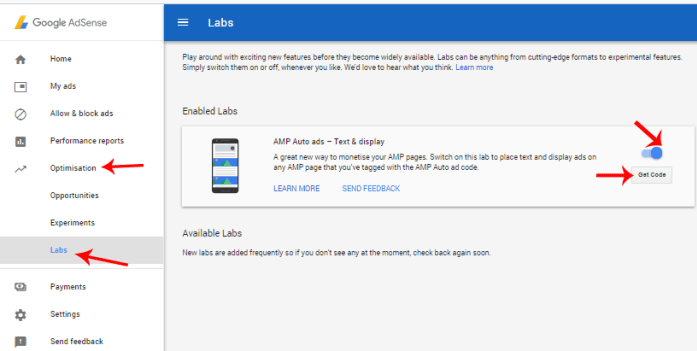
If you are very familiar with your AdSense Dashboard, you must have noticed a new feature located within Optimization>>Lab. This feature is called “AMP auto ads (text and display) – A great new way to monetize your AMP pages. Switch on this lab to place text and display ads on any AMP page that you’ve tagged with the AMP Auto ad code”.
First thing you need to do is toggle on this feature and click on get code.
You will be provided with an AMP code you have to add to two places on your website.

AdSense has a guide to add this code to your site. However, you may find this difficult to implement without proper guidance if you are not a tech savvy. This post will help you add those AMP codes to your site even if you are new to coding.
You can add AMP codes by directly customizing your AMP plugin. But the most recommended method is to add your AMP code to your theme functions.
How to add AMP codes to theme functions
Make sure you are logged in to your WordPress dashboard. Hover your mouse cursor on the appearance icon and click on editor.
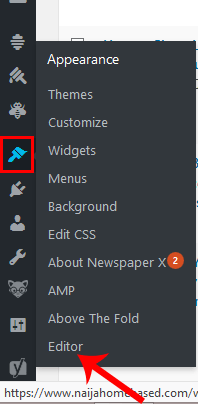
Make sure the theme you want to add your AMP code to is selected and click on Theme functions (functions.php).
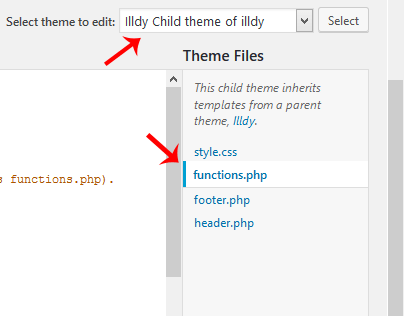
Recommended action: Add AMP code to a child theme and not a parent theme. Remove AMP code previously added to AMP plugin if that didn’t work.
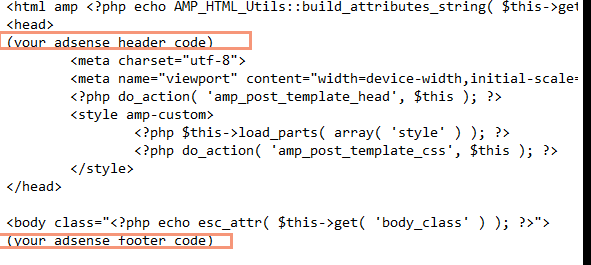
Add the two codes below to your functions.php respectively, ensuring you replace //adsense_header_code and //adsense_footer_code with your AMP header and footers codes respectively.
//Adding Header Code in AMP pages in WordPress add_action(‘amp_post_template_head’,’nhb_amp_my_custom_head’); function nhb_amp_my_custom_head($amp_template) { ?&amp;amp;amp;amp;gt; //adsense_header_code &amp;amp;amp;amp;lt;?php }
//Adding Footer Code in AMP pages in WordPress add_action(‘amp_post_template_footer’,’nhb_amp_my_custom_footer’); function nhb_amp_my_custom_footer($amp_template) { ?&amp;amp;amp;amp;gt; //adsense_footer_code &amp;amp;amp;amp;lt;?php }
The final piece of code within your functions.php should look like the one in the image below.

With this method, Ads will begin to show up within your AMP pages. You can also verify this by visiting yoursite.com/page/amp/
If you intend to configure your AMP plugin directly (not recommended), here’s a guide for you.
How to add AdSense AMP code to AMP plugin
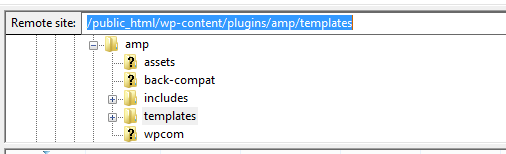
You can configure your plugin directly from your WordPress dashboard. However, it is advisable not to do that. The best way to configure your plugin is to Add the code using your FTP/SFTP client. In my case, I access my remote site using FileZilla. It is one of the best FTP clients out there.
Make sure you are logged in to your FTP client and ensure the location on the remote site points to /public_html/wp-content/plugins/amp/templates.
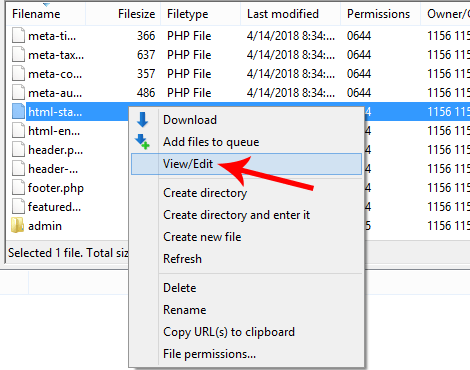
Under your amp>>template, you should see the filename html-start.php. right click on that file and click on edit.
Paste the AdSense header code directly below the <head> tag and the footer code directly below the opening <body tag, as shown in the image below.
After pasting the code in your editor, save the settings to your server.
Google Ads should start displaying in your AMP pages immediately. You can verify this by visiting any of your site/blogpost/amp in a mobile phone browser (preferably chrome browser). Google ads may not be visible in search results until around 20-30 minutes.
That’s everything about adding auto ads to your AMP pages in WordPress. Feel free to communicate your challenges if you were unable to get this done.
Subscribe to this blog using the subscription box below. Also, follow us on Facebook and Twitter to get access to our exclusive tutorials faster than anyone else.
Content retrieved from: https://www.naijahomebased.com/adsense-amp-code-amp-pages-wordpress/.
5 Key Considerations for Setting Up a Baidu PPC Account
Posted on August 16th, 2018
- Lena Xu
- March 13, 2014

Baidu is the world’s largest Chinese search engine and holds more than a 60% share in the Chinese search engine market. Worldwide, Baidu is the 5th largest destination online, in terms of traffic ranked relative to other sites, based on data from Alexa.com
As such, Baidu presents an attractive opportunity for B2B marketers looking to achieve visibility in the Chinese market. Baidu PPC Advertising is one mechanism for B2B companies to enter Chinese market via online marketing.
Unfortunately, setting up a PPC Advertising initiative through Baidu isn’t as easy as it sounds, especially for those B2B marketers used to Google AdWords and Bing AdCenter; even though the functionality is quite similar, administration is considerably different.
B2B marketers looking to set up a Baidu PPC account should take the following 5 points into consideration:
Baidu Divisions and Resellers Only Accept Local Clients
Baidu “only accepts local clients,” a rule that could help advertisers save lots of time when communicating with various Baidu resellers or Baidu divisions.
 In other words, the Baidu Beijing division or resellers only accept the clients located and marketing in Beijing. They would not even be able to create an account for a client looking to target an audience in Shanghai or even from Shanghai (you have to go through Baidu Shanghai division or Shanghai reseller to do this!).
Foreign companies without an existing Chinese presence “on the ground” need to create the account through Baidu overseas resellers. For example, A US company would need to work with a designated Baidu US reseller for creating a Baidu account; they cannot go directly to Baidu or though the Beijing reseller.
However, there is an exception if a US company has an existing Chinese presence such as a China branch company or China factory. For instance, if a US company has a branch company in Shanghai, and the website it plans to promote on Baidu PPC ads is mainly related to the Shanghai branch company, the company would not be “defined” as an “Oversea client” by Baidu.
If an organization’s annual PPC advertising budget is large enough, it’s possible to create a Baidu PPC account through Baidu headquarters in Beijing, regardless of whether you’re a local or a foreign company. This is called becoming a “Key Account Client.” The minimum ad spend requirements for “Key Account Clients” are different for oversea clients and China clients, and they are also different for the different cities and regions in China. You have to contact Baidu headquarters for more detailed information or to learn about applicable requirements.
Additional Points:
- Providing China Local Presence to Prove You Are a Local Client: If foreign B2B marketers want to prove they’re local clients, they have to provide the relevant information about having a local presence (i.e., a local website link or local certificate of incorporation).
- Complicate Communication Process: The communication process for creating a Baidu PPC account is far more complicated than creating a Google Adwords account. As a result, patience is required when communicating with various divisions or resellers in the process of creating a Baidu account.
[video_page_section type=”youtube” position=”default” image=”http://track-n-test.com/wp-content/uploads/2018/08/youtube-banner1.jpg” btn=”light” heading=”” subheading=”” cta=”” video_width=”1080″ hide_related=”false” hide_logo=”false” hide_controls=”false” hide_title=”false” hide_fullscreen=”false”]https://www.youtube.com/watch?v=IpGcnvo4GmI[/video_page_section]
Certificate of Incorporation
Unlike Google Adwords, Baidu requires that you submit a copy of the Certificate of Incorporation before you apply for a Baidu PPC account (it needs to be written and translated in English and Chinese (Mandarin)).
If you are an overseas company, you also need to provide one local government website, which allows Baidu to get the registration information for your company. Note that right now, Baidu PPC advertising will not accept any kind of lottery or pharmaceutical website advertisements based on Baidu PPC policy.
Sign a Contract
Establishing a Baidu PPC account involves signing a contract, which contains the privacy terms and advertising policy. B2B companies have to agree to these terms and email (or fax) the Baidu division or reseller the signed contract before applying for a Baidu PPC account.
For foreign companies, the commitment of overseas internet clients is essential, which includes the terms of Baidu service and relevant rules; for instance, the keyword selection and website content should comply with the provisions of Chinese law and all the information advertiser submit should be true.
Additional Points:
- Reserve extra business days for the contract signing process: It takes time for the Baidu division or reseller to process the contract. For this reason, B2B companies should reserve extra business days for the contract signing process.
- Translating Work: Foreign companies may need to translate the Chinese contract into an English contract by themselves since some Baidu China resellers may not be able to provide an English contract as well as those who speak English as a first language.
- Legal Terms: Due to the differences between Chinese and Western law (as well as the cultural differences), foreign companies should pay close attention to the legal terms in the contract.
Fee for Account Creation & Down Payment
Baidu requires a company to pay for the account creation fee and pre-pay the down payment for PPC ad spend as well. Sometimes, the fee for account creation and down payment differ based on different divisions and resellers. For example, the down payment for the Baidu US reseller is CNY 5,000 while the down payment for the Baidu Suzhou reseller is CNY 10,000 (this varies year by year).
In addition, most of Baidu resellers require an annual service fee, which cannot be waived for any reason (including whether you need any services or recommendations of account management from them). Usually the annual service fee is CNY2,400/year.
Additional Points:
- Not Only PPC Ad Spend: The Baidu PPC account includes more than the PPC ad spend. A Baidu account management fee = the Baidu account creation fee + the reseller annual service fee + the Baidu PPC ad spend.
- Make Full Use of the “Annual Service Fee”: Do not hesitate to ask Baidu divisions or resellers for more detailed information and recommendations about the Baidu PPC management since, you’ve already paid for the services in your “Annual service fee.”
Payment Methods
The payment process can be inconvenient for a non-China company, since Baidu does not accept any form of international payment methods, including credit cards like Visa or Matercard; overseas third-party platforms like PayPal are also unacceptable.
For this reason, it’s advisable to for foreign companies to use a payment process through their Chinese bank accounts. Otherwise, companies have to transfer the ads budget to Baidu or Baidu resellers directly through international wire transfer.
Additional Points:
- Translating work: As with translating the contract, B2B companies may need to translate the banking account information from Chinese into English by themselves since some of Baidu resellers may only be able to provide the banking account information in Chinese.
- Reserve Extra Time for the Payment Process: It may take some time for banks and the Baidu division (or resellers) to process payments. B2B companies should reserve more time (1-2 weeks) for the payment process, especially for the international wire transfer process (2-3 weeks).
- Converting Currency: Most Baidu resellers accept only Chinese CN Yuan, so B2B companies may need to convert the US dollars into Chinese CN Yuan by themselves.
- Re-funding Contract: B2B companies may need to sign a new re-funding contract if they plan to change the banking account in Baidu PPC payment; however, this depends on different resellers.
Final Thoughts
As can be discerned from the points outlined above, Baidu account creation is not as simple as creating an account in Google Adwords. Nevertheless, Baidu PPC is still one of the most effective and efficient internet marketing tools B2B companies in China and, for this reason, the extra effort may pay off over the long term.
Stay tuned for more tips and recommendations regarding Baidu PPC marketing in the future. If you have any questions or comments about creating a Baidu PPC account, free feel to contact us or share your thoughts in the comments section below.
Content retrieved from: https://komarketing.com/blog/5-key-considerations-for-setting-up-a-baidu-ppc-account/.
How to get a $10,000 Working Capital Loan From Paypal
Posted on August 16th, 2018
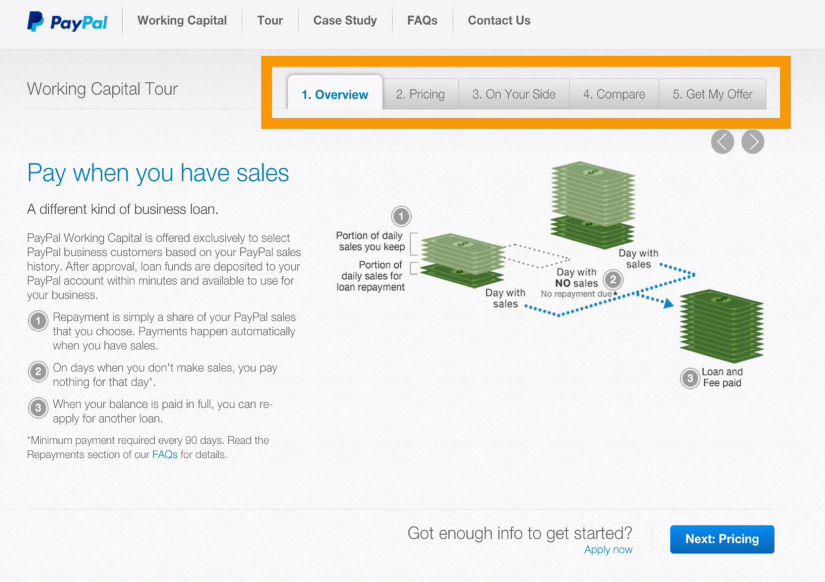
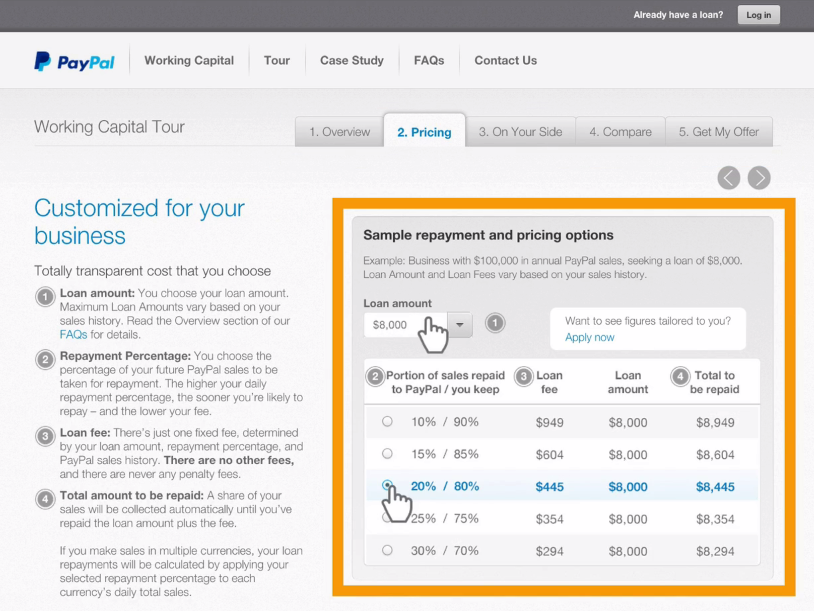
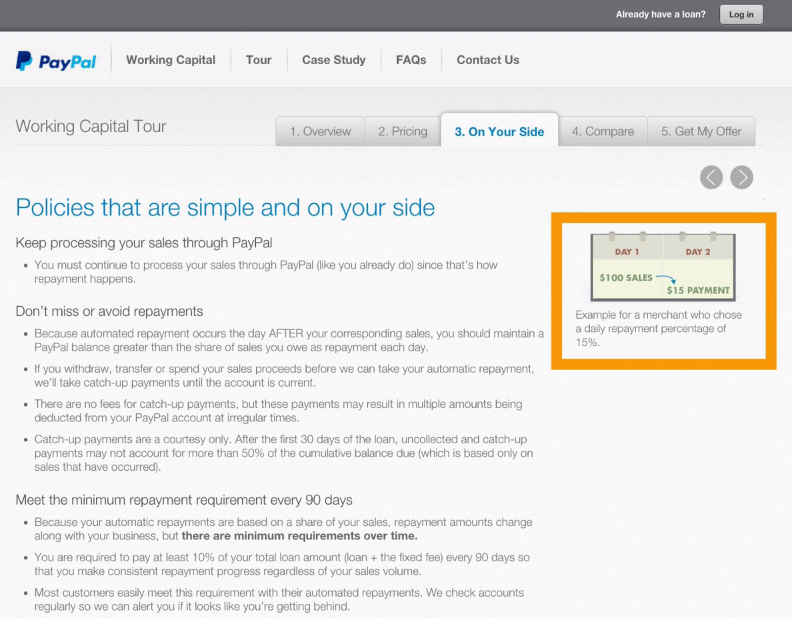
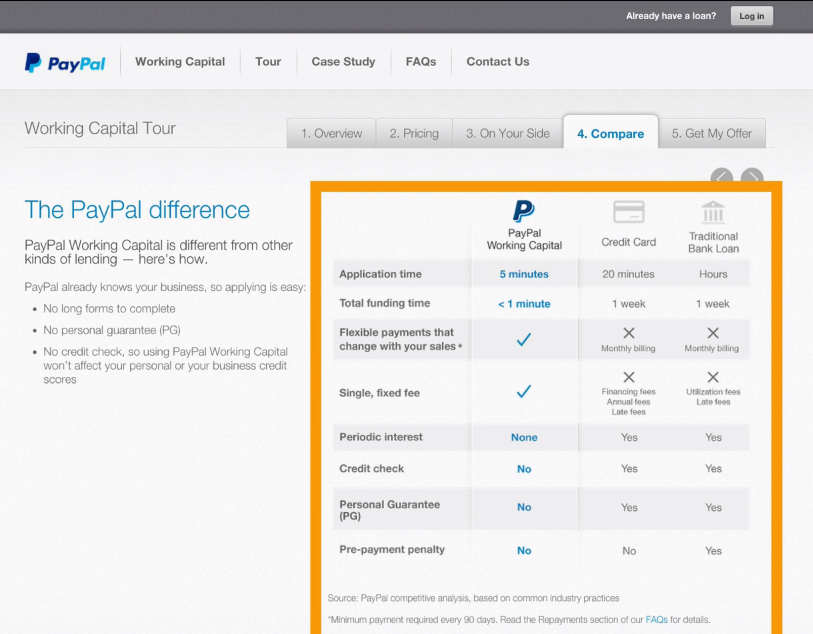
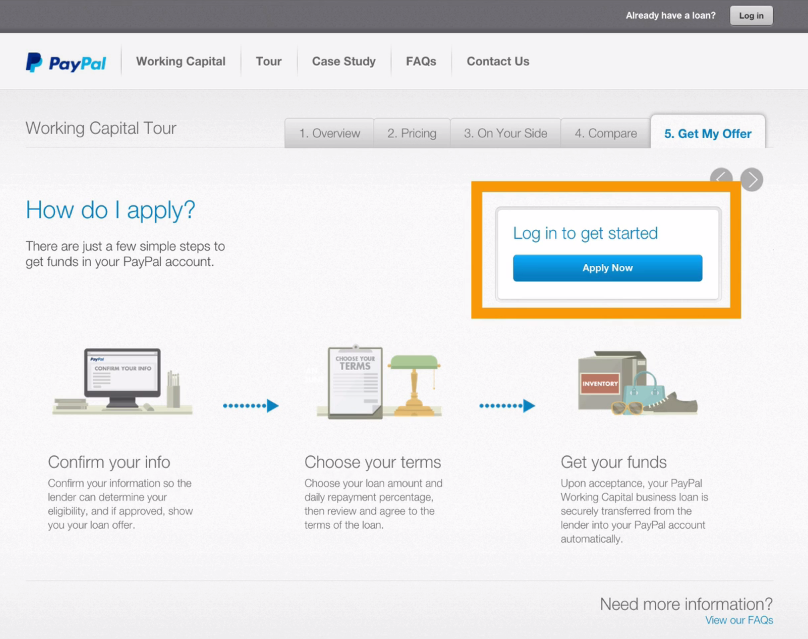
PayPal Working Capital Loans are a dream source of funding for entrepreneurs who don’t have good credit – No Credit Checks Required – Get Funds Instantly Deposited – One Very Low Affordable Fee – Flexible Payback Terms Based on Sales And… You can get loans up to $85,000 All without a credit check!

These “Performance Based” loans are dream loans for entrepreneurs who are willing to hustle knowing that they have someone willing to help them scale their business up 10X! We decided to get one of these loans ourselves to go through the process so that we could see how it all worked before showing you.
2) Generate $20k+ in a 90 day period

The big takeaway here is to understand that PayPal has a working capital loan program that you can qualify for with a few creative ideas. You need to put together an action plan to generate $20,000 in your Paypal account, and season it over 90 days. This way PayPal sees you as a low-risk investment and you can begin scaling your entire business, just like I have shown you. And also keep in mind that this is just ONE of the modules in this course, so get ready for an exciting ride! I’ll see you in the next module to help you take your business to the next level and make these ideas turn into realities!
Content retrieved from: http://newtiptoday.weebly.com/how-to-get-a-10000-working-capital-loan-from-paypaltrade/october-18th-2015.
Top 25 Niches For High Traffic On Google
Posted on August 15th, 2018
Today I’m going to show you the top 25 niches that you can target to get high volumes of traffic on Google. If you are doing any type of business on the internet, you already know how much traffic can be a crucial 500 lb Gorilla when it comes to generating leads and sales. Now … what if I showed you the top 25 niches that I’ve personally created websites on, to pull in high volumes of traffic on Google. Would this interest you? … Of course 🙂
When it comes to ranking websites on Google, it’s starting to get harder and harder to get ranked for those “evergreen” niches. Most of us get discouraged when we work hard on our SEO sites and see little to no results … Believe me, I’ve been there and did that. When it comes to SEO nowadays and getting traffic to your sites, you have to be a little bit more proactive in finding different niches that are highly popular and no one would even think about. What I’m going to give you today is pure GOLD and some of these niches have made me hundreds of dollars per day in automated revenues.
Top 25 Out-Of-The-Box Niches
- Minecraft
- Guitars
- Celebrities
- Holidays
- Costumes
- Chocolates
- Peppers
- Popular Mobile Apps
- Popular Mobile Games
- Tiny Homes
- Video Editing
- Jokes & Entertainment
- Smart Watches
- Coding / Development
- Accessories
- Piano Sheet Music
- Senior Dating
- Hair Braiding
- Korean Fashion
- Magic Tricks
- Home Designs
- Infertility
- Drug Tests
- DNA Testing
- Foreclosure
Believe it or not, you don’t always have to go for the evergreen and hard competitive niches out there. There are literally hundreds and thousands of different niches that people STILL search online today and you just have to use your creativity. I’ve had a few of these niches produce up to $9k+ per month in earnings because I was doing 2 things :
#1 – I was targeting the right marketing with little competition
#2 – I had the right offer for this market to solve their problems
You need to be able to solve people’s problems in order to take a slow site to being a highly successful site. Even if you have 100 visitors per day, you can still target the right offer to those visitors that are highly engaged in your contents. I would rather have 100 people who are highly engaged in my contents and will eventually turn into a buyer lead than 100,000 visitors that are untargeted and turn up to becoming 0 sales. Zero sales out of 0 is still … ZERO.
The secret formula to making money with select few niches
Step #1 – Find a niche that is catered to a specific pain in your market
Step #2 – Find a solution for that particular market (an offer / service). You can find such offers in different places online such as offervault.com / clickbank.com / cj.com / shareasale.com and many other affiliate networks and programs out there available. Just search on Google “niche + affiliate” or “niche + offer” (replace the word niche, with your niche of choice)
Step #3 – Provide that service to your audience in specific niche markets for optimal results. You can either put them through an email autoresponder or a series of landing pages and a funnel to get them to purchase your product. My best route has ALWAYS been to building an email list so that you can continually send them relevant offers and multiple offers throughout the life of the lead.
The point of this blog post is to open your eyes and show you that the world out there has a TON of great ideas and great niches with little to no competition (especially if you have a great offer already set). There are even niches out there that will show you how to “get more gold” in an online game and how to conquer your enemies an win games faster which makes 6-7 figures per year. As long as you have the traffic and the solution to your visitor’s problems, you will see great results come out of it.
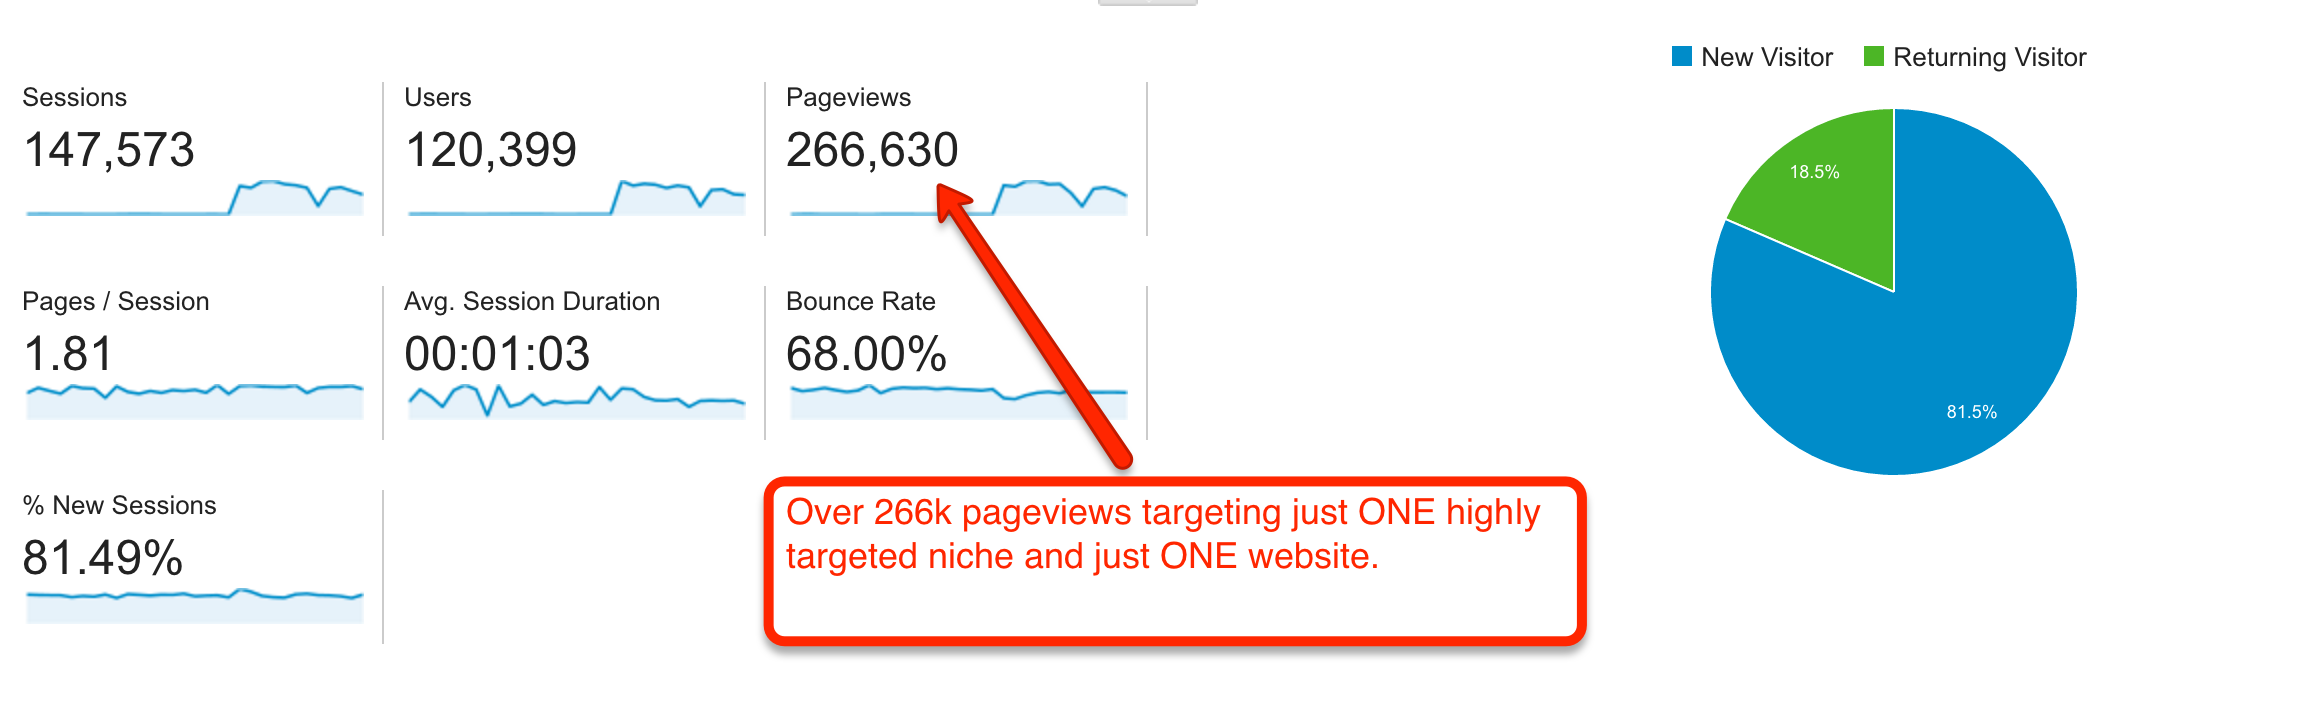
It would also be a shame to write up this blog post without showing you a service that my team and I have developed over the course of 6+ years to perfect for you. I have been building these authority sites for myself as well as for clients for many years now and we have done extremely well for myself .. (See image below of just 1 day’s earning with Adsense)

Check out the screenshot above showing $1,044 in earnings in just one day from these out of the box niches I’ve just showed you. When you’re targeting these niches out there, you can easily grab massive amounts of Google traffic and conquer your market. You really just have to think OUTSIDE the BOX and find GIANT communities that have a huge following (but no one is targeting) …
Once you find these niches, start building your authority site and start dominating multiple page #1 rankings on Google for search terms you would not even have thought about. There are literally billions of searches on Google every day and this is why I’m not afraid to share these niches with you! I’m not afraid of the competition or scarcity of these niches, because the market is just TOO BIG. I’m targeting for niches that NO ONE would ever think about and that’s because of the out of the box mentality that I’ve been focusing on.
It would also be a shame if I did not show you this offer as well. Some might say it’s a shameless plug, but it’s really a shame if you knew that I was doing this for myself and have not shown it to you …
If you would like to have stores like these and start generating 100% organic traffic from Google, we have created a service for our clients which we build out Authority sites 100% DFY (done for you). These sites have been proven to generate traffic, leads and sales for myself and the hundreds of clients we have provided this for. If you are interested in these stores, you can visit our Authority site services here.
What I would recommend even if you do not take our services, is that you go out there and find specific niches that you can be an authority of and generate contents for. Once you have dominated your market and have become an authority in that market, you need to attract your website visitors with offers that will help them SOLVE their PROBLEM. Remember … you don’t always have to go for evergreen niches such as diet / health / skin / fitness and do what EVERYONE else is trying to do. It’s always good to also have your own mindset and think of new ways to generate traffic in different markets. There are millions of people out there looking to find a solution for their problems. If you can gather these people who have problems and give them a solution to their problems, that’s where you will find success.
Content retrieved from: http://teovanyo.com/top-25-niches-for-high-traffic-on-google/.
How To Track Facebook Ads in Google Analytics [The Easy Way]
Posted on August 14th, 2018
Accurately tracking Facebook ads in Google Analytics consists of two primary steps:
- Clearly defined and consistent UTM Parameters so that you can identify Facebook traffic in Google Analytics
- Import cost, impression, and click data into Google Analytics so that you can map platform and session data
Analyzing performance holistically can be a daunting task given that Facebook and Google don’t always play nicely together.
But as a data-driven marketer accurately tracking Facebook ads in google analytics is crucial to understanding campaign performance.
So let’s explore a method for efficient Facebook ad tracking after we take a look at the current problem.
[video_page_section type=”youtube” position=”default” image=”http://track-n-test.com/wp-content/uploads/2018/08/youtube-banner1.jpg” btn=”light” heading=”” subheading=”” cta=”” video_width=”1080″ hide_related=”true” hide_logo=”false” hide_controls=”false” hide_title=”false” hide_fullscreen=”false”]https://www.youtube.com/watch?v=YGOehkY6VNk[/video_page_section]
Tracking Facebook Ads in Google Analytics is Time Consuming
Reporting works well within the confines of one specific vendor.
Google products, for example, work well together in that they allow the linking of Google Analytics (reporting) and Adwords (advertising platform), enabling one to see all data seamlessly in a single reporting interface.
Although Facebook has become a prominent advertising platform, it does not, like Google, have a diverse product portfolio and does not provide reporting outside of platform-specific metrics.
Note: Facebook does provide a reporting and Analytics Tool that is worth exploring.
Since there is no way to seamlessly connect the two platforms, what are our options?
- Analyze and report on each platform separately
- Map the data in a spreadsheet
- Perform manual exports & GA custom imports
All of these options, even with a sound system in place, can be extremely time-consuming, taking away from analyzing and optimizing campaign performance.
In this article, I will go over three available Google Analytics features that you can leverage when tracking Facebook ads in Google Analytics:
- Data Import
- Calculated Metrics
- Custom Reports
It Starts with Proper Campaign Tagging
Let’s go back to the beginning.
When setting up Facebook campaigns, many digital marketers use the Google Campaign URL builder to generate UTMS that look something like this:
/http://easyautotagging.com/?utm_source=facebook&utm_campaign=Spring%20Launch&utm_medium=cpc&utm_content=lifestyle%20image
Aside from the manual effort required, there is nothing wrong with this approach.
That said, defining the source as ‘facebook’ and medium as ‘cpc’ provides limited insight into audience/targeting performance.
[video_page_section type=”youtube” position=”default” image=”http://track-n-test.com/wp-content/uploads/2018/08/youtube-banner1.jpg” btn=”light” heading=”” subheading=”” cta=”” video_width=”1080″ hide_related=”false” hide_logo=”false” hide_controls=”false” hide_title=”false” hide_fullscreen=”false”]https://www.youtube.com/watch?v=ck5VEYhoUFo[/video_page_section]
Using Available Facebook Campaign Fields
There is a more straightforward way to tag your URLs without having to come up with a unique naming convention for UTM fields.
The easiest way to tracking Facebook Ads in Google Analytics is to create unique naming conventions for your Facebook Campaigns, Ad Sets, and Ads that you then use to tag your UTMs respectively.
Below is an example of what the UTM fields and their respective Facebook values would look like:
Campaign – “Campaign Name”
Source – “Facebook” or “Instagram”
Medium – “Ad Set Name”
Ad Content – “Ad Name”
Note: Using Ad Set Name (read audience) as the medium value can mess with your default and/or custom channel grouping in Google Analytics. You can either modify your channel grouping or map custom parameters to custom dimensions.
There are two ways you can go about tagging your campaigns:
Bulk exports/imports via the power editor
EasyAutoTagging which automates tagging all of your Facebook campaign ad URLs
I go into details of how you can do this in How to Track Granular Facebook Campaign Performance in Google Analytics.
Linking your Google Analytics Account
So, how can you see this data in Google Analytics?
First, we have to import Facebook campaign cost, impression and click data into Google Analytics in one of two ways:
- Manual Import
- Automated Import
Option 1: Manual Import
Without EasyAutoTagging, you are limited to exporting Facebook campaign data daily, weekly, or monthly, then manually importing it into Google Analytics via Data Imports.
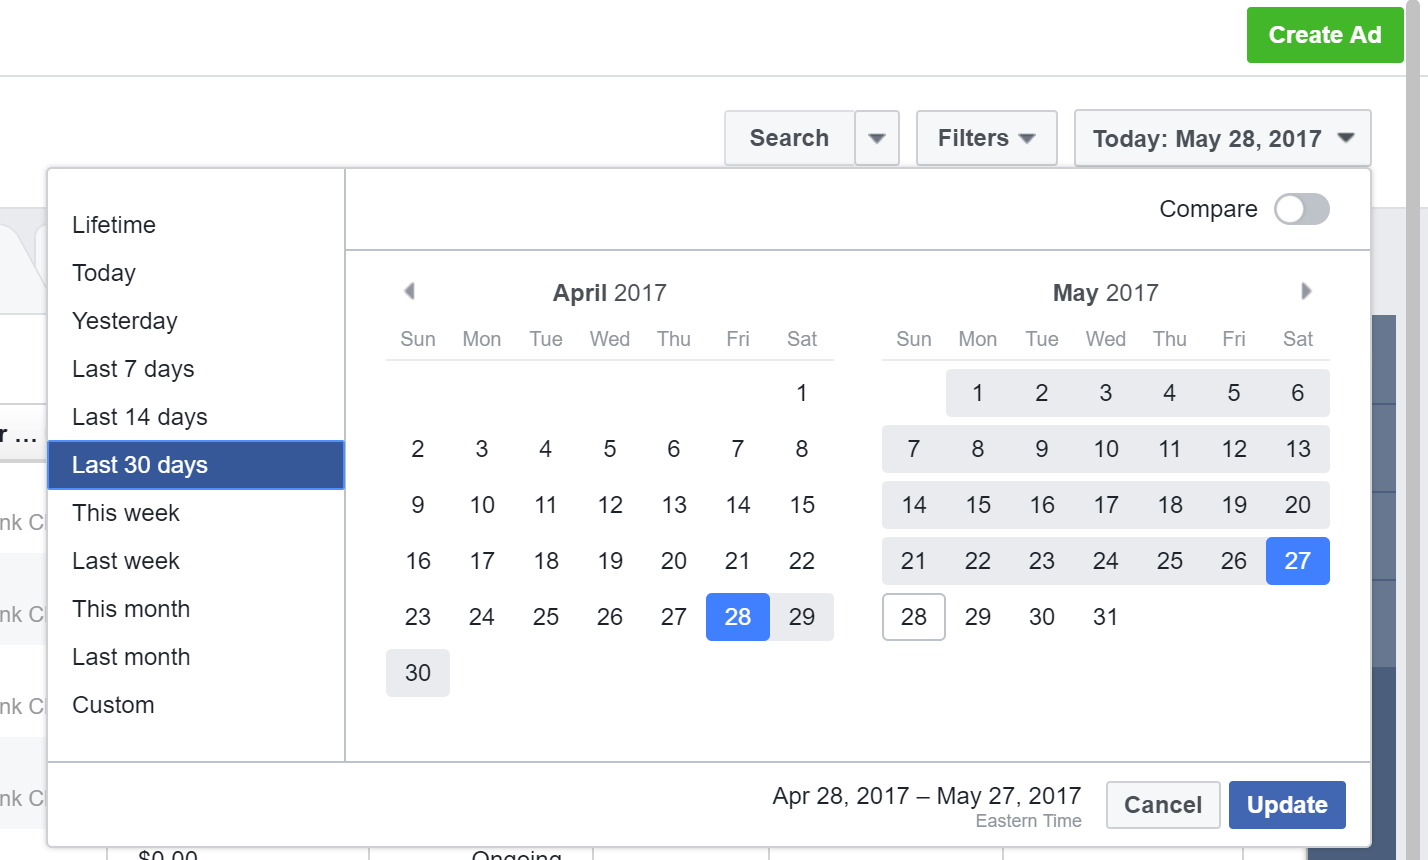
First, go to your Facebook accounts Ads Manager and select your desired date range:
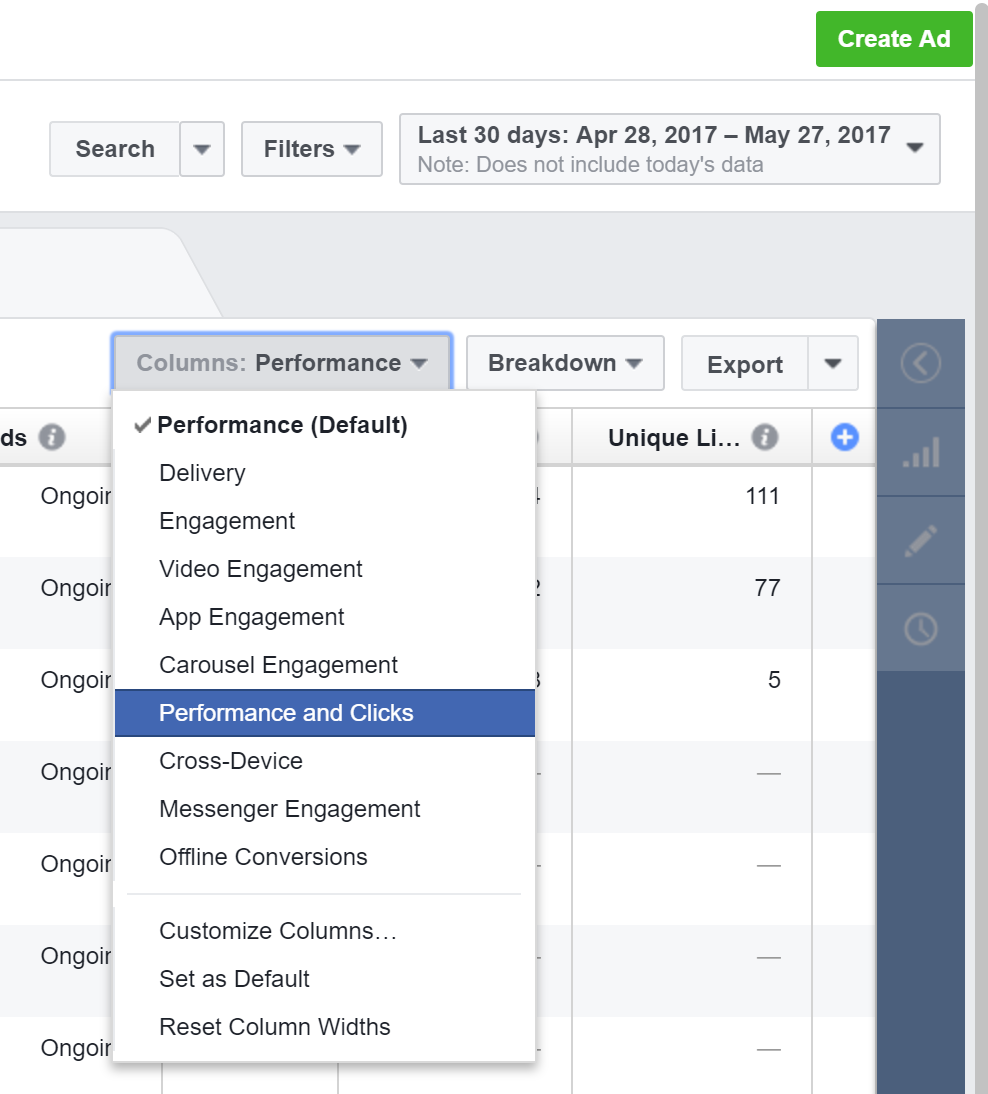
Select the Ads tab across the top and Go to Columns and Select Performance and Clicks:
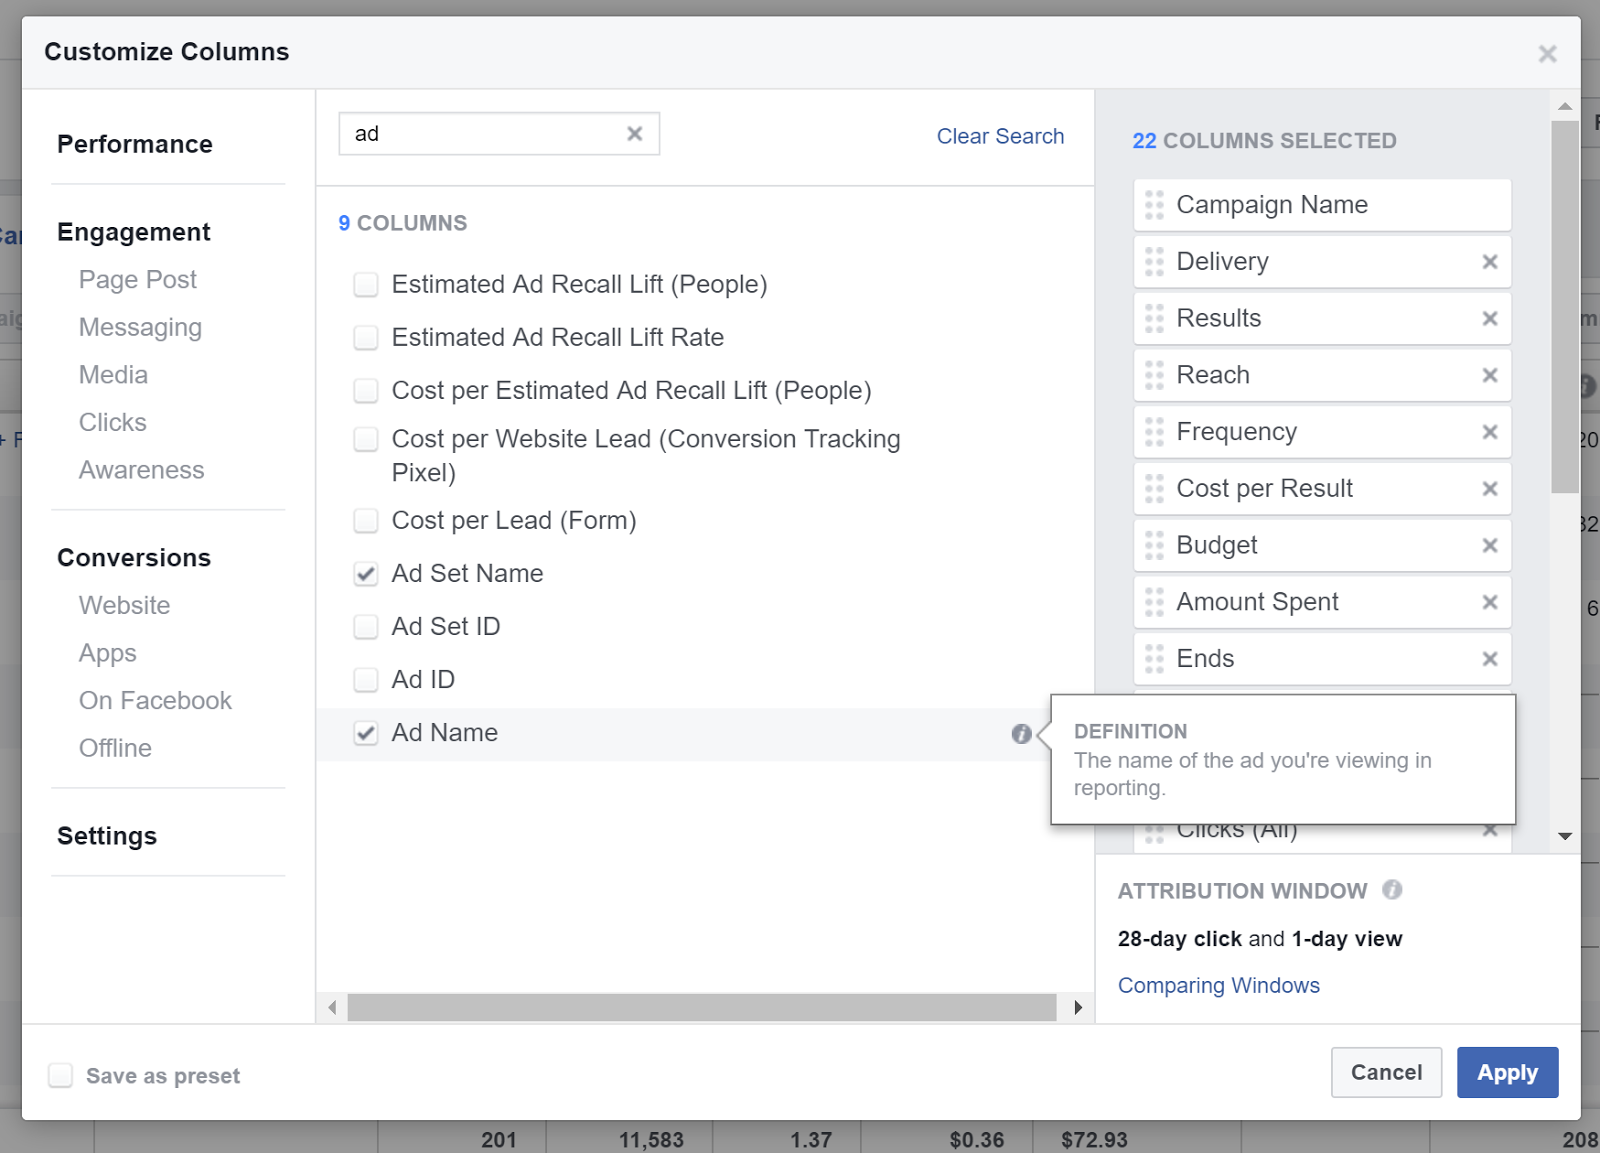
Customize columns and add Campaign Name, Ad Set Name, and Ad Name:
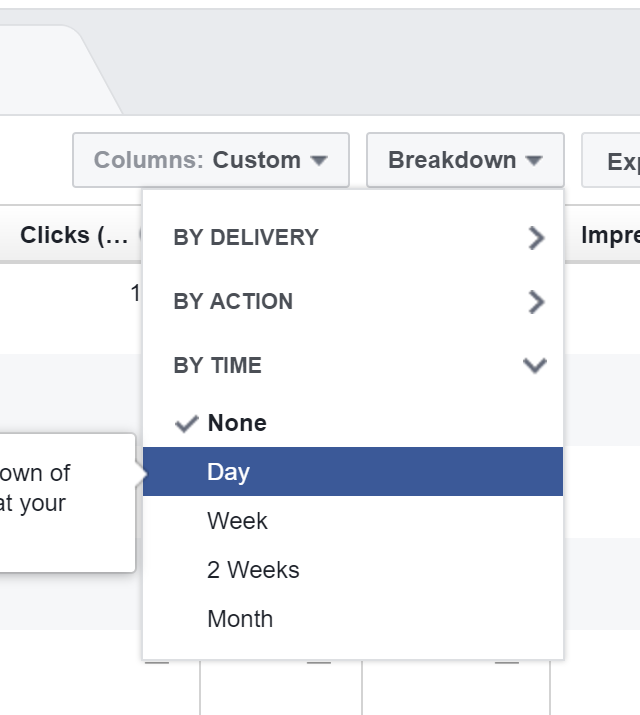
Click Breakdown > by time > Day
Select the campaigns you would like to import and export these to a CSV file:

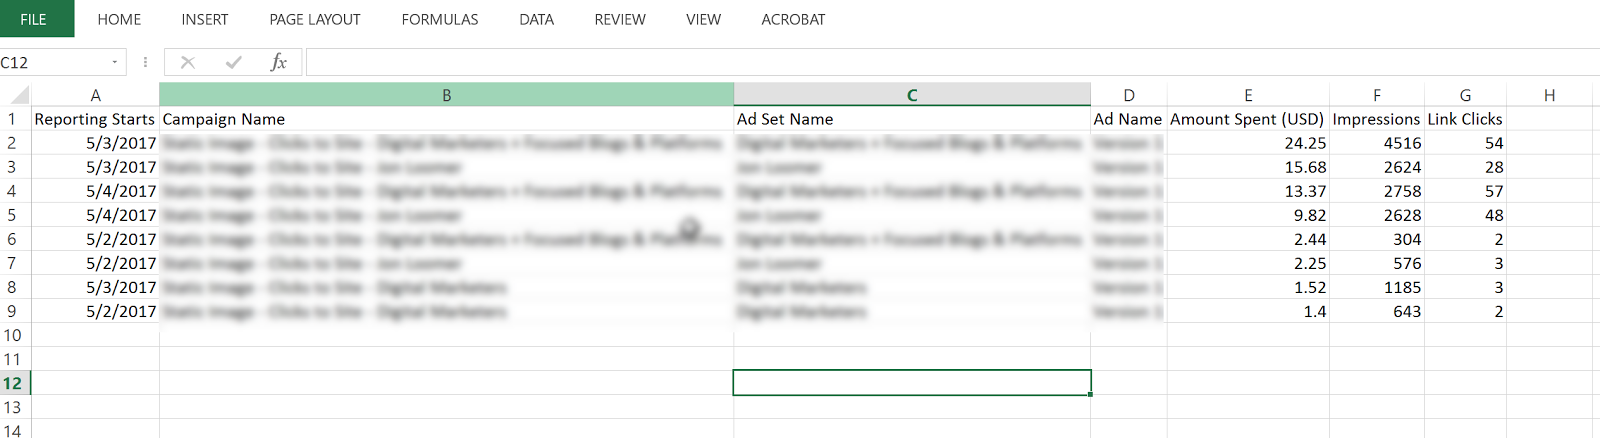
Open the CSV and delete all columns except:
Day (Reporting Starts), Amount Spent, Campaign Name, Ad Set Name, Ad Name, Impressions, Link Clicks
Once you have these cleaned up, head over to Google Analytics and go to Admin > Data Import
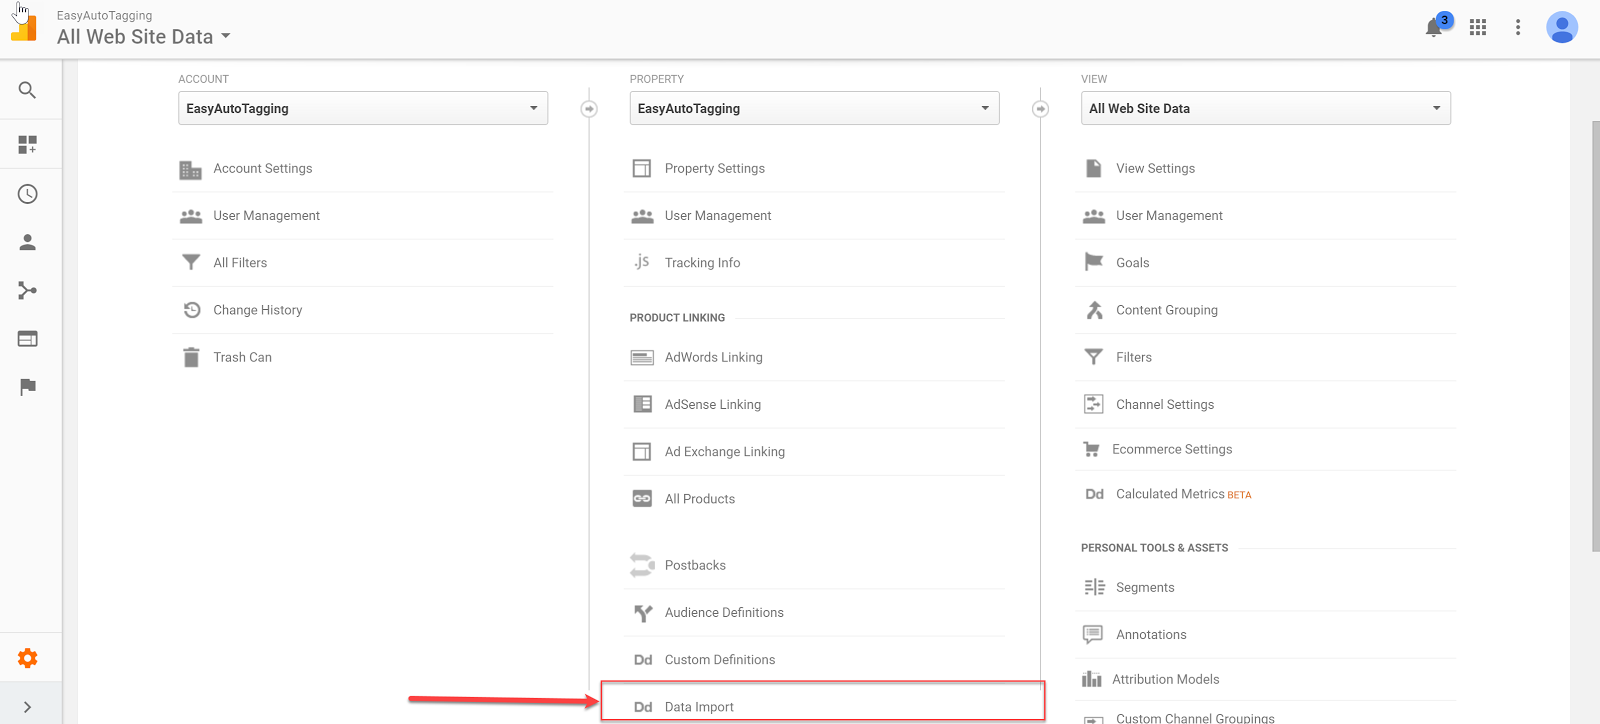
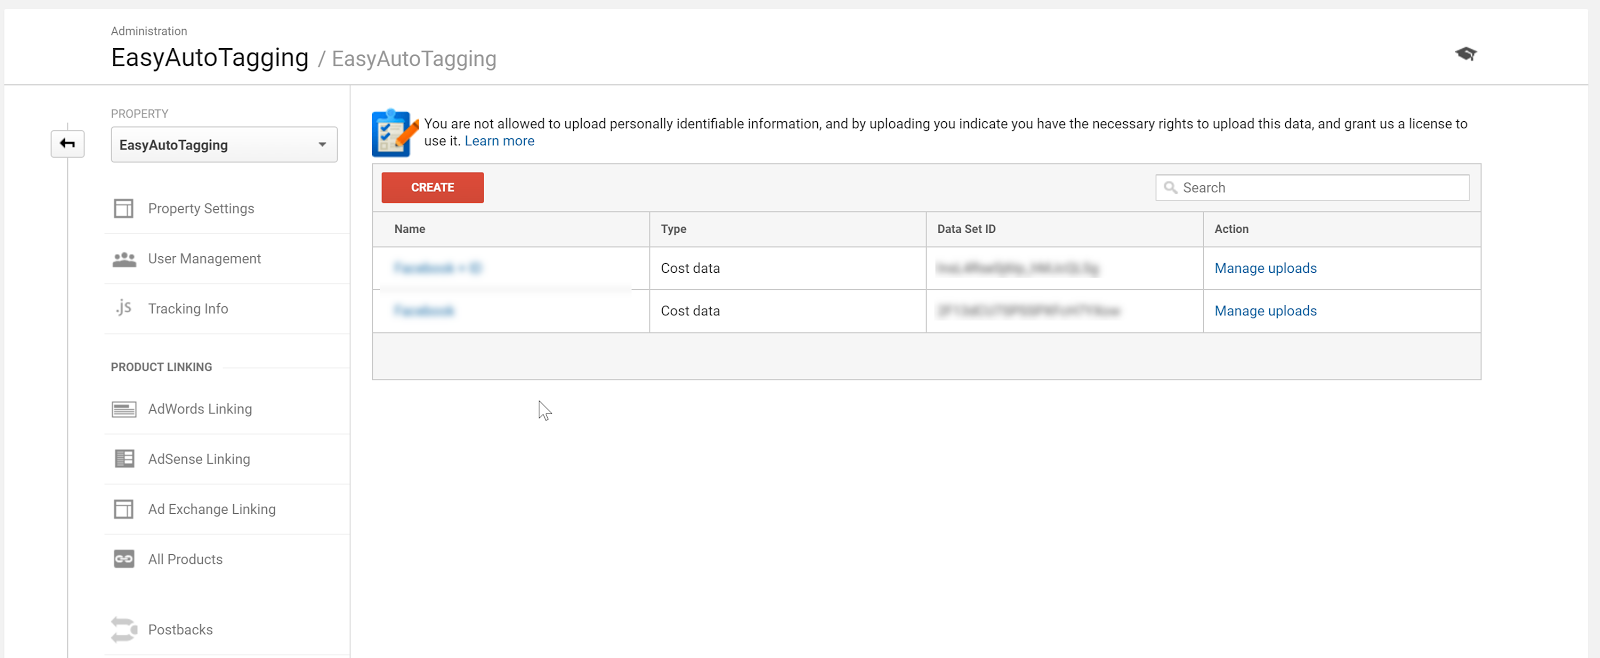
Select your cost import dataset. I go into the detail on how to set up cost, impression, click DataSet in Setting Up Cost Data Sets.
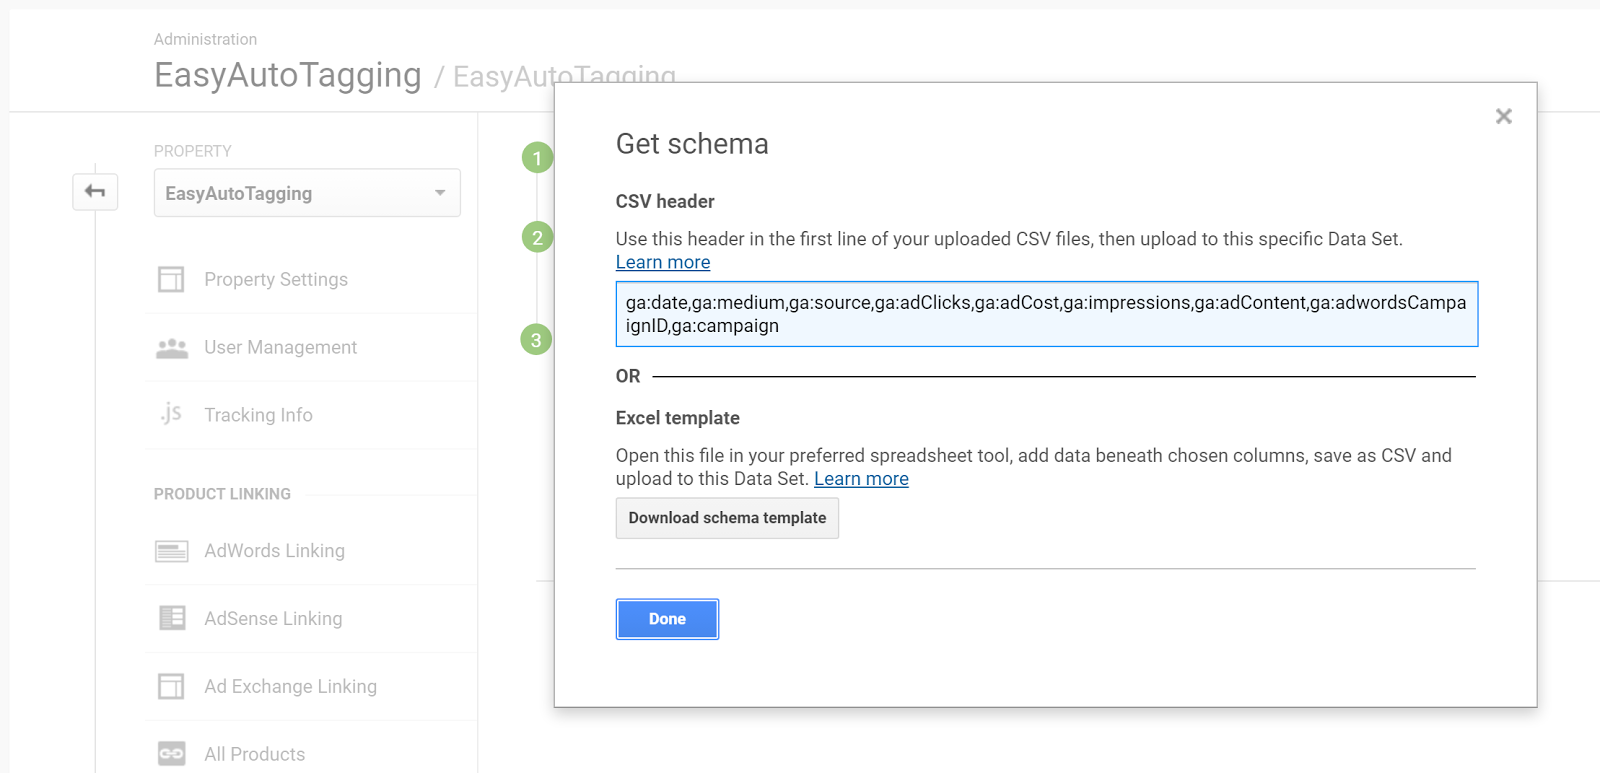
Copy and paste the headers into your CSV respectively of column values.
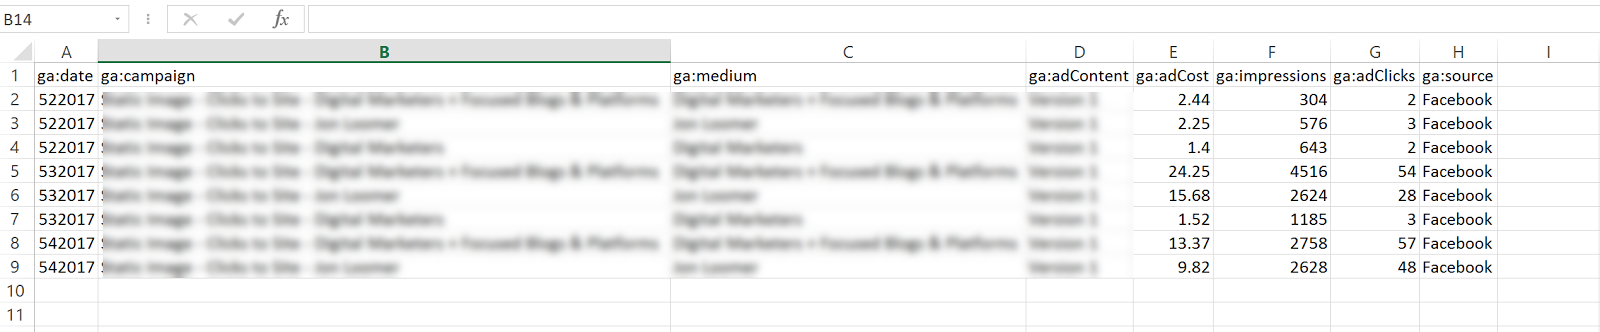
For source, you need to manually add the source as Facebook and/or Instagram depending on campaign/ad set placement.
Format the date column from 5/3/2017 to this 532017
Your final results should look like this:
Go back to Data Imports in Google Analytics and click on manage uploads > Upload File and upload your CSV doc.

Option 2: Automated Daily Import
With EasyAutoTagging’s GA Connector you can easily link your Facebook campaigns to Google Analytics using the same UTM values assigned when generating URL parameters.
Just follow the set up in How to Track Granular Facebook Campaign Performance in Google Analytics
With automated daily imports of your Facebook campaign data, you can now generate detailed insights across platform metrics, and session behavior in a single location when tracking Facebook Ads in Google Analytics.
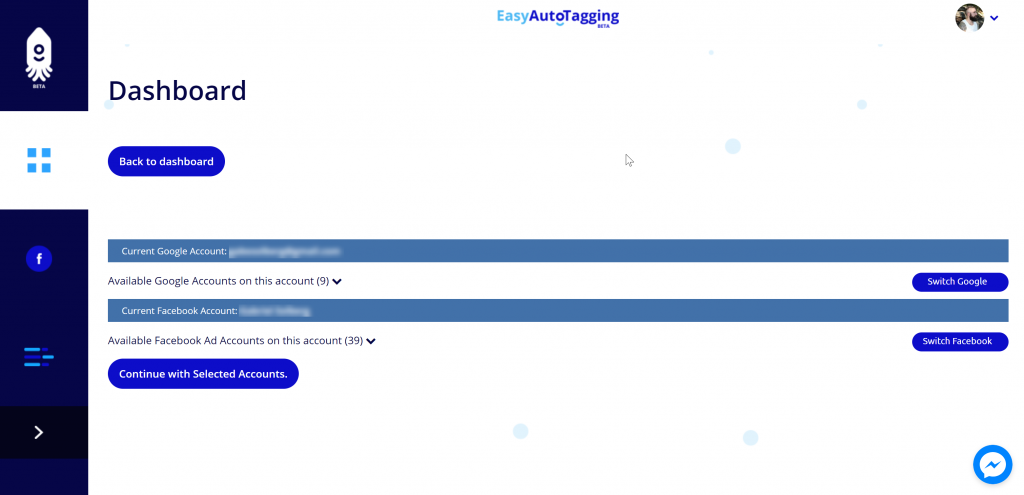
Ok let’s get started:
Log in to EasyAutoTagging.
Create a new connection group and connect to your desired Google Analytics and Facebook accounts.
Click continue.
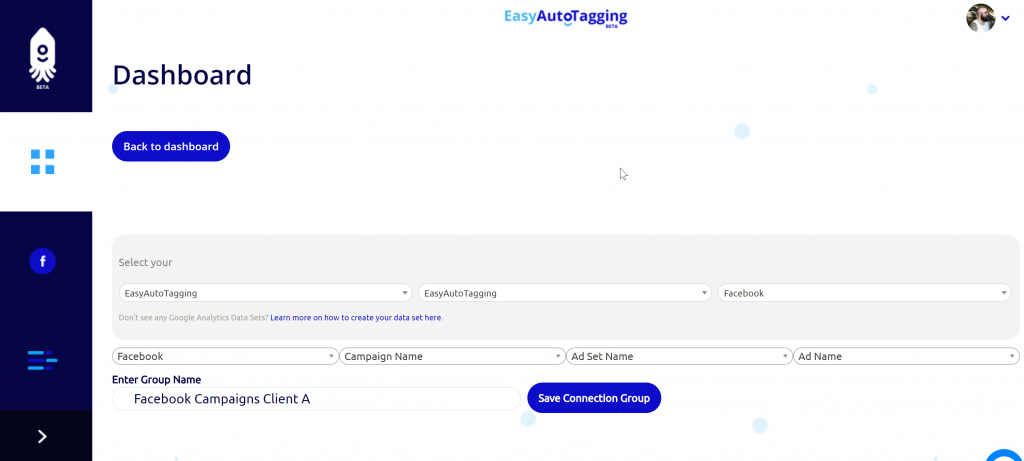
Next select your Google Analytics Account, Property and DataSet and define your Parameter Values. (source, medium, campaign, content)
Note: You can choose a pre-defined or enter custom parameter values. To ensure proper mapping, please make sure that you import parameter values exactly match your defined UTM parameter values.
Assign a name and save the Connection Group.
Note: If you do not have a data set created you need to create one in Google Analytics first. You can see how to do this in Setting Up Cost Data Sets
Once you saved the connection group, you can add facebook campaigns as needed.
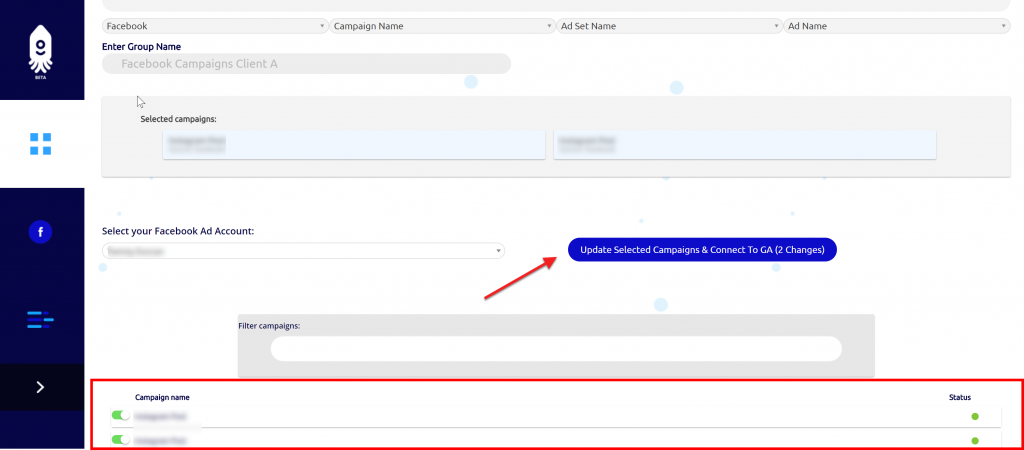
You will get notified via email once the initial upload of all campaign data to date has completed and all connected campaigns will continue to import data daily.
Seeing the data in Google Analytics
Ok, now that we have all campaigns tagged and are tracking Facebook Ads in Google Analytics, where can we see our Facebook ad analytics?
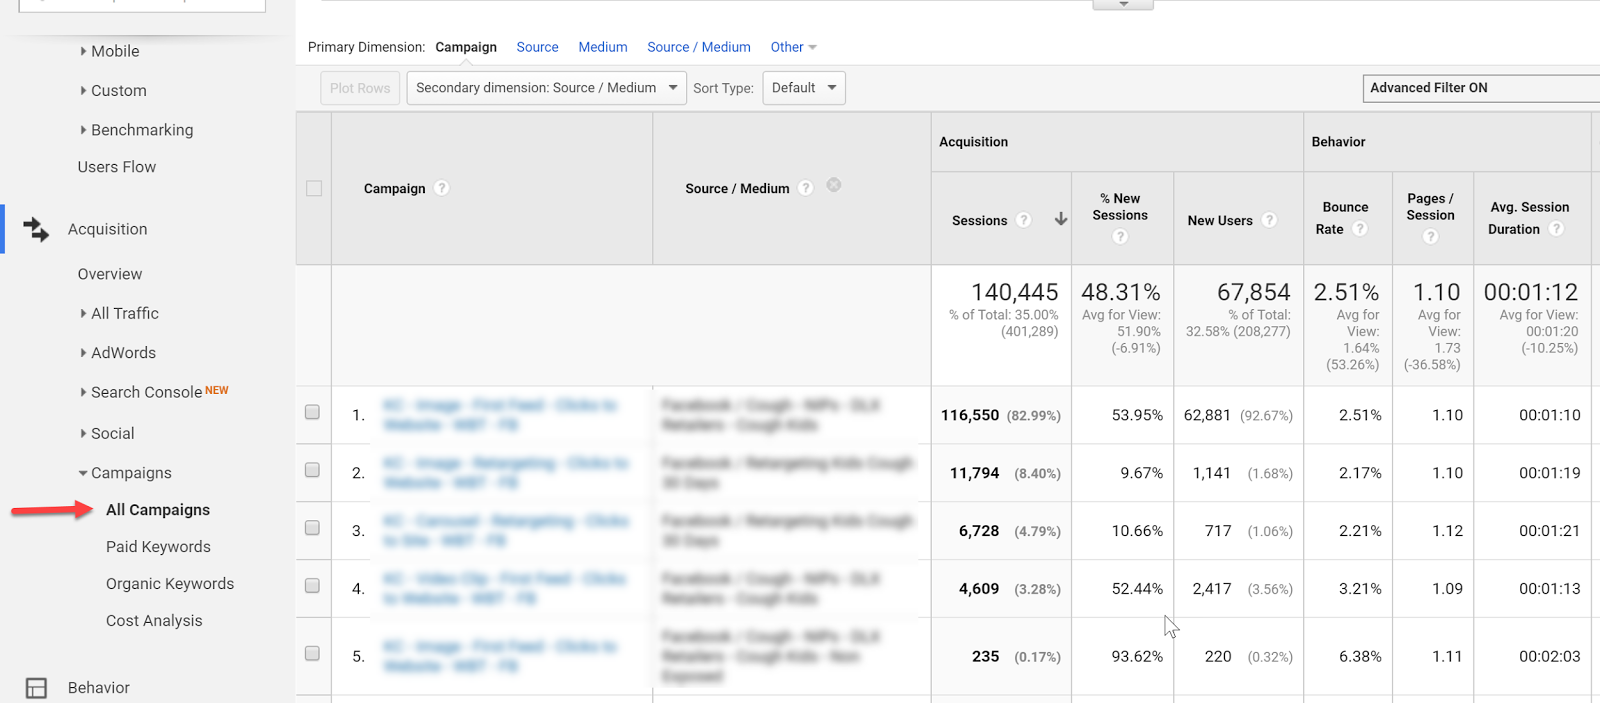
Let’s start with two default views that Google Analytics gives us:
Campaign View
In the campaign view, we can see an overview of campaign performance.
For more granularity, we can add secondary dimensions to see ad content or source/medium breakdowns.
Cost Analysis View
The Cost Analysis View shows cost, impression, clicks, CTR, CPC, and some primary on-site metrics on a campaign and/or source/medium breakdown allowing us to analyze platform alongside sessions data.
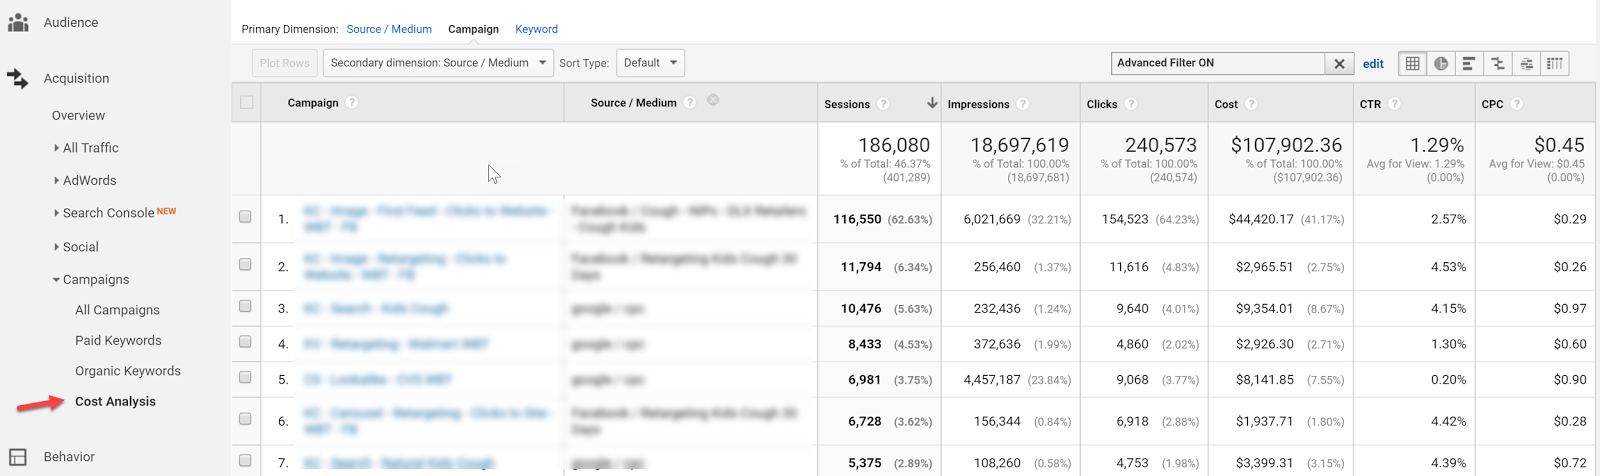
Both of these views, although isolated from each other within Google Analytics, can already provide a wealth of insights, but let’s take tracking Facebook ads in Google Analytics one step further with Calculated Metrics and Custom Reports.
Calculated Metrics
Google defines Calculated Metrics as follows:
Calculated Metrics are user-defined metrics that are computed from existing metrics and drive more relevant analysis and enable greater actionability without leaving the product.
Ok, so here are a few example metrics that we might want to see in our reports.
Note: Keep in mind that one can only create 5 calculated metrics per view in the standard Google Analytics version.
CPV – cost per visitor (this will always be different than CPC since many platforms have a clicks to session drop off up to 25%)
Goal
CP Goal
Goal Conversion Rate
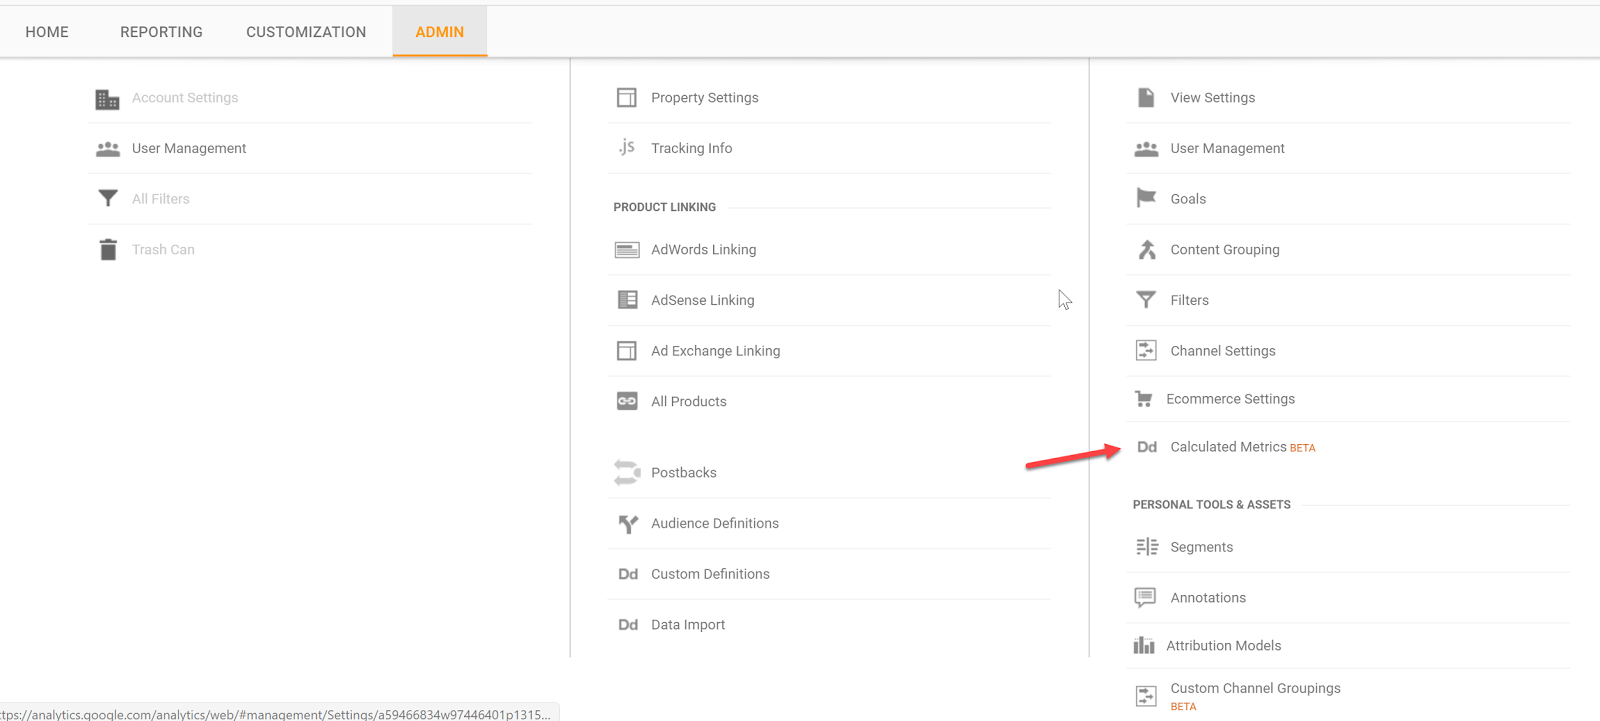
Let’s get started…you can find calculated metrics in your Admin section
Add a new custom calculation, call it CPV and define the formatting type as Currency (Decimal):
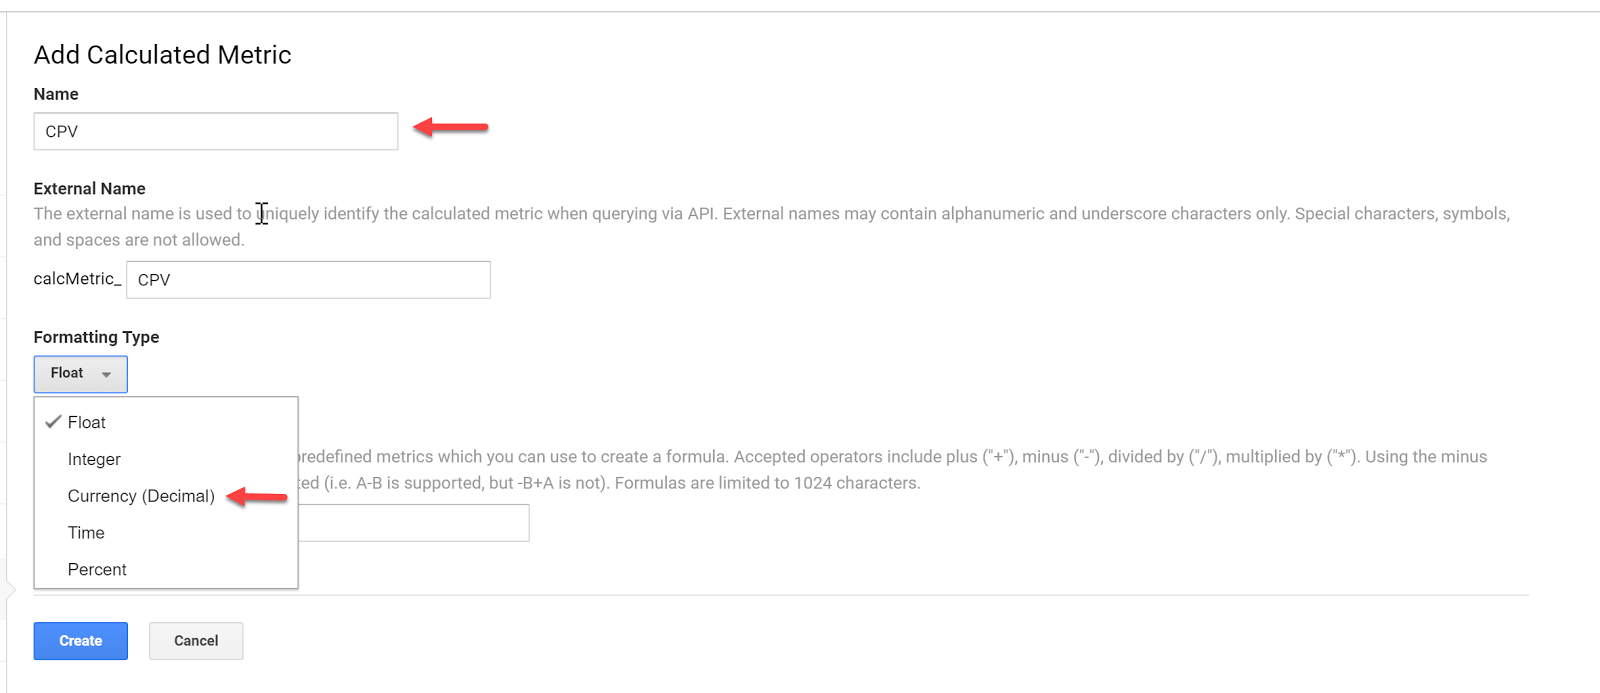
Enter the formula and click Create:

Do the same for your specific goal conversion rate and cost per conversion. In this case, we will use engaged user.
Now that we have the custom calculations in place, we can go ahead and set up our custom reports.
Custom Reports
Having all data aggregated doesn’t mean you have to use Google Analytics for reporting – it just makes it easier to pull all your Google Analytics Facebook data from one place.
But for the sake of this article, let’s stick with custom reports within Google Analytics.
Let’s go ahead and set up a custom report.
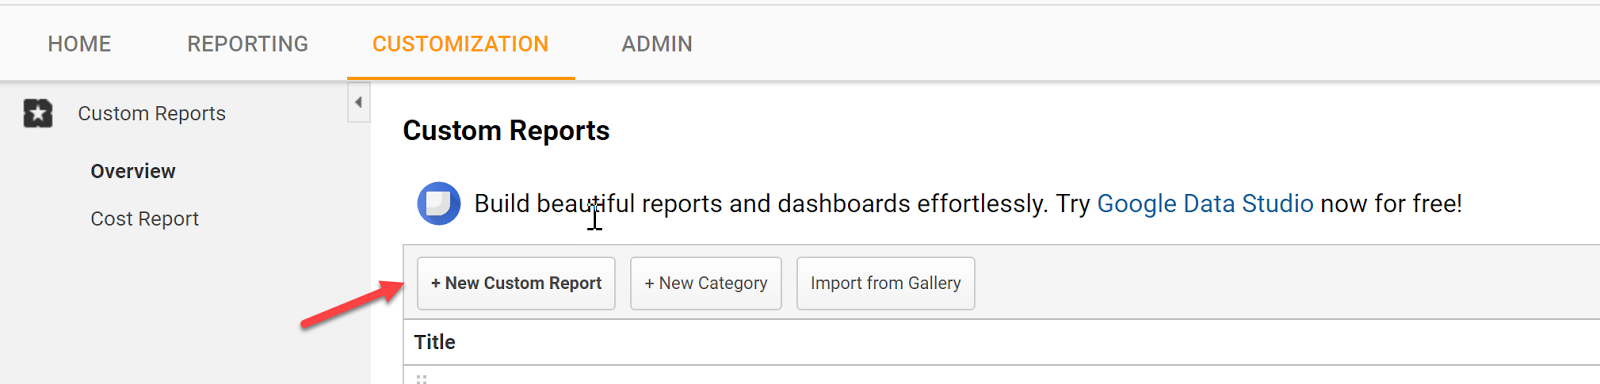
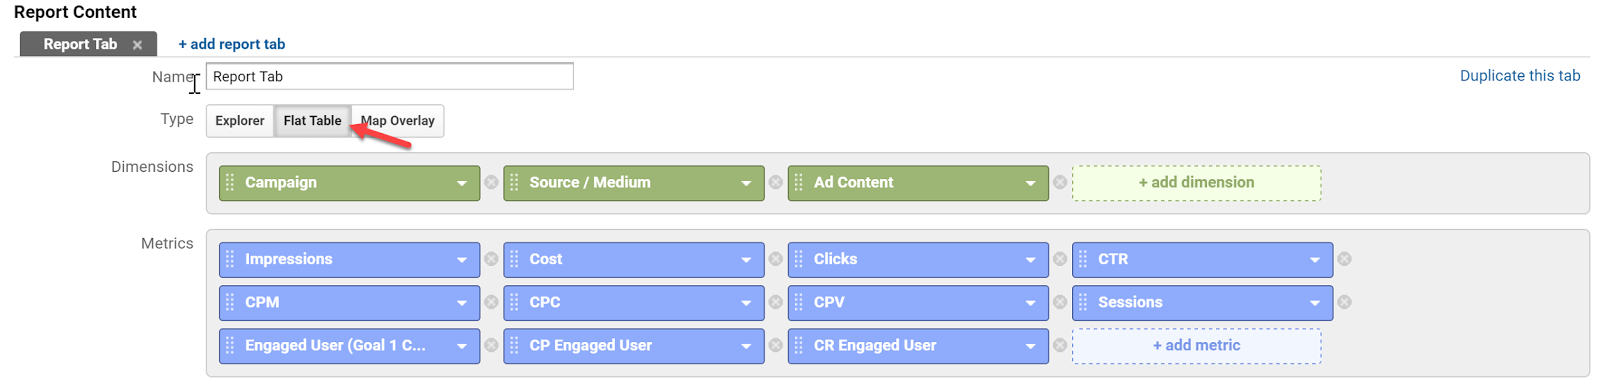
Go to Customization and click create a New Custom Report
Select a Flat Table and add:
Dimensions:
Campaign | Source / Medium | Ad Content
Metrics:
Impressions | Cost | Clicks | CTR | CPM | CPC | CPV | Session | Engaged Users | CP Engaged User | CR Engaged
Apply Filters as needed:

Select your view:
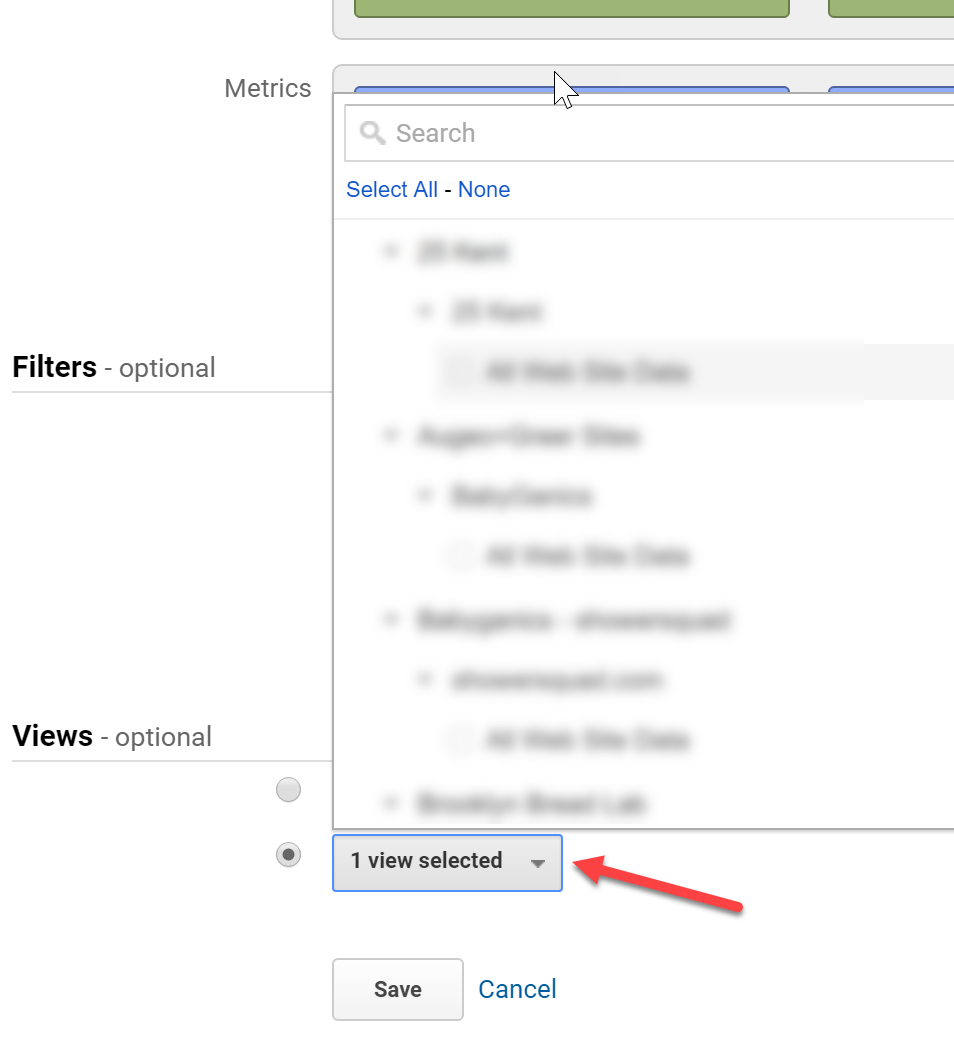
Label the report and hit save.
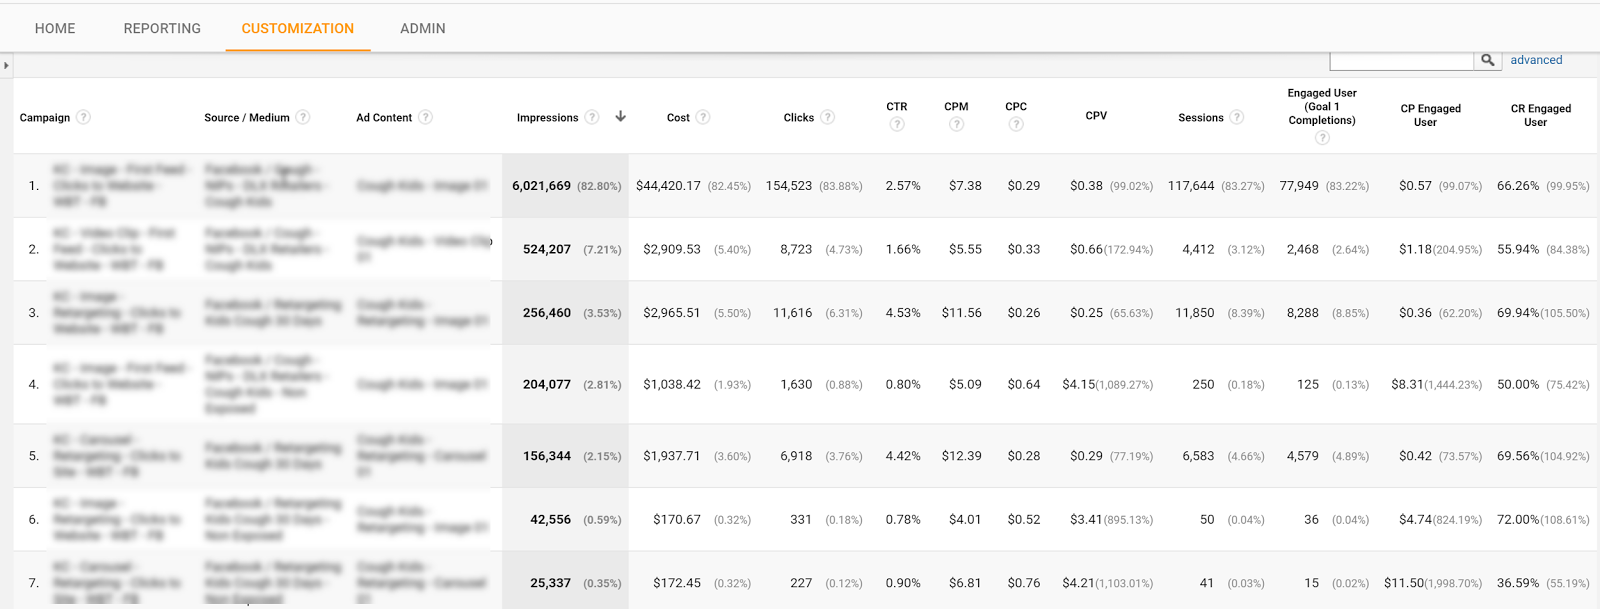
You can now see all of your campaign platforms and on-site data in one place.
Tell us in the comments what you have done to make tracking Facebook ads in Google Analytics a seamless process?
Content retrieved from: https://easyautotagging.com/tracking-facebook-ads-google-analytics/.
How You Can Use Facebook Ads to Promote Your Blog
Posted on August 13th, 2018
We’ve all heard about the wonders of Facebook ads for our blogs. You’ll find at least one mention of them on any marketing blog you come across.
But what you may not have found is a guide on how to correctly promote your blog with Facebook ads.
You see, Facebook ads are a fantastic way to promote your blog and gain new readers. But most bloggers aren’t aware of the steps needed to convert cold traffic into valuable readers.
If you’re feeling lost, don’t worry. In this post, I’m going to try to cover as much as I possibly can about creating Facebook ads for your blog, and how you can do it correctly.
[video_page_section type=”youtube” position=”default” image=”http://track-n-test.com/wp-content/uploads/2018/08/youtube-banner1.jpg” btn=”light” heading=”” subheading=”” cta=”” video_width=”1080″ hide_related=”false” hide_logo=”false” hide_controls=”false” hide_title=”false” hide_fullscreen=”false”]https://www.youtube.com/watch?v=iR6ATUw0BIU&vl=en[/video_page_section]
But first, you’ll need a Facebook page:
1. Create a Facebook page.
Facebook pages can be an extremely helpful tool to promote your blog.
If you haven’t already, go ahead create your page. Regardless of whether you’ll use it as a social channel or not, you can’t create an ad without one!
Once you’ve created your page, it’s time to log into your Facebook Ad Manager and start creating your ad.
2. Choose an objective.
When you create a Facebook ad, it’s important you use proven formatting techniques to maximize your metrics. Before I go any deeper, let’s start from the beginning:
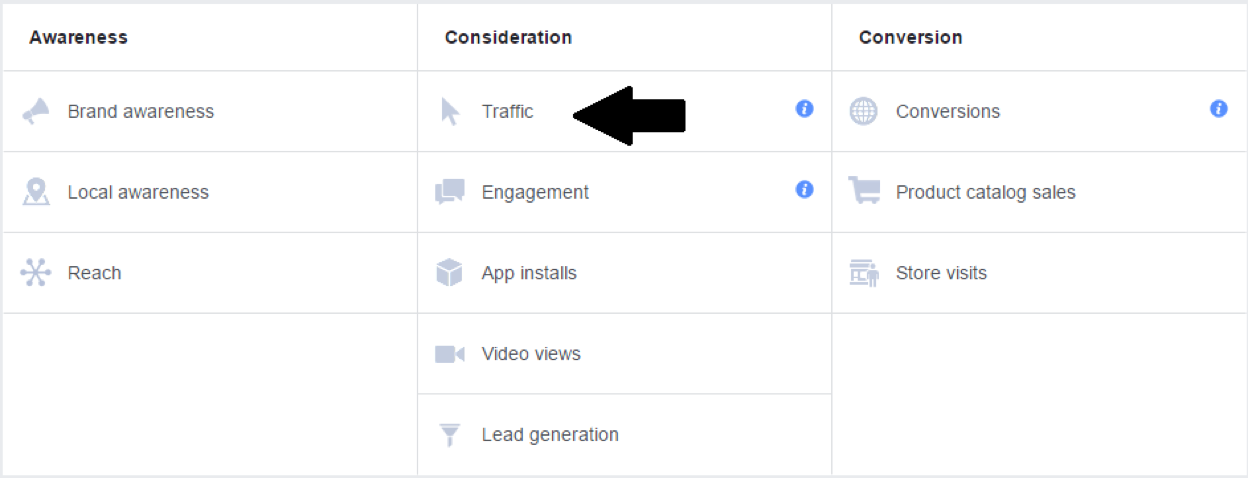
To create a Facebook ad, go to the Facebook Ad Manager and click on the “Create Ad” button. Once you click the button, you’ll be presented with a ton of different ad campaign goals. For this guide, I’m going to stick with the “Traffic” goal.
Now, some may argue that Facebook’s “Boost Post” option is better for promoting single blog posts.
Don’t get me wrong; boosted posts are a great way to promote your blog on the fly. However, the “Traffic” objective allows you to have much more control over your ad spend, targeting options, and copy.
Once you’ve set your goal, name your campaign and you’ll be ready to set your budget and targeting options.
3. Set your budget and targeting options.
Setting the budget for your Facebook ad will determine whether you come out broke or with a great ROI, so it’s important that you do it right.
When starting off with a brand new ad, it’s a good idea to set the budget of your advertisement for only $5 a day.
This way, you’ll be able to measure the strengths and weaknesses of your ad without spending a fortune on an under-performing campaign.
Later, it’s likely that you’ll start spending more money on well-performing ads, but I’ll touch on that later.
Now let’s get into the nitty gritty: targeting.
If you didn’t know already, one of the main reasons that Facebook ads are so popular in the marketing world is because if their over-the-top targeting options. Facebook ads allow you to target anyone from Android phone users to church-going reptile owners.
When setting your targeting, it’s important that you aren’t shooting for too broad of an audience. It’s easy to get trapped in the illusion of, “Wider Audience = More Engagement”, but this simply isn’t true.
Think of your audience as a single person. What qualities do they have? What are their interests? Who might they follow on Facebook?
If your ad is being seen by too wide of an audience, chances are you’re not going to be receiving a ton of clicks. And when you aren’t getting enough clicks, you’ll start to pay more for the ones you do get!
As you can see from this chart by AdEspresso, studies show that the lower the relevance of a Facebook ad, the higher the amount of money paid per click:
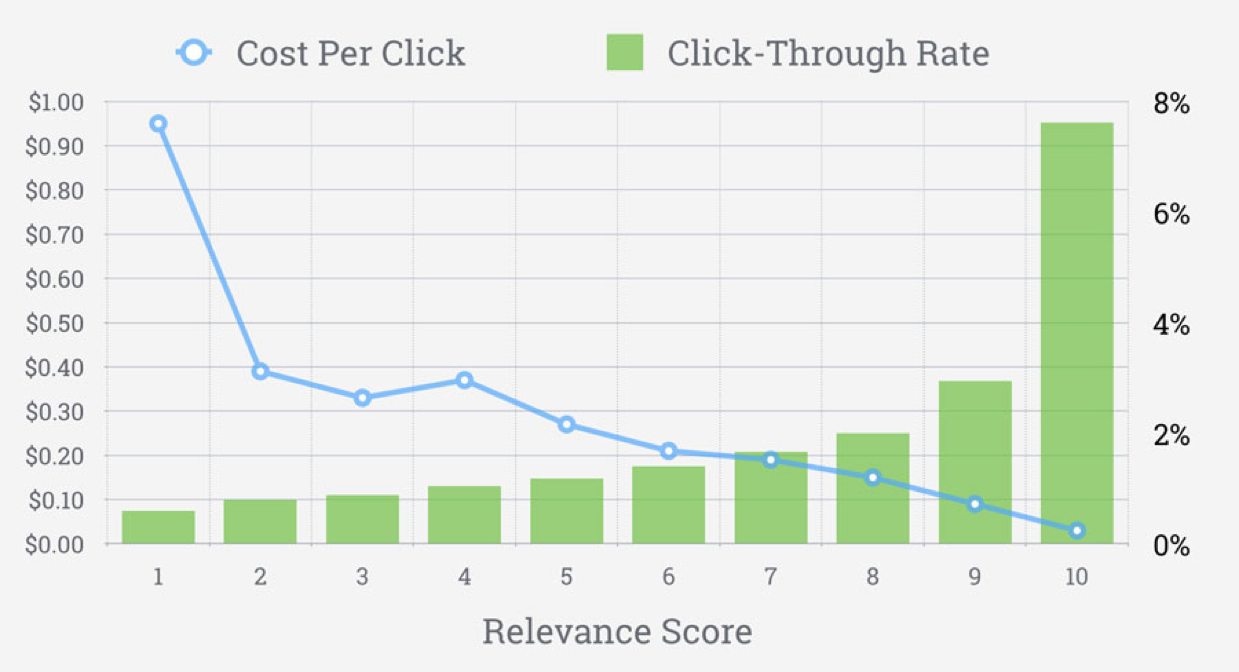
Facebook ads relevance score. Source: Adspresso.com
And I don’t know of anyone who wants to pay more for the same results.
4. Write the ad copy.
Believe it or not, writing the ad text is half the battle.
According to Joanna Wiebe of Copyhackers,
“Everything about the success of your body copy hinges on a single thing: your hook. To find your hook, you need to know exactly for whom you’re writing the ad… and what they care about. Because the goal of the hook is this: make me care.” – From The Beginners Guide to Writing Facebook Ads
When you’re trying to drive cold traffic to your blog, telling your potential readers, “Check out my new blog post! It’s about [topic]… I think you’ll like it!”, will almost never work.
If readers have no idea who you are, there’s little chance they’ll click your links unless they have a good reason to.
So instead of taking the easy route, write a brief and enticing summary of your post that and place it inside the “Text” field of your ad. Here’s an example of what I mean:

Giving readers a glimpse into the problems you’re solving in your post will prove to them that you’re not out there to just take their money.
After you’re finished writing your post summary, come up with an engaging question to ask your target audience at the beginning of your ad.
For instance, if you wrote a blog post called, “5 Easy Methods to Earn New Clients for Your Business”, you could write a question like, “Struggling to find clients for your online business despite putting in hours of backbreaking promotion?” at the beginning of your post.
Asking an engaging question will entice readers to finish reading the rest of your summary. So if you included a call to action at the end of your text, that reader will most likely click to read the rest of your post!
Once you’ve written a killer summary, you’re ready to find a featured image.
5. Choose a featured image.
When creating your ad, it’s important that you’re using images that capture your audience’s attention. This means that using dark colors and bland images is generally not a good idea.
If you look at some metrics from a separate advertisement I ran, you can see that when I used a graphically designed image with light and dark blue colors compared to a stock image with bright warm colors, the stock image received almost 50 more clicks compared to the other post.
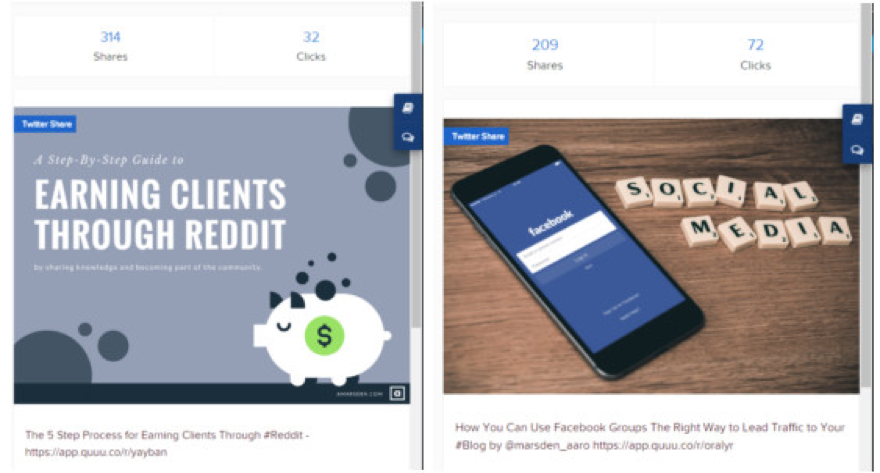
Not only did the brighter image receive 40 more clicks, it also had 100 fewer shares!
Furthermore, Facebook strongly prefers that no more than 20% of an image to be filled with text, so most Facebook marketers choose to use simple stock photos as their featured images.
If you choose to use stock images, be sure that they’re relevant to the topic of your post. Also, be sure that the images you’re using aren’t copyrighted.
To avoid any copyright problems, I use sites like Pixabay and Unsplash to find relevant images for my ads. You can also use Facebook’s built-in stock image library to find safe and pre-formatted images.
Once you’ve got some nice visual content, it’s time to write a killer headline.
6. Write a headline.
As Neil Patel puts it, “The primary purpose of the headline is to get the first sentence read.” And he’s right; without a gripping headline, there’s no real incentive for readers to continue reading your post at all.
The headline of your ad is the very next thing that potential readers are going to see after your featured image. This makes it the perfect place to draw in users and earn their click.

Writing a headline for your Facebook ad is exactly like writing a title for your blog post. It should be short, catchy, and include some relevant keywords from your blog post. If you don’t already have a nice catchy headline, here are some things to keep in mind when writing it:
- Use “How To’s” and “How You’s” in your Facebook headline, followed by a common barrier that most people face when encountering a problem. (ex. “How You Can Promote Your Blog with Facebook Ads Without Having to Spend Money on A/B Testing”).
- Use numbers (ex. “5 Simple Ways…”)
- Keep it short.
- Make it as specific as possible. For instance, let’s say that you wrote about how your target audience can increase their search presence in Google. Instead of saying, “Learn How You Can Rank Higher on Google”, say something like, “Learn How You Can Increase Your Organic Traffic by 50% In Only 2 Months”.
- Try to convey a sense of urgency. You can do this by asking a question (ex. “Are you making these crucial mistakes when trying to promote your blog?”)
If you’re still stuck creating a catchy headline, feel free to use one of the many headline generators on the web. Just be sure that you refinie your results!
Lastly, include a nice call to action in the News Feed Link Description (NFLD) of your ad.
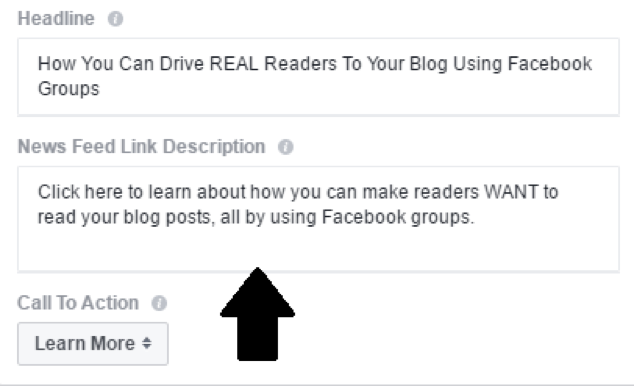
Your NFLD should be a combination of the main idea from your headline and a call to action. For instance, in the ad I created above, my NFLD read, “Click here to learn about how you can promote your blog…”.
Finish your ad off with a proper button that users can click to read your blog post, and that’s it! You’re ready to publish your post.
Yay!
After your post is published, be sure to keep a watchful eye over your metrics. Try your best to analyze what’s working with the advertisement and what’s not.
If you don’t have the budget right now to conduct A/B testing, don’t worry about it. Just focus on bettering your Facebook ad skills and learning, and you’ll be creating great ads in no time.
How have you used Facebook ads to promote your blog? Do you have any useful tips for other bloggers trying to use this platform? Let me know in the comments!
Content retrieved from: https://blog.getresponse.com/facebook-ads-to-promote-your-blog.html.